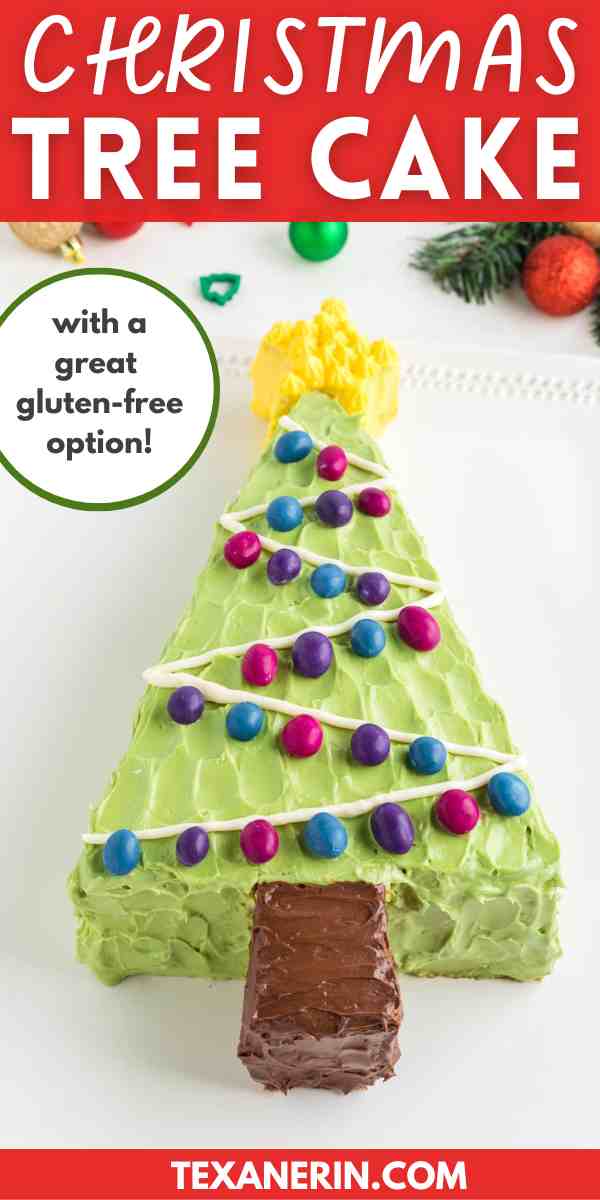
This Christmas tree cake is made using a 9″x13″ pan, doesn’t require any special tools, and has the most delightfully airy orange (or vanilla or almond) cake base with cream cheese frosting. It can be made with all-purpose, white whole wheat or gluten-free flour.
The cake base
I adapted today’s recipe from King Arthur Flour. I used less sugar and added orange extract and zest.
It’s the best non-chocolate cake I’ve ever had. It’s still plenty sweet without the extra sugar, so I can assure you – you won’t miss it.
I usually don’t think of orange-flavored treats as all that exciting, but this one is. It’s my new go-to cake, dethroning my brownies, minus the Christmas tree shape and decorations.

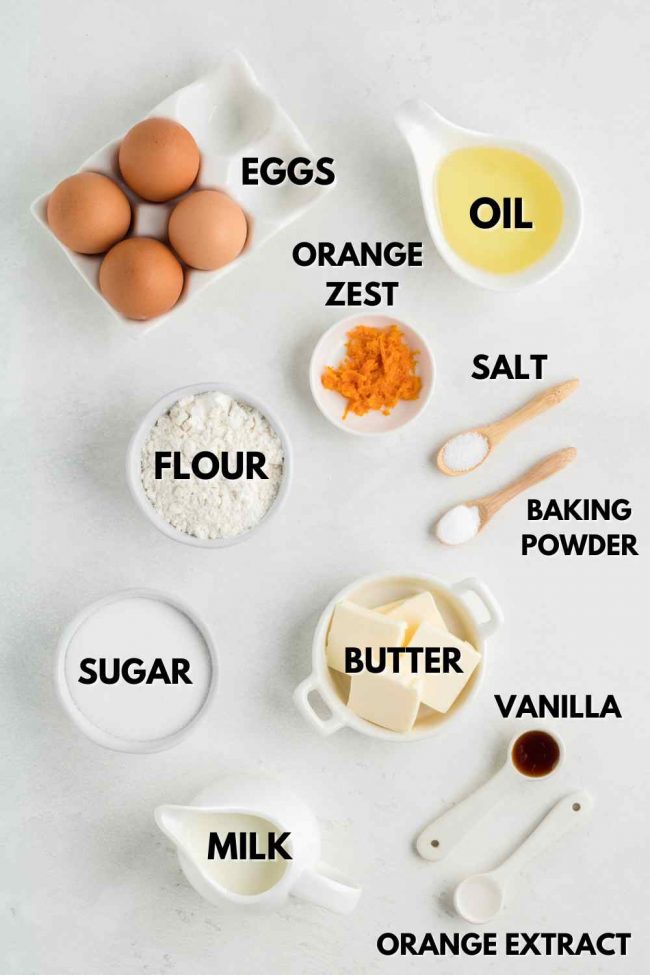
Ingredients
- Flour – you can use regular all-purpose flour, white whole wheat flour or if you’re gluten-free, use King Arthur Flour Gluten-free Measure for Measure Flour for the most amazing gluten-free cake.
- Baking powder + salt – you must use baking powder and not baking soda.
- Eggs – this recipe calls for 4 eggs. That’s just too many to sub with an egg replacer. You also have to beat the eggs with the sugar, which makes for an airier cake, and that’s not possible with egg replacers.
- Granulated sugar – coconut sugar might work if you don’t mind a beige cake. It will make the cake taste less orangey.
- Orange + vanilla extract – if you don’t want an orange-flavored cake, then you can use more vanilla extract or almond extract. If you want an orange cake but don’t have orange extract, using orange juice in place of the extract won’t add any flavor. It’s too small of an amount, and adding additional orange juice would badly affect the cake’s structure.
- Milk – you can use whatever type of milk you’d like. If you want to use canned coconut milk, then water it down until it’s as thin as regular milk. There’ll probably be some coconut flavor in your cake. I always use unsweetened cashew milk.
- Oil – you want an oil that’s liquid at room temperature. Vegetable oil, canola oil or a light olive oil. You will be able to taste the olive oil if using that, so beware. Olive oil + orange is a great combination, but not one I’d serve at a kid’s birthday party.
- Butter – if you want to make this cake base dairy-free (the frosting is not dairy-free), you can use more oil instead of the butter. So use 1/2 cup + 1 tablespoon of oil instead of the amount of butter + oil called for.
- Orange zest – this is optional, but if you’re using orange extract and going for an orange-flavored cake, you should definitely use this.
- Decoration candies – I used Unreal candies. More on this below! But you can use absolutely anything you’d like to decorate the cake. Sprinkles, M&Ms, whatever.
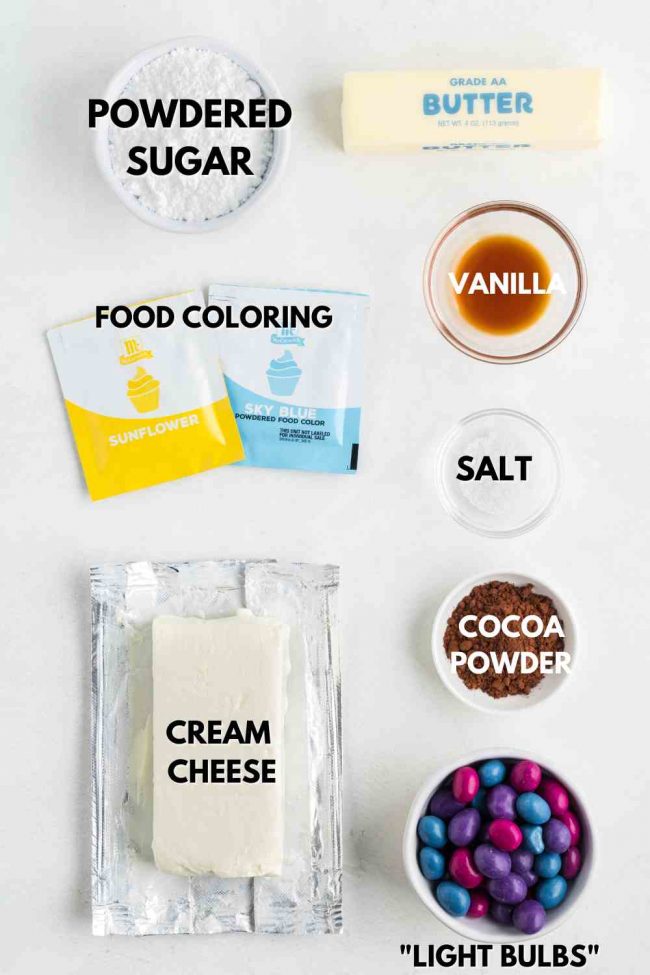
- Powdered sugar – this is for the frosting and there’s no sub for it.
- Cream cheese – same as above.
- Cocoa powder – this is to make brown frosting for the tree trunk.
- Food coloring – I used natural food coloring, but you can use whatever you’d like!
Prefer cake mix?
If you don’t want to make the cake from scratch, you can use a cake mix. I believe all cake mixes give you directions on how to bake them in a 9″x13″ pan. So follow the preparation and baking instructions on your box, and then come back here to assemble the cake.
How to make the cake
To make this cake, it takes a few minutes more than making a one-bowl cake recipe. But it’s SO worth it! Especially if you’re gluten-free because I don’t think there’s a better vanilla or orange gluten-free cake recipe out there.
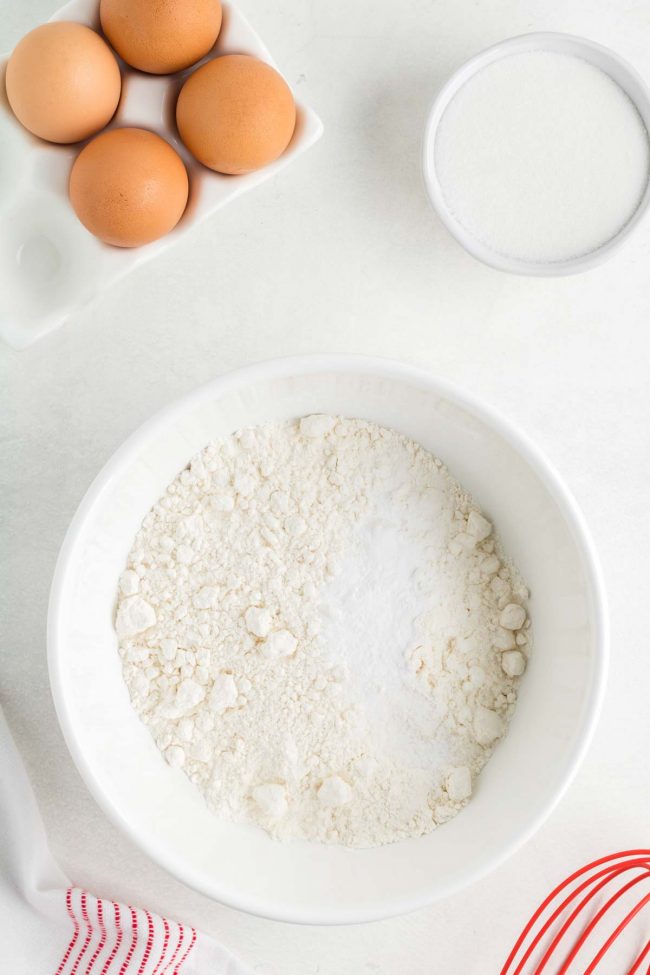
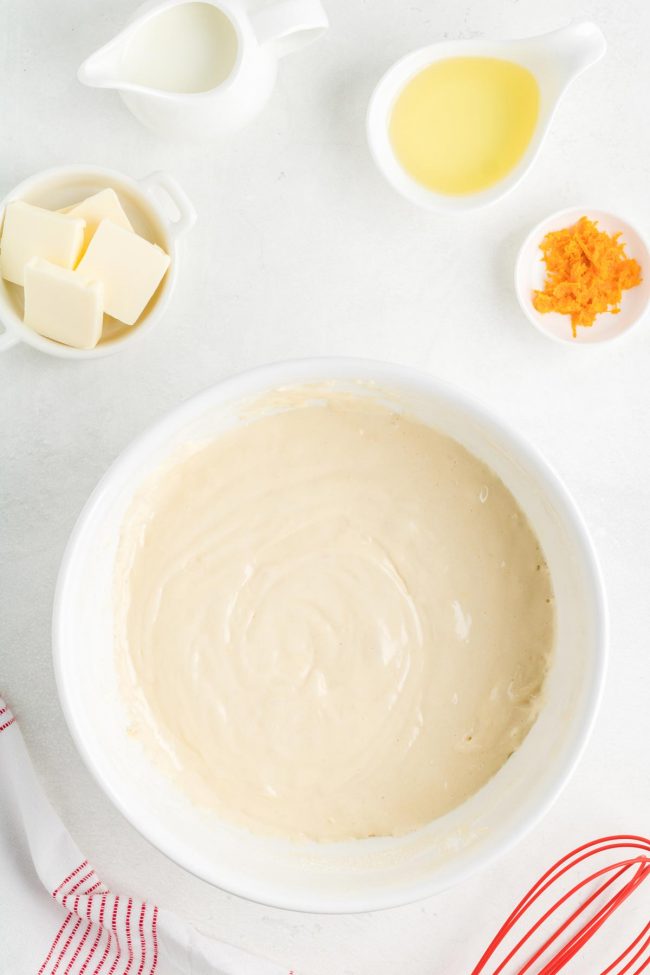
First, mix together your dry ingredients.
Then you beat the eggs, sugar, orange extract, and vanilla extract until thickened and light gold in color, about 2 minutes.
I tried to skip this step once. I like to dump everything in a bowl, stir with a big spoon, and be done with it.
The cake was definitely not as airy. So be sure to follow the instructions!
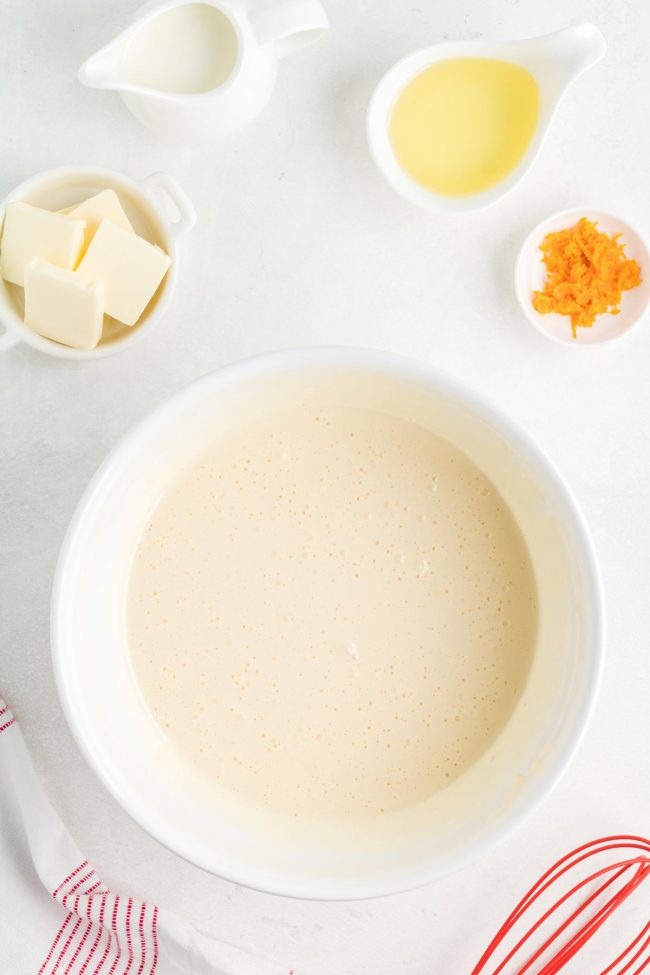
Fold in the dry ingredients.
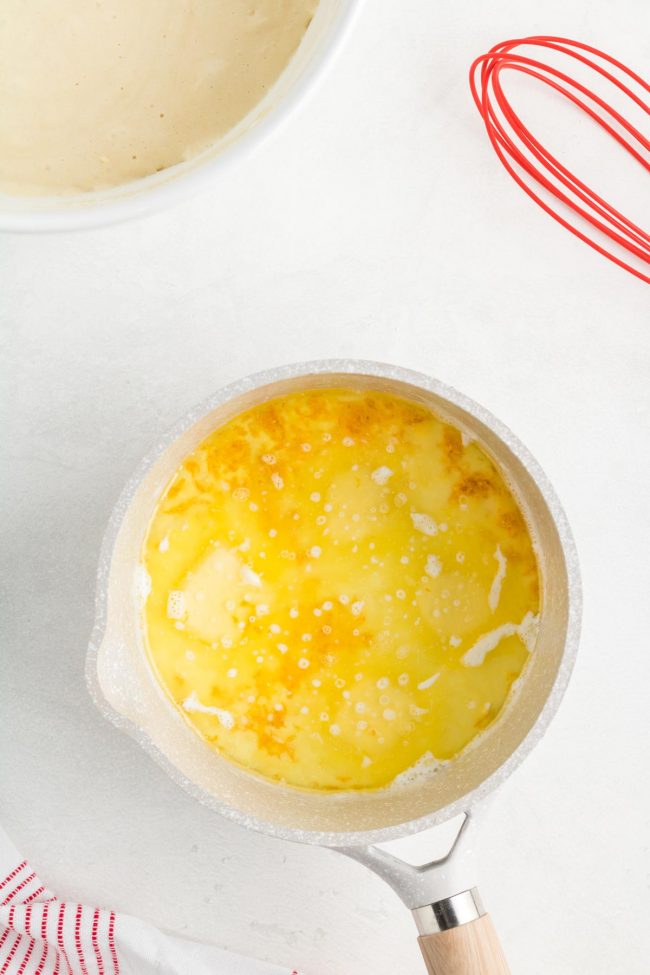
Heat the milk and zest until it’s about to simmer. Remove from the heat and add the butter and oil.
Scalding the milk and beating the sugar and eggs together is annoying but worth the extra 3 minutes of effort.
Scalding milk kills the whey protein that weakens gluten and prevents yeast dough and cakes from rising properly.
I thought – if I’m making a gluten-free cake and using cashew milk, there’s no gluten and whey protein. So this is irrelevant, right?!
I skipped that step, and the cake was definitely not as airy. You could tell a big difference. I’m not sure why, though.
If anyone does know, I’d love to hear why. :)
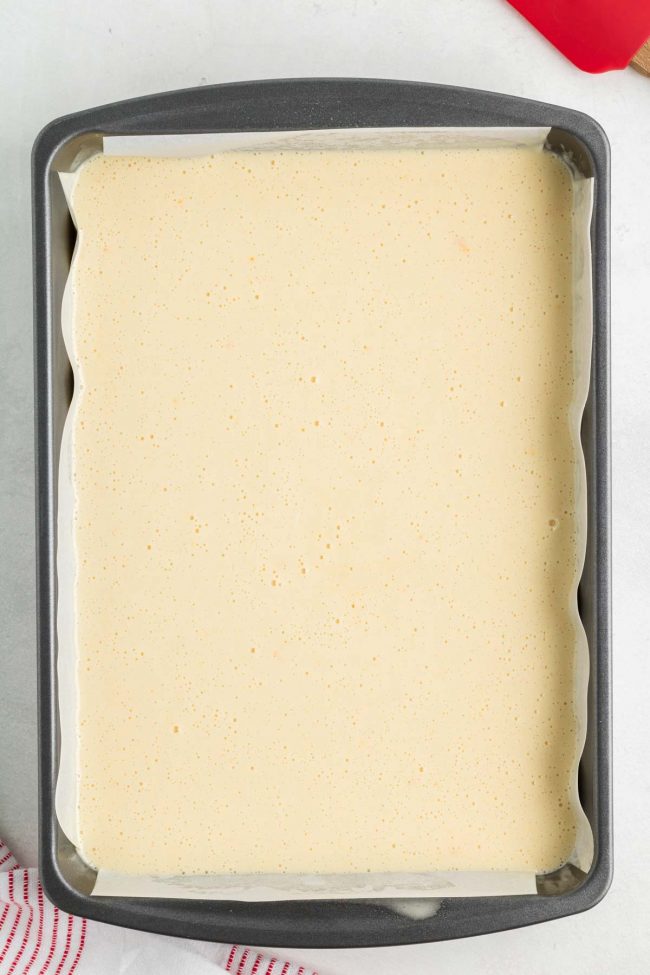
Pour the batter into the prepared pan. It’ll have lots of little bubbles.
Frosting
While your cake is baking, prepare the frosting.
I used my Healthier Cream Cheese Frosting. It’s a normal cream cheese frosting recipe but made with less sugar. And nobody misses the sugar! It’s been my go-to frosting recipe for years, and everyone loves it.
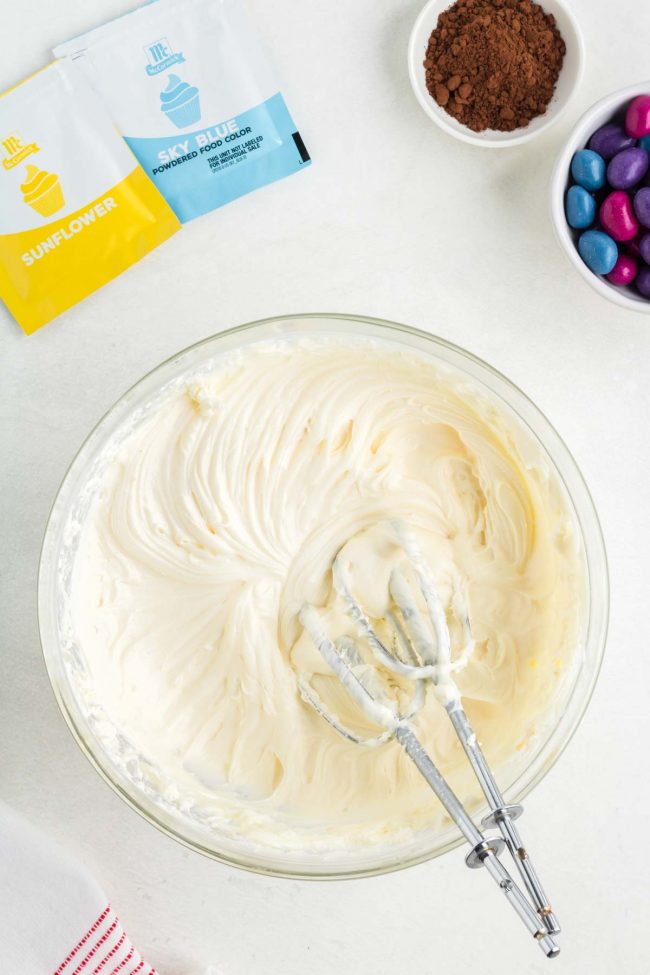
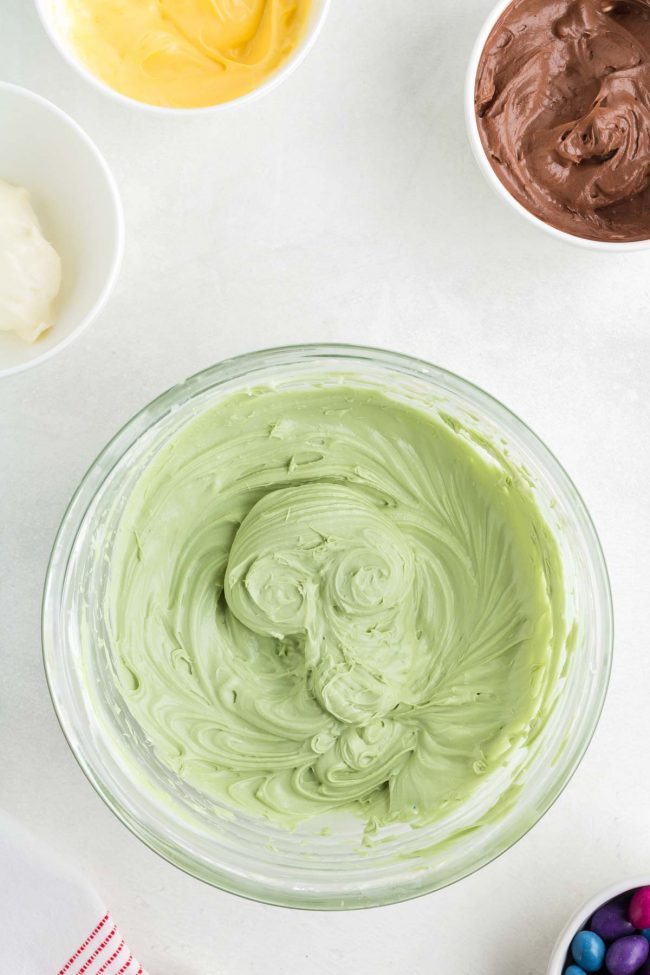
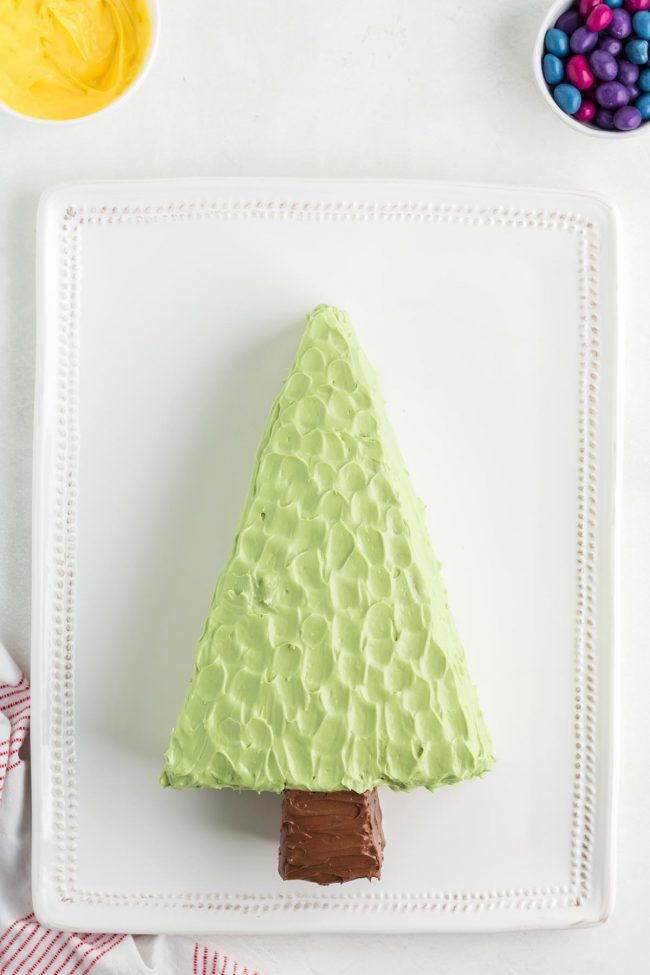
You’ll be dividing up the frosting to make green frosting for the cake and yellow frosting for the star. You’re going to add cocoa powder to some of the white frosting to cover the tree trunk and then use the remaining white frosting to pipe on the Christmas tree light wire.
How to assemble the Christmas tree
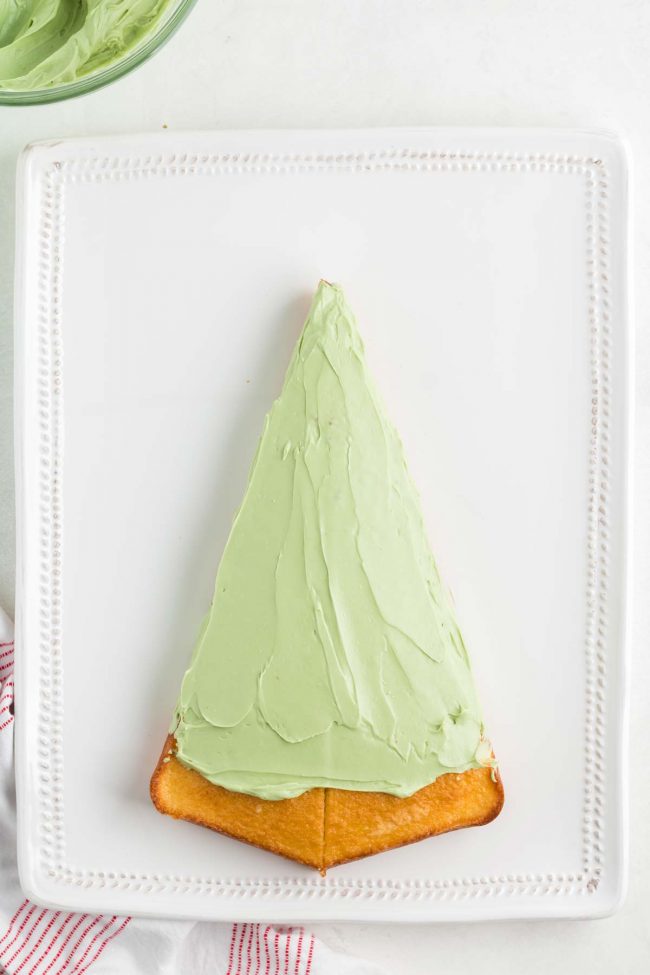
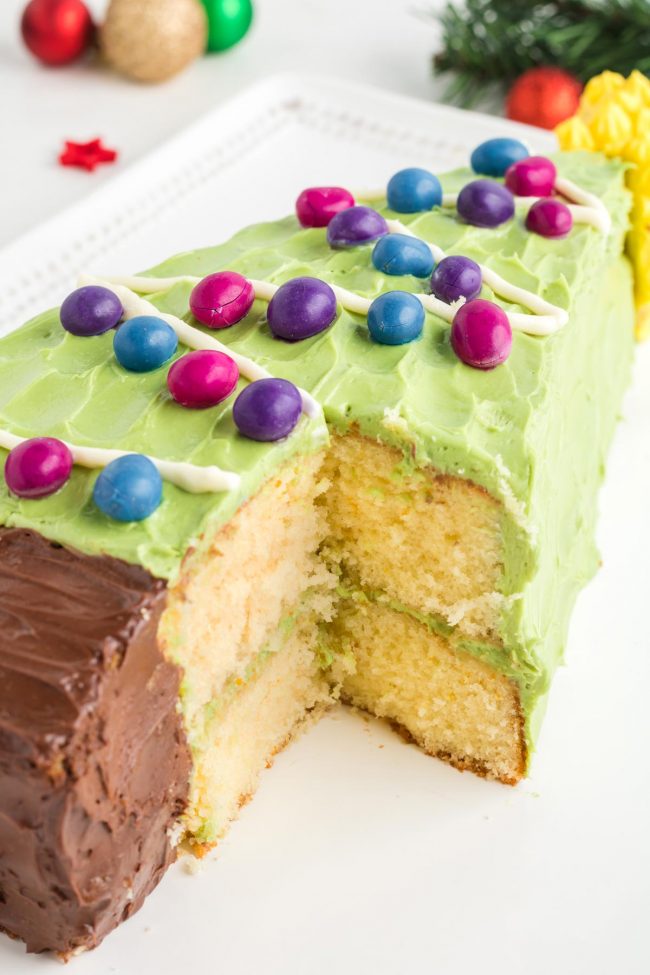
Cut a big triangle like you see below. The 2 pieces cut off on the sides are not to eat immediately as I thought. I had to remake the cake. 😆
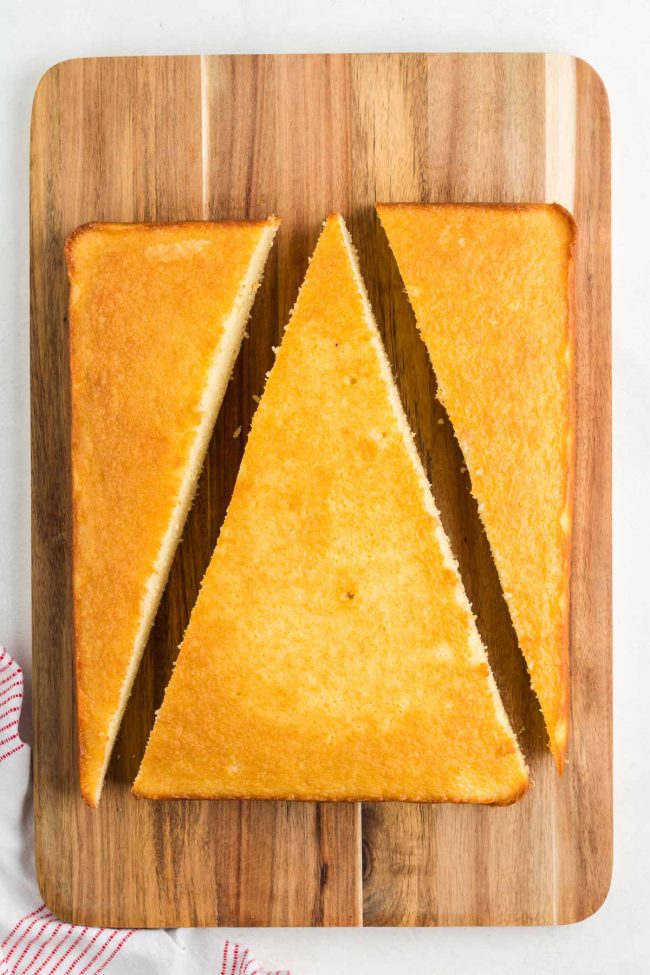
This is a double-layer cake! So you take the two cut-offs and place them on a serving plate or tray – it needs to be quite large to fit the cake properly – rounded side up, into a triangle that’s the same exact size and shape as the large, whole triangle you just cut.
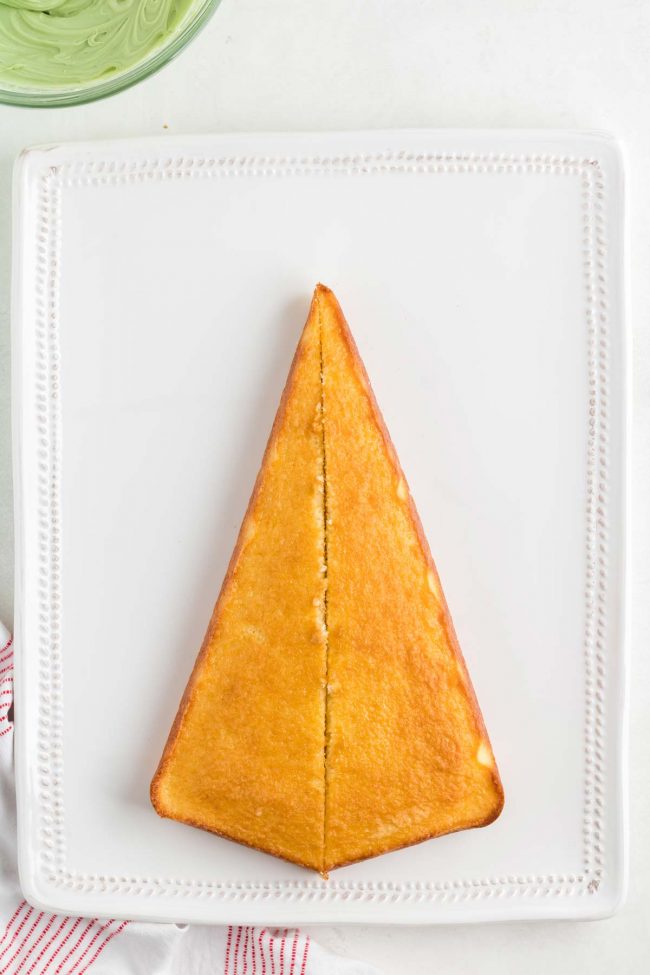
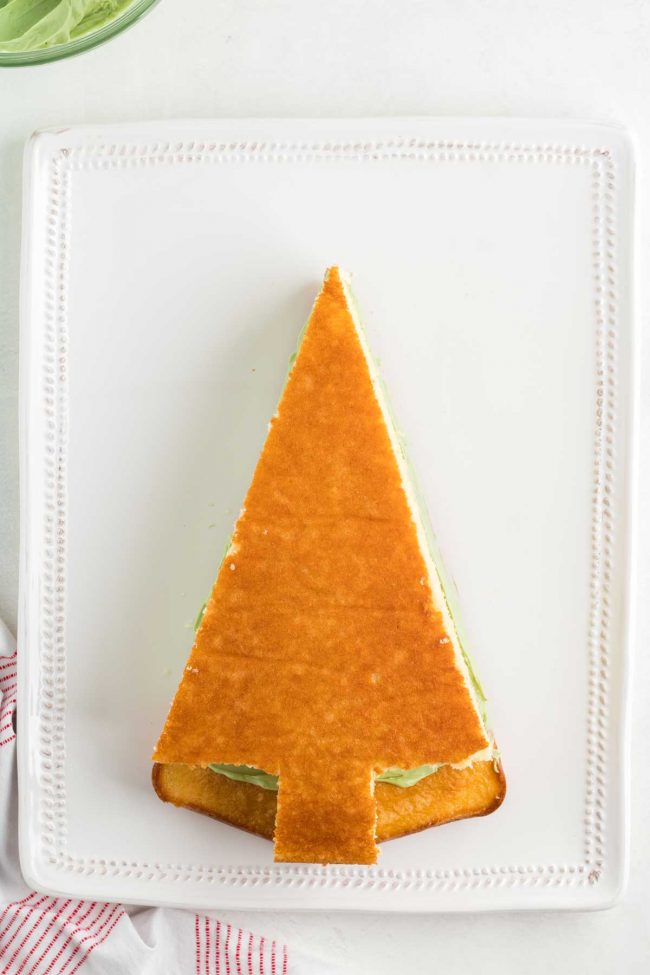
On the whole large triangle piece, in the bottom corner, use a star-shaped cookie cutter to cut out TWO stars.
You don’t want to use one that’s too big, because then a lot of cake would be wasted. It also shouldn’t be too small that the stars are disproportionate. My cutter was about 1.5”.
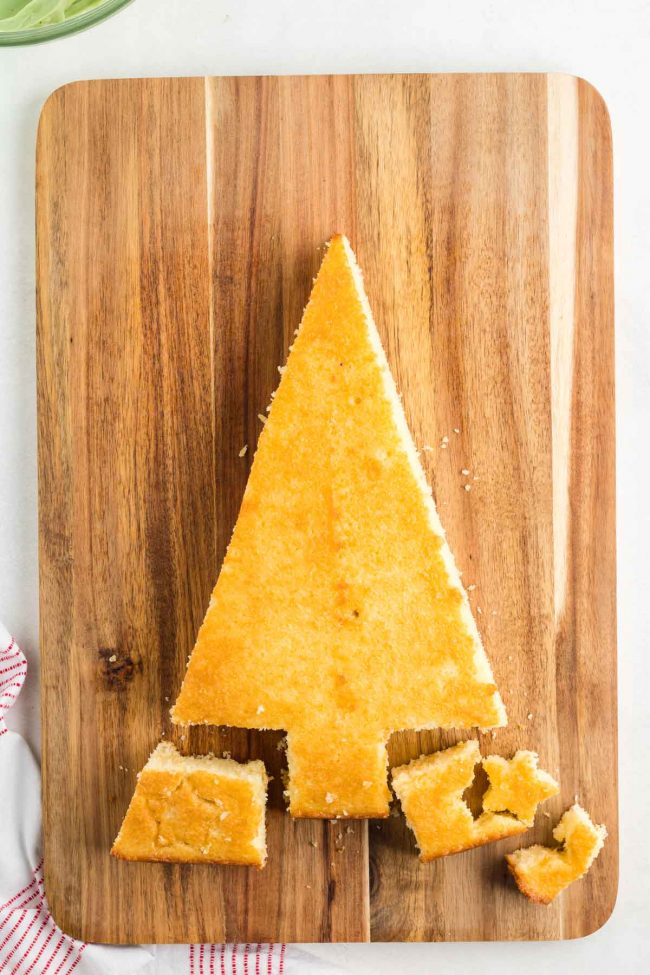
Cut out the stars at the very bottom of the cake, in the corners, and then continue cutting to form a tree trunk.
Use 1 cup of the green frosting to spread over the top and sides of the cake that’s on the serving tray – but you don’t have to add frosting to the very bottom because that’ll be cut away. You can frost the middle section that will form the tree trunk with some brown frosting.
Place the whole triangle piece (the one from which you cut the stars) and place it, flat side up, on top of the frosted cut pieces already on the tray/dish/whatever. Then use a knife to cut out the tree trunk.
Cover the top and sides of the top layer of cake with the remaining green frosting.
Then pipe on your white frosting to form the Christmas tree light wire. Do NOT decorate with candy or sprinkles until just before serving!
Whatever you use might not bleed into the frosting, but it might. So let’s play it safe.
It only takes a moment to put on the “light bulbs” and sprinkles, so it won’t add any stress to last-minute party prep.
Yield
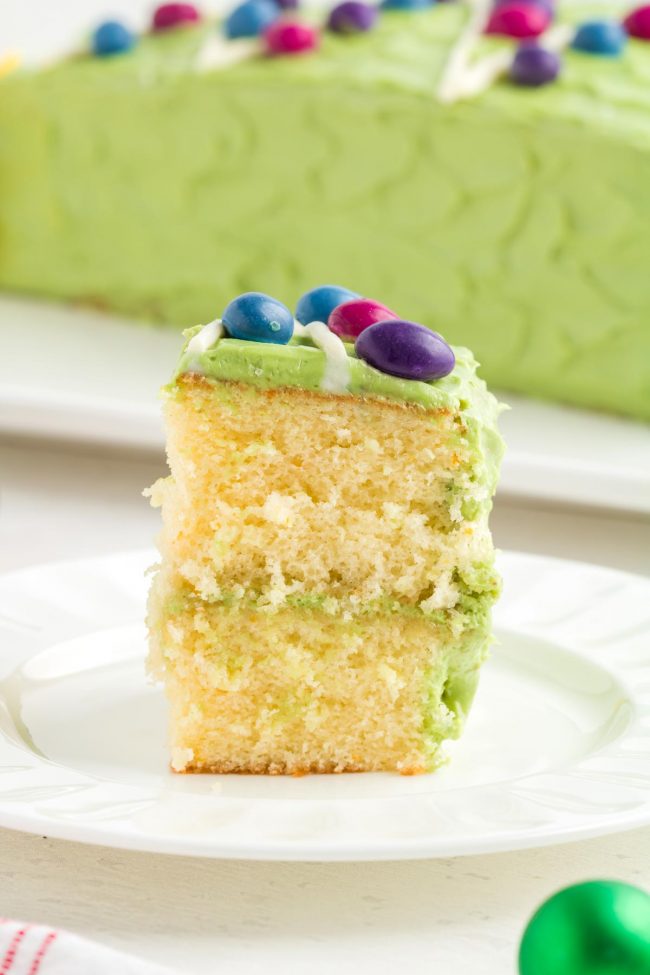
The cake recipe only yields a 9″X13″ pan, and then you cut it up and stack the layers to create a 2-layer cake. The pieces are quite tall, though not as high as a 3-layer cake, so you can cut small pieces.
If you’re making this for a crowd, you might want to do 1.5 or double the recipe. If you 1.5x it, you could add a third layer. If you double the recipe, then you should probably make two separate cakes rather than making a 4-layer cake.
But it’s just a guess. It might work and look fantastic!
Natural food coloring
I used these McCormick Nature’s Inspiration Food Colors.
I checked out all the highly-reviewed natural food coloring that I could find on US Amazon. Of what was actually available, I thought McCormick Nature’s Inspiration Food Colors had the best ingredients, so that’s what I used.
I prefer the ingredients in ColorKitchen’s Food Coloring, but it still says “unavailable” on Amazon. So I had my parents send me the colors from McCormick to Germany, where I live.
The green with natural food coloring isn’t as vibrant as the usual Wilton gel food coloring, but it still looks pretty good, I think. :)
Candy to decorate
You can use M&Ms to decorate or any other candy. I used Unreal Dark Chocolate Covered Peanut Gems because I like the ingredients. But they bleed within an hour. Mainly the pink ones.
Gluten-free version
In the photos, all-purpose flour was used, but I always make this cake with King Arthur Flour Gluten-free Measure for Measure Flour, and it looks and tastes exactly the same.
My hunt for the perfect vanilla gluten-free cake is over! This cake is incredible. And this is coming from someone who always used to pick chocolate over vanilla.
Some gluten-free vanilla cake is good straight from the oven but then gets denser and denser throughout the day. Some recipes yield a weird texture from the beginning. I can’t tell you how many gummy recipes I tried before this one.
I haven’t tried any other brands, so I can’t say if they’d work as well. I highly recommend using King Arthur for the best results!
Almond flour, coconut flour, or anything else that’s not meant as a 1:1 sub for all-purpose flour will not work.
Other Christmas recipes
- Eggnog White Russian uses eggnog instead of cream for a holiday twist on a classic cocktail.
- Christmas Morning Punch is great for the whole family! It’s made with real fruit juices with floating cranberries and has sparkle and fizz from bubbly water.
- Whole Orange Cake with cranberries is perfect for the holidays. It’s gluten-free, grain-free and can easily be made paleo.
- Almond Flour Sugar Cookies are crisp around the edges with chewy centers and have a delightful cream cheese frosting.
- Almond Paste Cookies also known as Christmas German almond horns taste as impressive as they look. They’re naturally gluten-free with paleo and vegan options.
- Pignoli Cookies are super easy to make, yet look like you spent all day in the kitchen. There are only 5 ingredients, and topped with toasty pinenuts, perfect for holiday affairs. Paleo option.
That’s it! If you try this Christmas tree cake, I’d love to hear about it. Please leave a comment or snap a pic and tag #texanerin, so I can be sure to see it. Thanks. :)
Christmas Tree Cake

- Prep Time:
- Cook Time:
- Ready in:
- Yield: 12-16
Check out the photos if the assembly directions are difficult to understand!
Ingredients
- 2 cups (240g) all-purpose flour, white whole wheat flour or for gluten-free, use 2 cups (240 grams) King Arthur Flour Gluten-free Measure for Measure Flour
- 1 1/4 teaspoons salt
- 2 teaspoons baking powder
- 4 large (50 grams each, out of shell) eggs, at room temperature
- 1 3/4 cups (350 grams) granulated sugar
- 1 1/2 teaspoons vanilla extract
- 1 1/2 teaspoons orange (or almond or more vanilla) extract
- 1 cup (240 ml) milk of choice
- 1 tablespoon orange zest
- 1/4 cup (56 grams) unsalted butter, cut into pats
- 1/3 cup (67 grams) oil1
- two 8-oz packages (1 pound / 450 grams) cream cheese2
- 1/2 cup (113 grams) unsalted butter
- 1 1/3 cups (160 grams) powdered sugar
- pinch of salt
- 3/4 teaspoon vanilla extract
- green food coloring (I used McCormick Nature's Inspiration Food Colors)
- 1 tablespoon Dutch-process cocoa powder
- M&Ms or other candy to make the "lights" (I used Unreal Dark Chocolate Covered Peanut Gems)
For the cake:
For the frosting:
For decoration:
Directions
- Place the rack in the center of the oven. Preheat the oven to 325 °F (162 °C) and line a 9”x13” pan with a piece of parchment paper.
- In a medium mixing bowl, stir together the flour, salt, and baking powder. Set aside.
- In a large mixing bowl with an electric hand mixer or a stand mixer with a whisk attachment, beat the eggs, sugar, vanilla extract, and orange extract at medium-high speed for about 2 minutes until it's thickened and a light gold color. Should your stand mixer not have a whisk attachment, then beat the mixture for 5 minutes using the paddle attachment.
- Beat in the dry ingredients on low speed just until combined. Use a silicon spatula to scrape the bottom and sides of the bowl and mix briefly to incorporate.
- In a small saucepan, heat the milk and orange zest over medium heat. You shouldn't let it boil. When you see small bubbles start to appear around the edge of the saucepan, it's ready. The temperature will be 180-185 °F (82-85 °C). Remove the pan from the heat and stir in the butter and oil until the butter has melted.
- Slowly stir the milk mixture into the batter at low speed and mix until totally combined.
- Pour the batter into the prepared pan. It may look bubbly.
- Bake the cake for 38-40 minutes or until a toothpick inserted into the center comes out clean and the edges of the cake are pulling away from the pan's sides.
- Remove the cake from the oven and place it on a wire rack to cool completely, which takes about 2 hours.
- In a medium mixing bowl, beat the cream cheese and butter together with an electric hand mixer at medium speed until well combined. It's okay if it looks a little crumbly.
- Gradually beat in the powdered sugar until totally combined and then beat in the salt and vanilla.
- Add 1/2 cup of frosting to one small mixing bowl. Stir in 1 tablespoon of Dutch-process cocoa powder until combined.
- Add 1/4 cup of white frosting to another bowl. Color it yellow. With McCormick Nature's Inspiration Food Colors, I added 1/16 teaspoon sunflower and stirred until combined. If it’s not very bright, add another 1/16 teaspoon.
- To the 2 cups of frosting that are still in the bowl, color it green. With McCormick Nature's Inspiration Food Colors, I used 1/2 teaspoon of sky blue and 1/4 teaspoon of sunflower coloring. Beat in until combined.
- Cut a big triangle by cutting starting from the middle of the shorter (9" side) to the bottom corners of the opposite shorter side. If this is confusing, see the photos.
- You rearrange the cut-offs on a serving plate (or board/tray - it needs to be quite large to fit the cake properly!) rounded side up, into a triangle that’s the same exact size and shape as the large triangle you just cut.
- Use 1 cup of the green frosting to spread over the top and sides of the cake that’s on the tray - but you don’t have to add frosting all the way to the very bottom because that’ll be cut away, except for the bottom middle section, which will form the tree trunk. Frost the middle section that will form the tree trunk with some brown frosting.
- On the whole large triangle piece, in the bottom corner, use a star-shaped cookie cutter to cut out TWO stars. You don’t want to use one that’s too big because then a lot of cake would be wasted. It also shouldn’t be too small that the tree looks silly. Mine was about 1.5”. So cut out the stars at the very bottom of the cake in the corners. Place the whole triangle piece (the one from which you cut the stars) and place it, flat side up, on top of the frosted cut pieces already on the serving tray. Then use a knife to cut out the tree trunk on the bottom piece. Frost the tree trunk with brown frosting.
- Cover the top and sides of the top layer of cake with the remaining green frosting.
- Stack and frost the star with the yellow frosting. I recommend using a star tip to pipe them on, but you can do this however you like.
- Pipe on the white frosting to form the Christmas tree light wire. Do NOT decorate with candy or sprinkles until just before serving! Whatever you use might not bleed into the frosting, but it might.
- Without the candy, the cake will stay good for at least 3 days in the fridge. If you have leftovers, you can freeze them for up to 3 months.
- If you want to make the cake in advance, it's best to bake the cake and cover until ready to use. You can also make the frosting a few days in advance (keep that refrigerated). And then on the day of serving, frost the cake. The covered unfrosted cake can sit at room temperature for up to 2 days.
To make the cake:
Prepare the frosting:
Assemble the cake:
Decorate:
Notes
- You want an oil that's liquid at room temperature. Vegetable oil, canola oil or a light olive oil. You will be able to taste the olive oil if using that, so beware. Olive oil + orange is a great combination, but not one I'd serve at a kid's birthday party.
- If you live outside of the US - you likely have a different type of cream cheese than in the US. US cream cheese is firmer and meant for baking, rather than the kind for toast, like in Europe. For 8 ounces (225 grams) of cream cheese, buy a 300-gram package (the stuff at Aldi, Lidl, etc. works just as well as Philadelphia), put it in the center of a clean tea towel or cheesecloth, and squeeze out the liquid until you have 225 grams of cream cheese. So for this recipe, buy 600 grams of cream cheese and squeeze out the liquid until you have 450 grams of cream cheese left.
- Adapted from King Arthur Flour.
Join over 12,400 readers and sweeten up
your inbox with new posts for free!
This subscription is free of charge and can be canceled at any time.


10 comments on “Christmas Tree Cake” — Add one!
3 comments are awaiting moderation!
What a great idea! Cannot wait to make this cake for our Christmas dinner, it looks amazing!
Fabulous idea for a Christmas cake. I love the idea of the orange flavour and the M&Ms as Christmas lights!
This tree cake is too cute! My daughter saw it and now it is on our must make Christmas treats list!! Love that you use natural food coloring too!
What a great idea! I always see cakes for Easter, but never for Christmas! Thanks for the recipe share!
This is going to be so cute for Christmas. I’ll let my kids decorate it so I’m sure it won’t look as great as yours but will be tasty nonetheless.
This cake will be perfect for our holiday parties! I can’t wait to make it
This Christmas Tree cake is soft and moist. It is so colorful and definitely a creative idea. Perfect to try it out this Christmas. Kids would enjoy doing it.
I love this cake! It’s so adorable. I might just have to make it!
I hope that you’ll enjoy it if you do! :)
I absolutely loved this Christmas Tree Cake! I used the cake scraps and turned them into little presents that I put on the cake board with the tree. I’m definitely making this for future holiday parties.