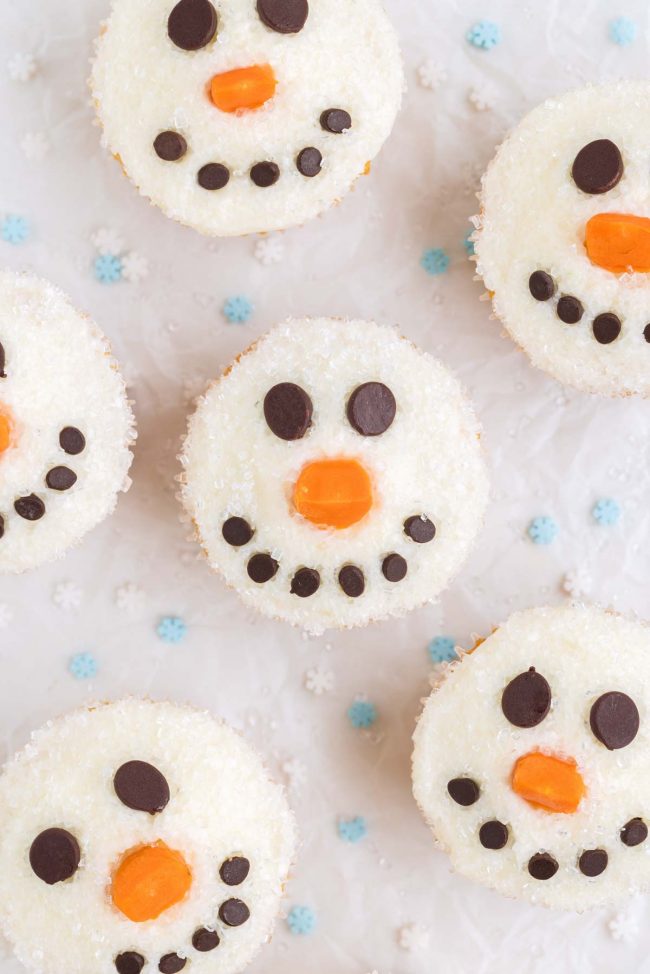
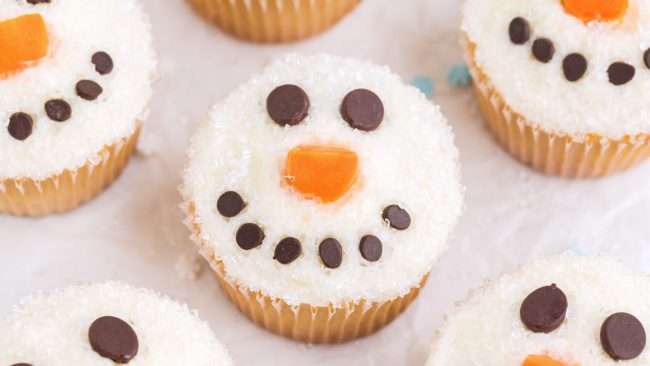
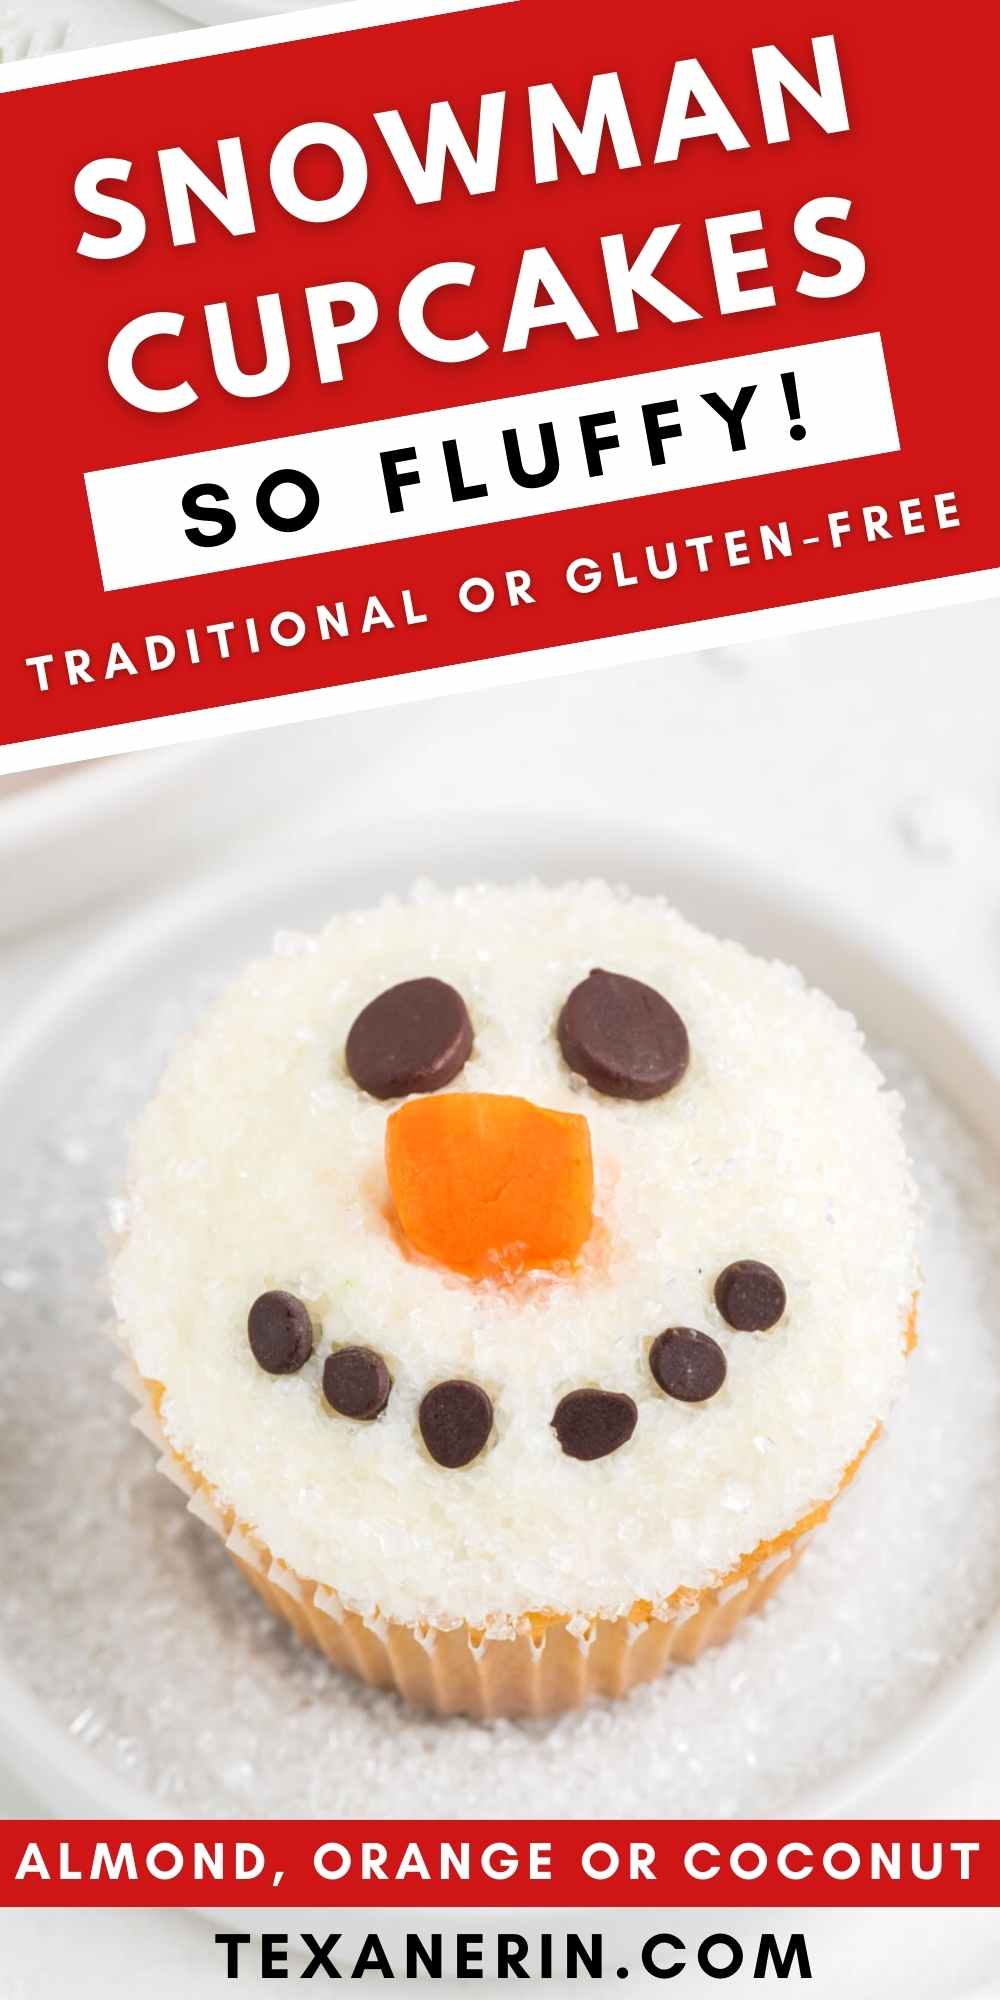
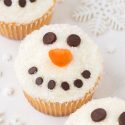
These snowman cupcakes are super easy, have the most amazing, fluffy vanilla, orange, almond or coconut cupcake base, and are topped with cream cheese frosting and an easy-to-make snowman face. They can be made traditionally with all-purpose flour or with gluten-free flour.
The cake base
Today’s recipe is an adaptation of the amazing King Arthur Flour birthday cake recipe I used in my Christmas Tree Cake and Matcha Cake Recipe. I’ve made a few tweaks, using less sugar and adding a burst of flavor with almond or orange extract and zest.
This is, hands down, my favorite non-chocolate cupcake recipe. It’s still wonderfully sweet, even without the extra sugar, and you won’t even notice it’s missing.
Here’s their original recipe, and you can see a video of them (that’s not me below!) making the cake batter below.
Ingredients
For the cupcakes:
- Flour – you have the option to use regular all-purpose flour, white whole wheat flour, or if you’re gluten-free, King Arthur Flour Gluten-free Measure for Measure Flour.
- Baking powder + salt – it’s crucial to use baking powder instead of baking soda.
- Eggs – this recipe requires 4 eggs, and substituting with an egg replacer is not recommended. Beating the eggs with sugar contributes to an airier cake, a result that cannot be achieved with egg replacers.
- Granulated sugar – no sub here.
- Almond or orange or coconut + vanilla extract – if you just want vanilla, use all vanilla extract instead of a mix of almond or orange or coconut and vanilla.
If you’d like orange cupcakes, note that you’d need to use orange extract, not orange juice. The amount of extract called for is so small that using orange juice would have zero effect on the taste. And using an amount large enough to affect the taste would negatively impact the cake’s structure. - Milk – you can use whatever you’d like. Even canned coconut milk works if thinned to a consistency similar to regular milk. Note that using coconut milk may add coconut flavor to the cake.
- Oil – opt for an oil that remains liquid at room temperature, such as vegetable oil, canola oil, or a light olive oil. Keep in mind that olive oil has a distinct taste, which would probably be noticeable in the final product.
- Butter – for a dairy-free version of the cake base (note: the frosting is not dairy-free), you can substitute more oil for the butter. Use 1/2 cup + 1 tablespoon of oil in place of the specified amount of butter + oil. I tried it out, and it works great. The flavor is better with butter, though.
- Orange zest – if you’re using orange extract instead of almond or coconut, then adding orange zest is highly recommended.
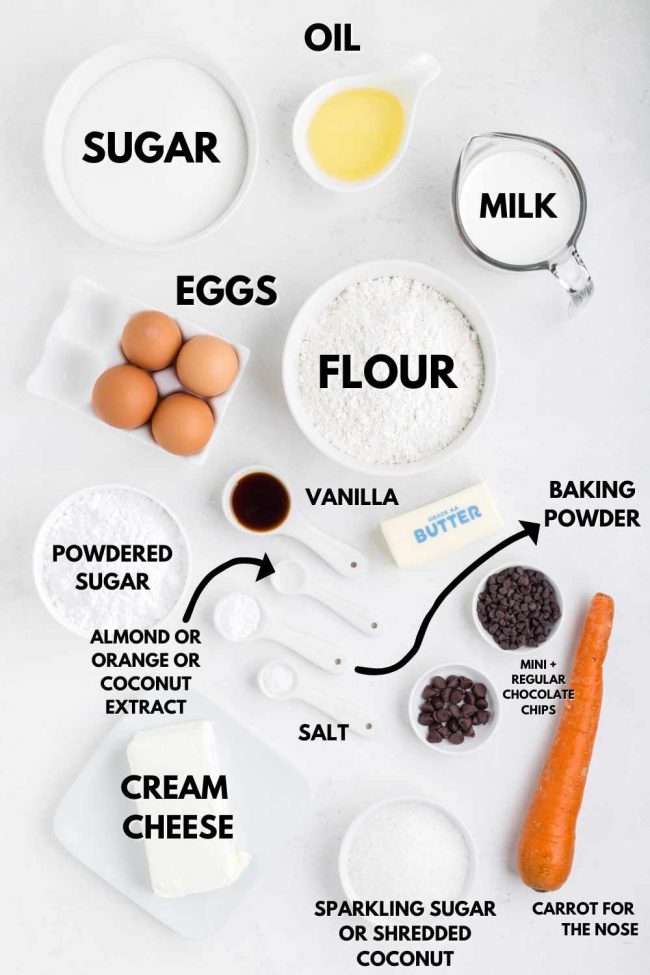
For the frosting:
- Cream cheese – this is for the frosting. No subs are possible if you want to make cream cheese frosting. Same with the other ingredients for the frosting listed below.
- Butter – make sure it’s room temp so that it’s easy to beat in with the cream cheese.
- Powdered sugar – if it’s super lumpy, you might want to sift it or blitz it in a high-speed blender to get it light and powdery again.
For the decoration:
As an Amazon Associate, I earn from qualifying purchases. For more info, see my disclosure.
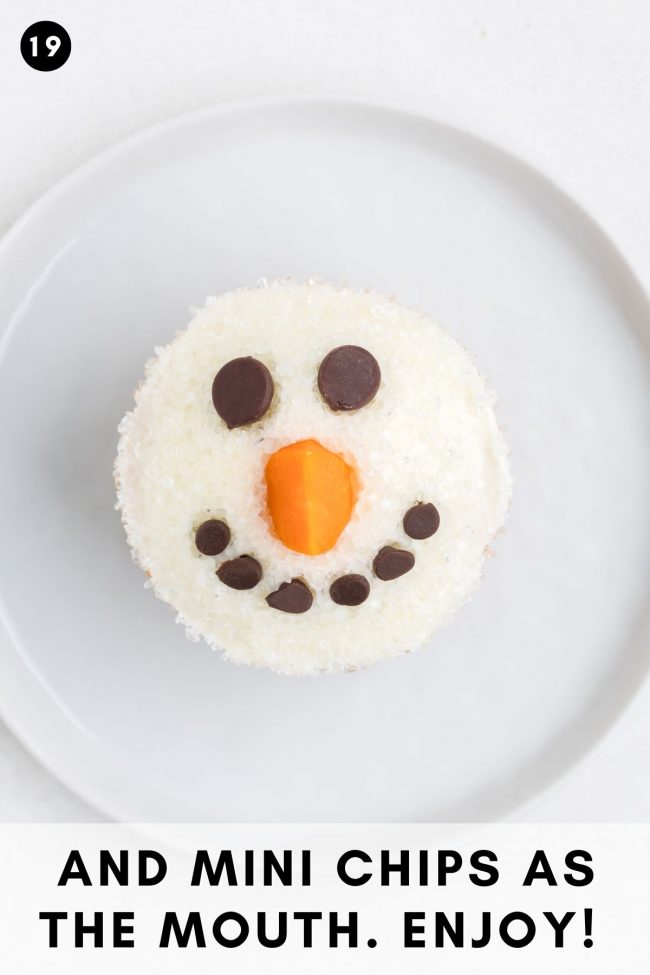
- Mini chocolate chips – for the mouth.
- Regular-sized chocolate chips – for the eyes.
- A carrot – you peel and cut this up into tiny carrot noses! If that weirds you out, you could use chewy candy, like YumEarth’s Organic Chewys.
- Sparkling white sugar (also known as sanding sugar) or shredded coconut – I wanted to avoid using sparkling white sugar because it sometimes has weird ingredients in it. But I went with it because the cupcakes came out so cute with them.
And of course, only as I was working on writing this post, I realized that unsweetened shredded coconut would work great. I don’t mean the long strands, but something like this.
And then instead of almond or orange extract, use coconut! I made a fourth batch, and it worked great.
Prefer cake mix?
If you don’t want to make the cupcakes completely from scratch, you can use a cake mix. I believe all cake mixes give directions on how to bake them as cupcakes.
So follow the preparation and baking instructions on your box, and then come back here to assemble the cupcakes.
How to make the cupcakes
Creating these cupcakes requires just a few extra minutes compared to a one-bowl recipe. Trust me, the extra effort is absolutely worthwhile!
This is especially true for those who follow a gluten-free diet, as it’s hard to find a more delicious vanilla or orange gluten-free cake recipe anywhere else. :)
Begin by combining your dry ingredients for the cupcakes.
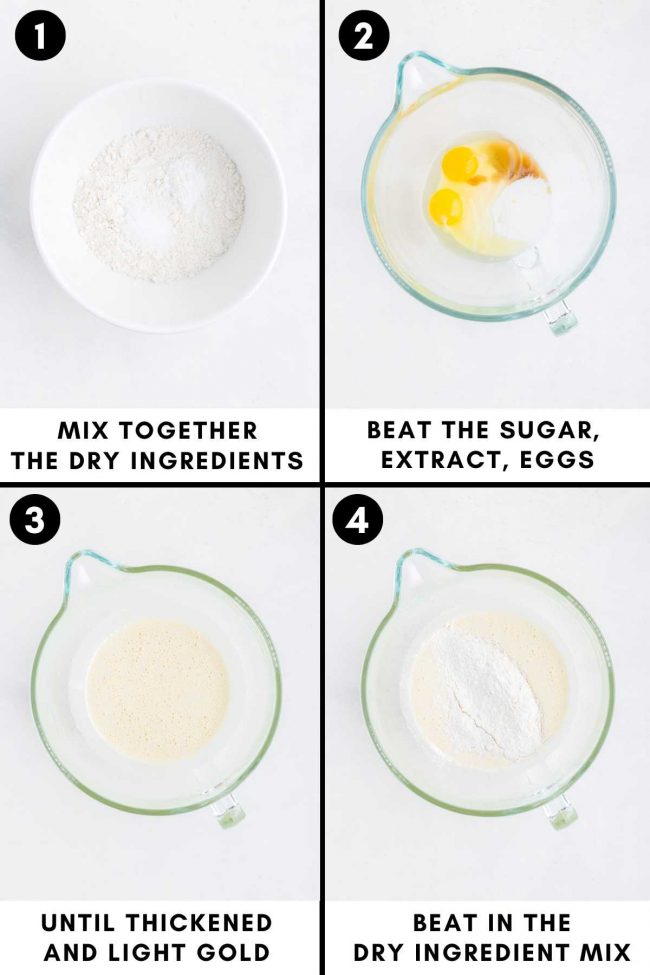
Next, whisk together the eggs, sugar, almond or orange extract (here’s how to make orange extract), and vanilla extract until the mixture thickens and turns a light gold color, usually taking about 2 minutes.
Gently fold the dry ingredients into the batter.
Warm the milk and zest until it’s on the verge of simmering. Remove from heat and incorporate the butter and oil.

Although heating the milk and beating the sugar and eggs might seem like an extra 3 minutes of effort, it’s a crucial step. Scalding the milk helps eliminate whey protein, which can weaken gluten and impact the rise of yeast dough and cakes.
I normally make these cupcakes with cashew milk and gluten-free flour, and I wondered if this step mattered, given the absence of gluten and whey protein. However, I found that skipping this step resulted in cupcakes that were noticeably less airy. The reason behind this discrepancy remains a mystery to me, and I’d appreciate any insights from those who might know. :)
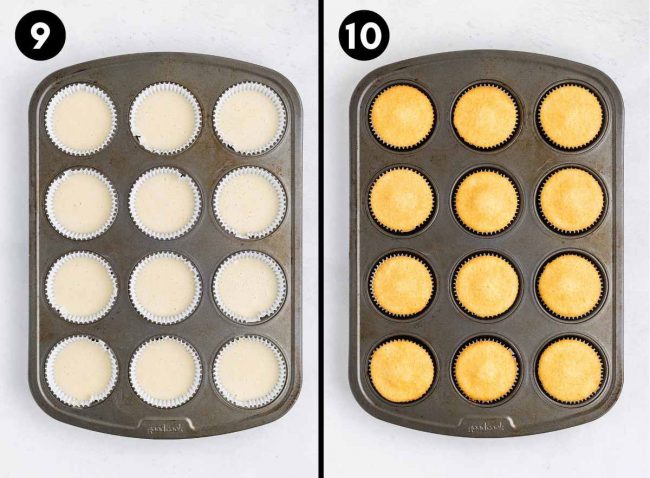
Pour the batter into the prepared cupcake liners; you’ll notice plenty of small bubbles in the mixture. Bake!
Frosting
While your cupcakes are baking, prepare the frosting.
I used my Healthier Cream Cheese Frosting. It’s a traditional recipe but with quite a bit less sugar.
Surprisingly, no one even notices the difference! This has been my trusted go-to frosting recipe for years, and it never fails to please.
How to decorate the snowman cupcakes
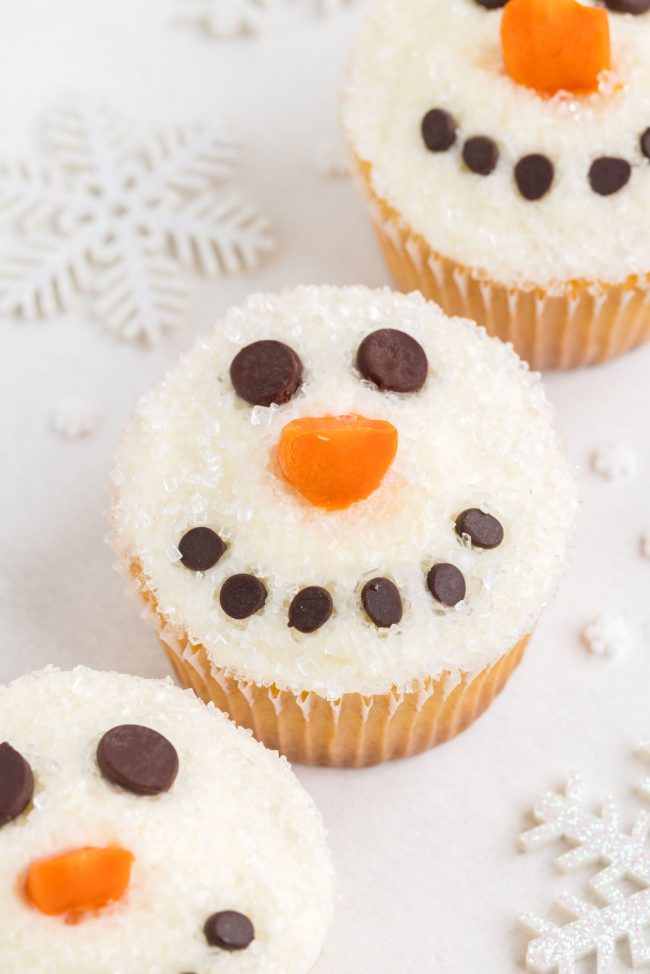
Spread an even layer of white frosting over each cupcake.
There’s enough frosting for 1.5 tablespoons (23 grams) per cupcake. You’re just slathering it on, not piping it on, so that’s plenty.
Then sprinkle with sparkling sugar or unsweetened shredded coconut, add the carrot nose, mini chocolate chips for the mouth and regular chocolate chips for the eyes.

Sparkling sugar options
- India Tree White Sparkling Sugar – contains sugar and carnuba wax. Sold in a 33-ounce container at $0.44 per ounce at the time of writing.
- King Arthur Flour Sparkling Sugar – just sugar and carnuba wax. But .86 per ounce if you order from the King Arthur website and $1.80 per ounce from Amazon. Yikes.
- Wilton White Sparkling Sugar – contains sugar, shellac, and carnuba wax and is produced from genetically modified sugar ingredients. Sold in an 8-ounce container at $0.51 per ounce. Shellac is also known as confectioner’s glaze and is made from the secretion of female lac bug. Yummy! 😬
I use India Tree, but here are a few options.
Yield
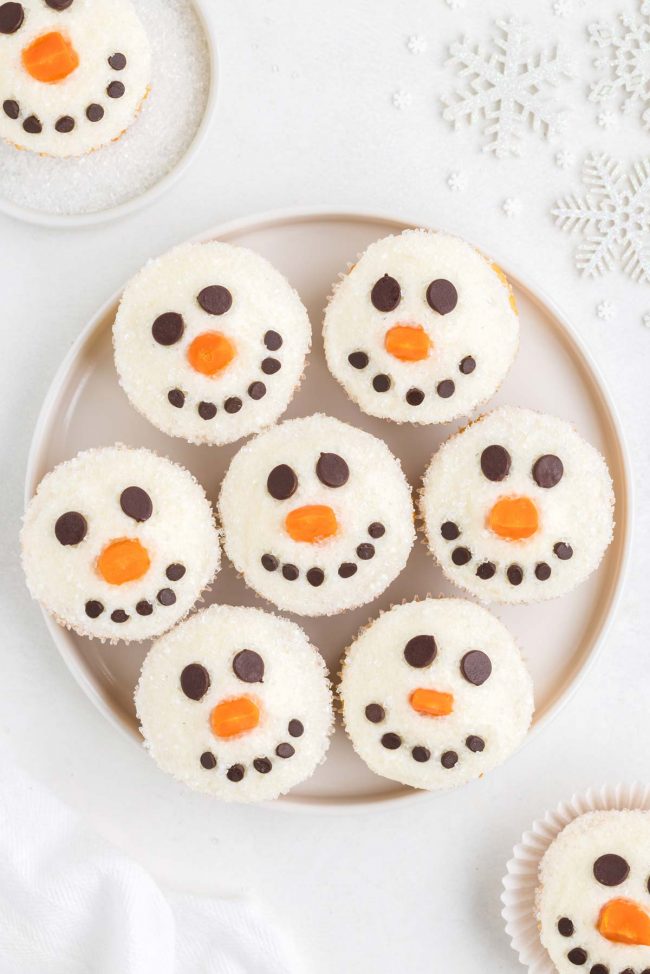
This yields 24 cupcakes, but you can easily halve the recipe. Or even better, bake up the full amount of cupcakes and save them for rainy days!
Storage and freezing
The cupcakes freeze great with or without the frosting. But don’t freeze them decorated unless you’re just freezing leftovers.
If you do that, remove the carrot nose. It won’t freeze well.
Don’t decorate, freeze, thaw and then serve. For best results, decorate on the day of serving and only add the carrot nose shortly before serving.
Gluten-free version
While the photographer used all-purpose flour (and I tested this recipe to make sure it works with that), I use King Arthur Flour Gluten-free Measure for Measure Flour when making these cupcakes, and the appearance, taste and texture are identical.
My quest for the ultimate gluten-free vanilla cupcake is complete! This cupcake is amazing, and that’s saying a lot coming from someone who typically favors chocolate over vanilla.
And for another gluten-free Christmas dessert, try this great Peppermint Crunch Ice Cream!
Some gluten-free vanilla cupcakes taste great right out of the oven but gradually become denser throughout the day. Other recipes result in an odd texture from the start. I can’t emphasize enough how many disappointing recipes I tried before discovering this one.
I have yet to experiment with other brands in this recipe, so I can’t guarantee similar outcomes. For optimal results, I highly recommend using King Arthur Flour!
Almond flour, coconut flour, or any substitutes not intended as a 1:1 replacement for all-purpose flour will not yield the desired results.
In my Gluten-free Pie Crust recipe from last week, I talked about how much better Bob’s Red Mill 1-to-1 Gluten-free Baking Flour is in that recipe. Today’s, it’s the opposite.
The cupcakes work with Bob’s Red Mill, but the texture is much better with King Arthur. I highly recommend having a bag of both. :)
By the way, I think these cupcakes would make a great base for these Snow Globe Cupcakes! Not the snowman face, but the cake base.
Other Christmas recipes
That’s it! If you try these snowman cupcakes, I’d love to hear about it. Please leave a comment or snap a pic and tag #texanerin, so I can be sure to see it. Thanks. :)
Snowman Cupcakes
- Prep Time:
- Cook Time:
- Ready in:
- Yield: 24 cupcakes
Ingredients
- 2 cups (240 grams) all-purpose flour or for gluten-free, use King Arthur Flour Gluten-free Measure for Measure Flour
- 1 1/4 teaspoons salt
- 2 teaspoons baking powder
- 4 large eggs (50 grams, out of shell), room temperature
- 1 3/4 cups (350 grams) granulated sugar
- 1 1/2 teaspoons vanilla extract
- 1 1/2 teaspoons almond, orange, coconut or more vanilla extract
- 1 cup (240 ml) whole milk or cashew milk
- 1/4 cup (56 grams) unsalted butter, cut into pats
- 1/3 cup (67 grams) vegetable oil or canola oil
- if using orange extract, then add 1 tablespoon orange zest
- 12 ounces (340 grams) cream cheese, room temperature
- 6 tablespoons (84 grams) unsalted butter, room temperature
- 1 cup (120 grams) powdered sugar
- pinch of salt
- 1/2 teaspoon vanilla extract
- 1 medium peeled carrot, cut into nose wedges
- regular-sized chocolate chips
- mini chocolate chips
- sparkling sugar (at least 8 ounces) or unsweetened shredded coconut1
For the cupcakes:
For the frosting:
For the decoration:
Directions
- Preheat the oven to 350 °F (175 °C), positioning the rack in the center, and line 2 muffin pans with 24 white muffin liners.
- In a medium mixing bowl, combine the flour, salt, and baking powder. Set aside.
- In a large mixing bowl, using an electric hand mixer or a stand mixer with a whisk attachment, beat the eggs, sugar, vanilla extract, and almond/orange/coconut/or extra vanilla extract until thickened and light gold, approximately 2 minutes on medium-high speed. If using a stand mixer without a whisk attachment, beat for 5 minutes with the paddle attachment. The batter should have a thick ribbon-like consistency.
- Add the dry ingredients to the bowl and mix, either by hand or on low speed with a mixer, until just combined.
- Scrape the bottom and sides of the bowl, then mix briefly to ensure it's well combined.
- In a saucepan over medium heat or in the microwave, heat the milk until steamy but not bubbling. Remove from heat, add the butter and oil, and stir until the butter is melted.
- Gradually incorporate the hot milk mixture into the batter, stirring on low speed with a mixer until well combined. Scrape the bowl and mix briefly until the batter is smooth.
- If baking one pan at a time, pour the batter into the cupcake liners just before baking. Bake the cupcakes for 19-25 minutes or until a toothpick inserted in the center emerges clean. While the cupcake surfaces may be very soft, it's fine as long as they aren't wet. If one cupcake has a wet spot, but the other seem fine, ignore the one and focus on the others to determine their readiness.
- After baking, allow the cupcakes to sit for 5 minutes, then turn them out onto a wire rack to cool completely for about 1 hour.
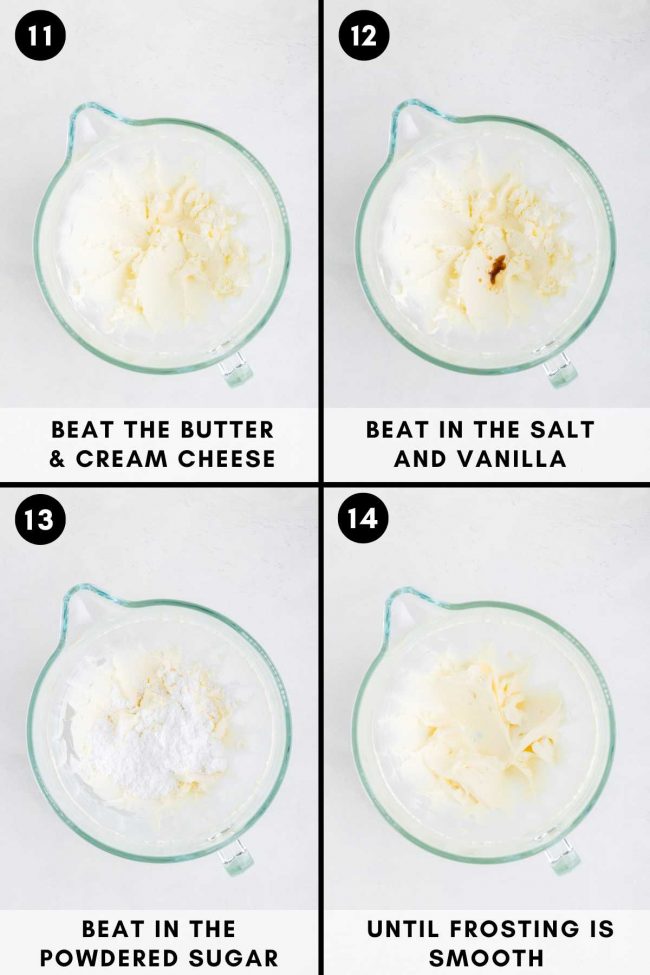
- Once cooled, prepare the frosting by beating the butter and cream cheese until soft and smooth. Add salt and vanilla, beating until combined.
- Gradually add the powdered sugar, 1/2 cup at a time, and continue beating until the frosting achieves a fluffy consistency.
- For best results, decorate on the day of serving and only add the carrot nose shortly before serving.
- Spread 1.5 tablespoons (23 grams) frosting over each cooled cupcake.
- Sprinkle on some sparkling sugar or shredded coconut. You can also put the sugar in a bowl and then dip the frosted cupcakes in it.
- Place the regular-sized chocolate chips, flat side up, on as eyes and the mini chips, flat side up, to form the mouth.
- Add a carrot wedge to form the nose.
- Refrigerate frosted cupcakes in an airtight container for up to 3 days.
Make the frosting:
Decorate:
Notes
- If using coconut instead of sparkling sugar on top, then I recommend using coconut extract for coconut cupcakes.
Source: adapted from King Arthur Flour
Join over 12,400 readers and sweeten up
your inbox with new posts for free!
This subscription is free of charge and can be canceled at any time.


26 comments on “Snowman Cupcakes” — Add one!
Can this be used as a gf vanilla cake recipe?
Yes. I link to a Christmas tree cake right at the top of the post that uses the same cake base. Use the baking time on that for a 9×13 pan. Or if using two 8″ pans, check out my Vintage Heart Cake. It’s also the same base as these cupcakes.
I made these for a Christmas potluck and they were the total hit of the party! Everyone LOVED them! They were soooo so yummy. I’ll be making them for my nieces for Christmas. thanks so much for your work on this recipe!
Oh, yay! I’m so glad to hear that. I hope your nieces will also enjoy them! Thanks so much for your feedback. :)
Made these for my kindergartener’s party and the teachers tell me that the kids were oohing and aahing over them. I can see why. They came out adorably and they were the fluffiest and most delicious cupcakes I’ve ever had. I’m not going to make another vanilla cupcake recipe! This is it!
That’s so nice to hear! Thanks for letting me know that they came out well. I love that you have a new go-to cupcake recipe! Thanks for your comment. :)
Adorable and delicious! I made these cupcakes with coconut extract and they were amazing. The cupcakes were so moist that I’ll definitely use this recipe again.
Yay! That’s so great to hear. Thanks so much for your comment! I’ll really glad you’ll be making them again.
These cupcakes are IT. I didn’t even make the snowman faces. I was supposed to, but I never got to it. Just shoved my face full of cupcakes. Now I have to make a second batch! This time under supervision. Haha.
Haha. I’m the same way. It’s hard to resist these! I hope the next batch worked better. :) Thanks so much for your feedback!
I made your cupcakes with my sons, and they were almost too cute to eat. They had the best texture of any cupcake I’ve ever made. I’ll surely be using this again for Christmas and other celebrations. Thank you so much for this recipe.
You’re welcome! And I’m really glad to hear that. :) I hope your sons enjoyed them, too! Thanks a bunch for your feedback.
I needed a gluten-free recipe for a kid’s party, and these came out better than I could have expected. I can’t believe that they’re gluten-free. Is this normal for a gluten-free recipe? Lol. I made some in the past and they were like cardboard. Thank you for the amazing recipe! I’ll be sure to check your site the next time I need something gluten-free.
Oh, I love to hear that! I’m so glad you’ll be checking back in for future GF recipes. :) And haha, aww. Yeah. A lot of GF recipes are cardboardy, but not mine. :) Here you can see my Gluten-free Recipes. I hope you’ll find something else you’ll like just as much! Thanks for your feedback.
These cupcakes were so fun. My daughter needed something festive for her preschool, so we made these together. All the kids loved them! I used the coconut option. The teachers wanted the recipe, too. Thank you so much!
You’re welcome! That’s great that the kids loved them and the teachers, too. :) Thanks a bunch for your comment!
Over the weekend my niece and I practised making these cute cupcakes for her school Christmas fair. They turned out so well for us. She can’t wait to bake again to raise some funds for her school. And I can’t wait to keep a few for myself!
Ooh, I love that you practiced first! That’s something I do, too. :) I hope that they’ll be a hit at the bake sale! Thanks for your comment.
I love baking sweets for my colleagues and made these right after coming across the recipe on Pinterest. They are so stinking cute!!! I’m going to make these again for my neighbors. And myself. So, so tasty. And fluffy!
Haha. I love your enthusiasm. I feel the same about them! I’m so glad you enjoyed them. Thanks for your feedback!
These snowman cupcakes are fabulous. I made a trial run with half the ingredients as you suggested. We loved them and I’ll be making more for Christmas!
Oh, yay! I’m really happy to hear that! Thanks so much for your comment. :)
I made these today with my kids and we had a lot of fun making a mess lol. The cupcakes weren’t quite as perfect as yours but still very cute and very delicious!
Woohoo! Glad you had fun with your kids. :D Thanks for your comment!
I was supposed to make cookies for a party but I had to make these instead. haha. No one complained! They were SO. FLUFFY. Yum. 😋
You rebel! ;) I love that you feel that you had to these these cupcakes instead. :D I’m so glad you liked them! Thanks for your feedback.