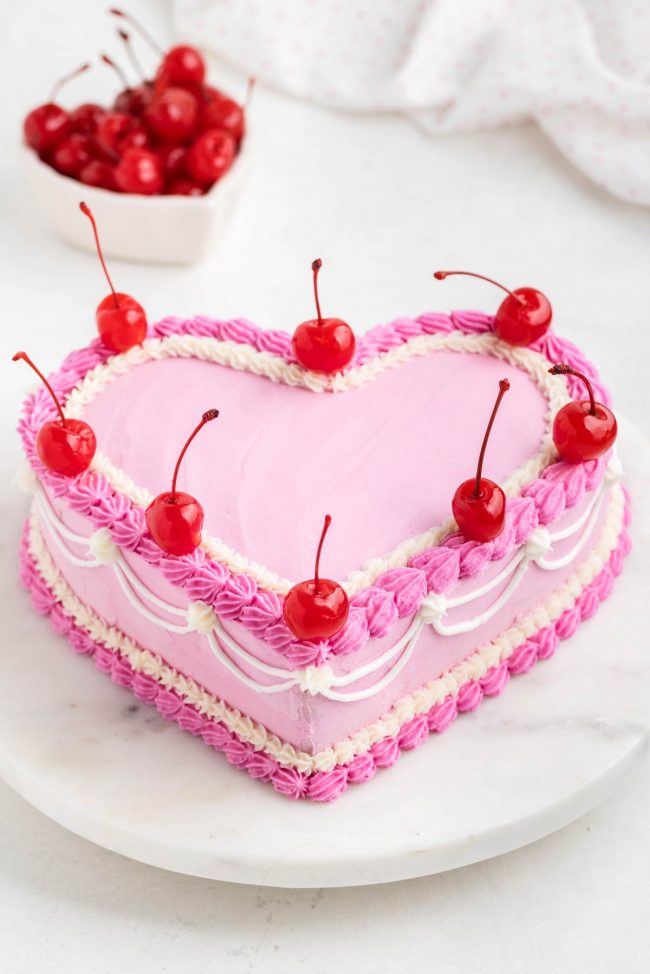
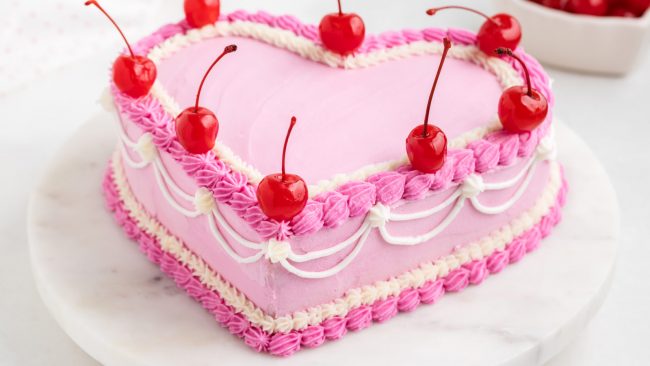
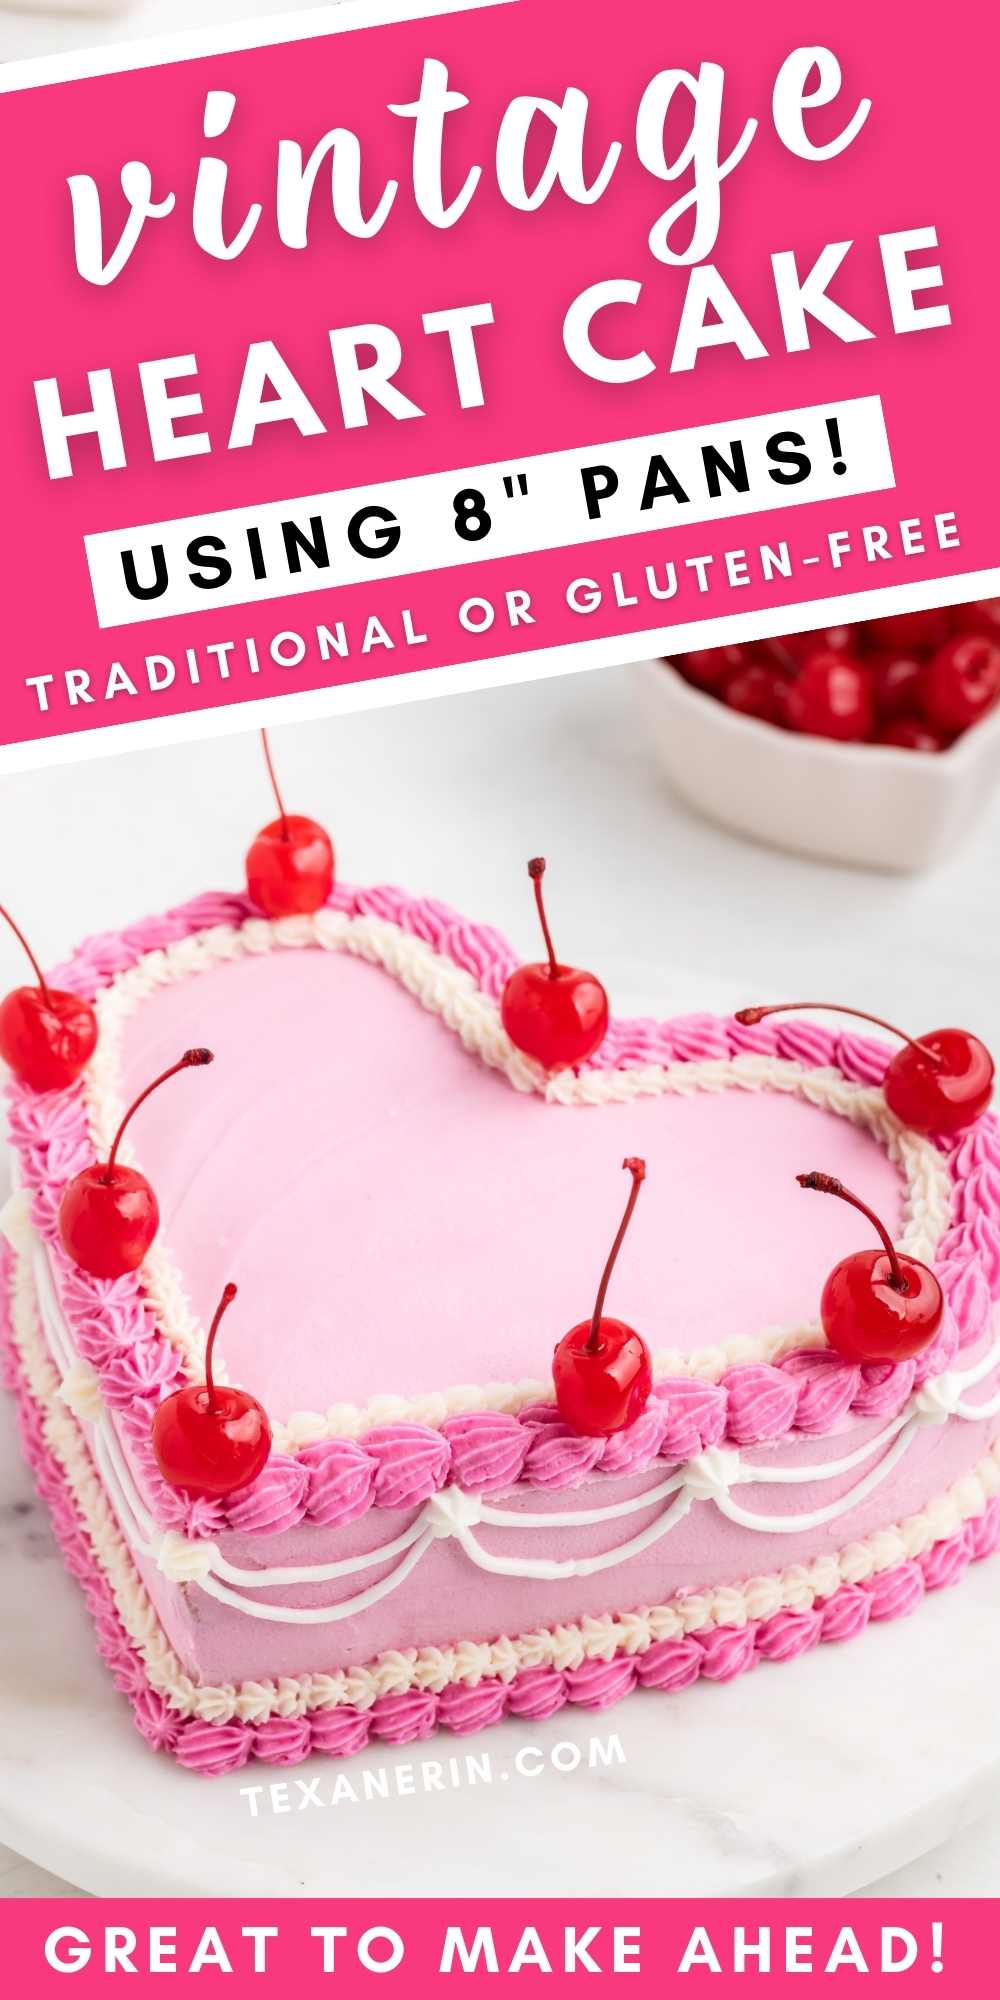
This vintage heart cake has a flavorful lemon or vanilla fluffy cake base and pink naturally-colored frosting for a perfect Valentine’s Day dessert. You don’t need a specialty pan as it’s super easy to create the heart shape using two 8″ pans using only 2 simple cuts. You can also make it with all-purpose or gluten-free flour.
Cake base
This recipe is an adaptation of the amazing King Arthur Flour birthday cake recipe I used in my Snowman Cupcakes and Christmas Tree Cake. I’ve made a few tweaks, like using less sugar and adding a bit of extra flavor with lemon extract and zest.
You can omit the zest and use all vanilla extract if preferred. Or use almond or a different extract in place of the lemon.
I also made it last night with all vanilla extract and 2 tablespoons of lime zest. I would have used lime extract if I had had any. You could definitely taste the lime, but it was too subtle for my liking.
I also increased the temperature by 10 °F. The original temperature worked great for a 9″x13″ pan and for cupcakes, but my photographer and I got mixed results when using 8″ pans.
Increasing it by 10 °F has yielded fluffy cake layers every time, so I’m sticking with 335 °F.

This recipe is, hands down, my favorite non-chocolate cake recipe, and it’s still wonderfully sweet, even without the extra sugar.
Here’s the original birthday cake recipe, and you can see a video of them (that’s not me!) making the cake batter below.
You can, of course, use a cake mix if you prefer, and follow the rest of the recipe for the frosting and assembly.
You need two round 8″ cakes, so a cake mix would work great.
If you think this is too much work, I have two other heart-shaped desserts that are perfect for Valentine’s Day. For these Heart-shaped Brownies and Heart-shaped Chocolate Chip Cookies, you bake up the brownies and cookies and then cut out the hearts. Super simple!
Ingredients
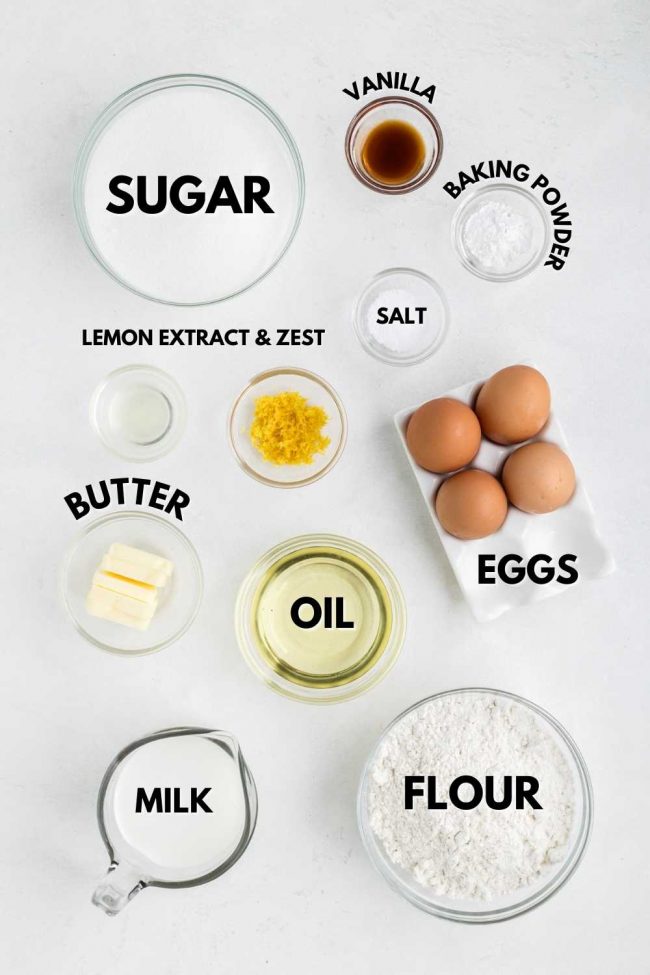
For the cake:
- Flour – you can use all-purpose flour or if you’re gluten-free, King Arthur Flour Gluten-free Measure for Measure Flour (not their GF all-purpose flour) or Bob’s Red Mill Gluten-free 1-to-1 Baking Flour. That’s the one in the blue bag.
- Baking powder + salt – you must use baking powder and not baking soda.
- Eggs – this recipe requires 4 eggs, and substituting with an egg replacer wouldn’t work. Beating the eggs with sugar contributes to an airier cake, a result that can’t be achieved with egg replacers.
- Granulated sugar – no sub here. Please don’t try it with coconut sugar, a liquid sweetener or a keto sweetener.
- Lemon + vanilla extract – if you prefer to use only vanilla, you can definitely do that.
In place of lemon, you could alternatively use orange, almond or coconut extract. - Milk – you can use whatever type you’d like. Even canned coconut milk works if thinned to a consistency similar to regular milk. Note that using coconut milk would probably add a bit of coconut flavor to the cake. I always use unsweeteened cashew milk (my photographer used whole milk).
- Oil – opt for an oil that remains liquid at room temperature, such as vegetable oil, canola oil, or a light olive oil. Keep in mind that olive oil has a distinct taste, which would be noticeable in the baked cake.
- Butter – for a dairy-free version of the cake base (note that the frosting is not dairy-free), you can substitute more oil for the butter. Use 1/2 cup + 1 tablespoon of oil in place of the specified amount of butter + oil. I tried it out, and it works great. The flavor is better with butter, though.
- Lemon zest – if you’re using orange extract, use orange zest. If using almond or coconut extract, I’d omit the zest.
For the frosting
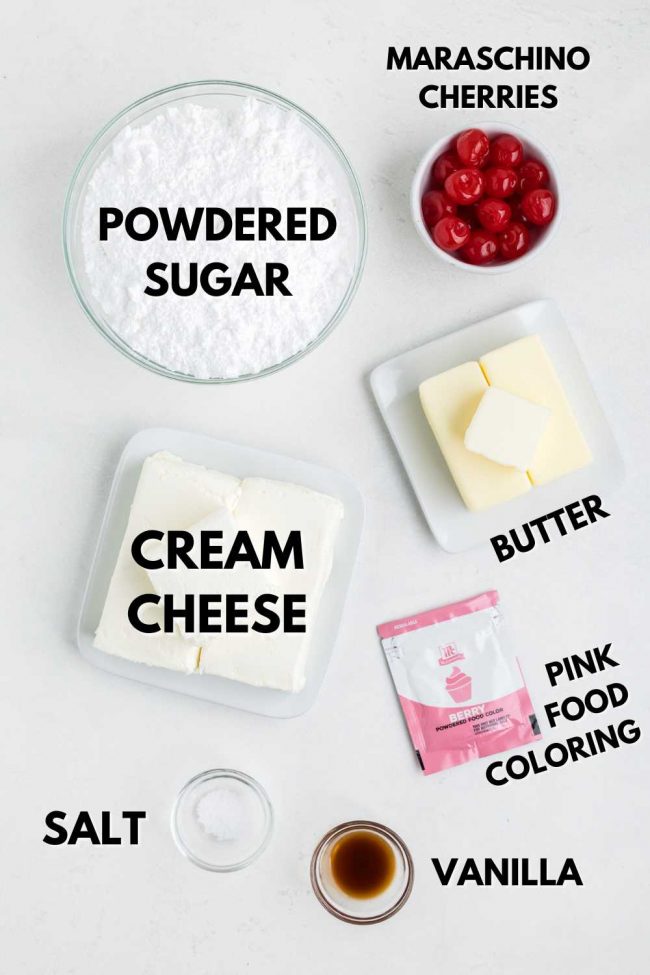
- Cream cheese – no subs are possible if you want to make cream cheese frosting. Same with the other ingredients for the frosting listed below.
- Butter – make sure it’s room temp so that it’s easy to beat in with the cream cheese. I always regret it when I don’t wait long enough for the butter to soften!
It creates a mess, and then I’m stuck microwaving it at 30% power, stirring, microwaving, stirring, and so on until all the little butter clumps melt. Then, the frosting is too soft and has to be chilled to firm up before using. - Powdered sugar – if it’s super lumpy, you might want to sift it or blitz it in a high-speed blender to get it light and powdery again.
- Pink food coloring – I used McCormick Nature’s Inspiration Food Colors, but Supernatural Kitchen Food Colors also work. Much more detail about this below!
How to make a vintage heart cake
The full directions are at the bottom of the post in the recipe box.
This is to just give you an overview.
Although heating the milk might seem like an annoying extra 3 minutes of effort, it’s a crucial step. Scalding the milk helps eliminate whey protein, which can weaken gluten and impact the rise of yeast dough and cakes.
I almost always make this cake recipe with cashew milk and gluten-free flour, and I wondered if this step mattered, given the absence of gluten and whey protein.
So I tried it out, and I found that skipping this step resulted in a noticeably less airy cake. The reason behind this remains a mystery to me!
I guess my point is – just do it. :) Regardless of what combination of ingredients you use.
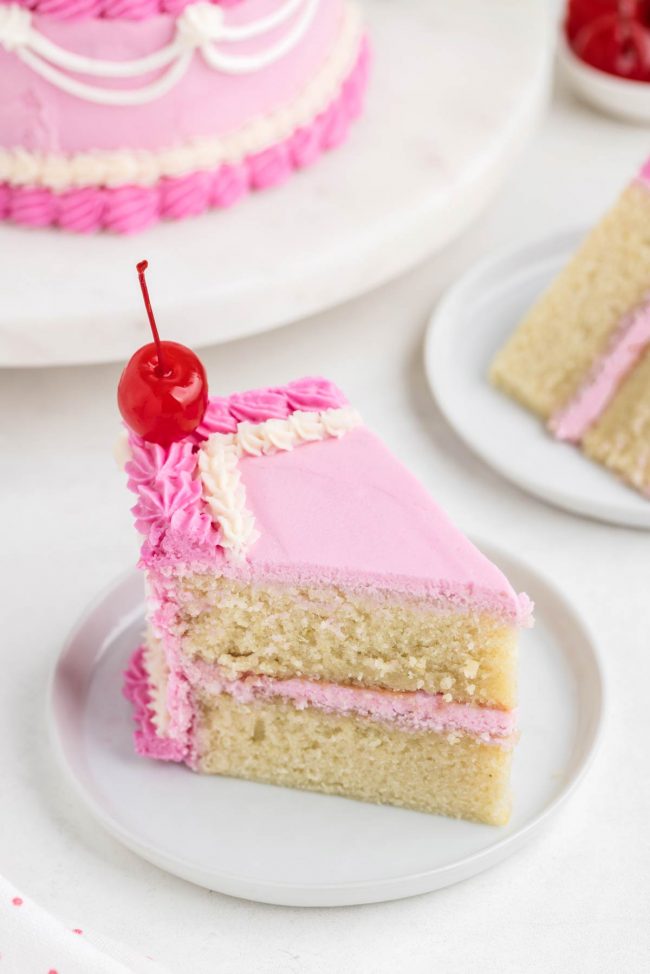
This is the same frosting recipe I use in every recipe of mine that calls for cream cheese frosting. It’s a scaled-up version of my Healthier Cream Cheese Frosting.
The only thing making it healthier is that it uses a LOT less powdered sugar. It doesn’t use cauliflower or something like that. ;)
Nobody misses the extra sugar. And you can obviously pipe with it, but it is less firm than regular cream cheese frosting.
It doesn’t harden, but stays relatively soft. So keep that in mind in case you need to transport the cake.
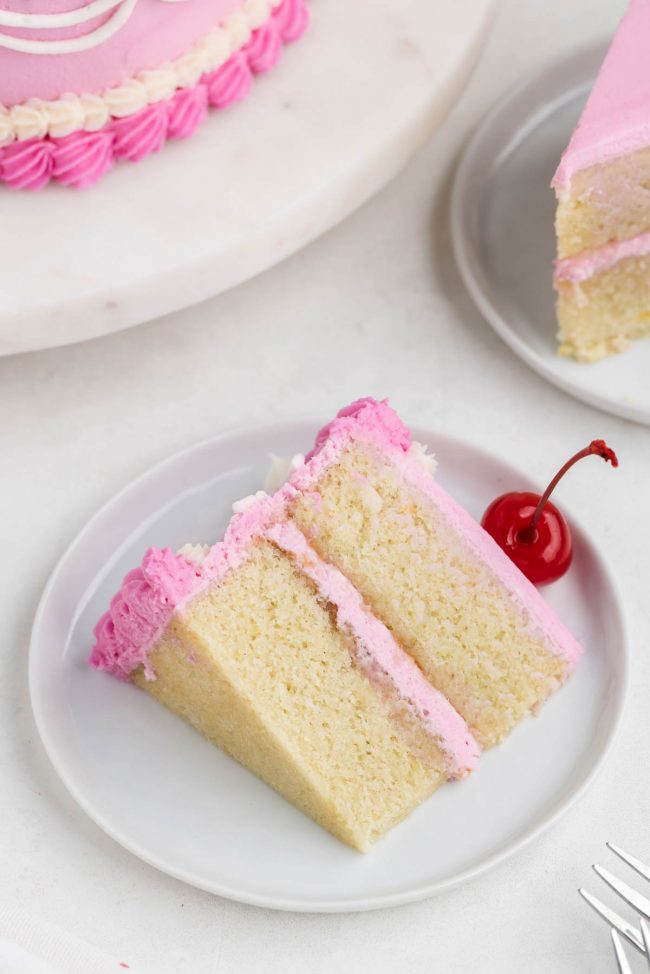
In case you’re thinking that’s way too much frosting and would like to reduce the amount, here’s how much I needed and where:
- Middle of the cake – 3/4 cup
- Crumb coat – 1/2 cup (will probably just need 1/3 cup)
- Attaching rounded cut-offs to main cake piece – 1/4 cup (you’ll likely use less)
- Top of cake – 3/4 cup
- Sides of cake – 1 cup
That = 3 1/4 cups (775 grams). The frosting recipe yields 5 cups (1195 grams), leaving 1 3/4 cups (420 grams) for piping on some decorations.
Don’t want to do any piping? Don’t want to frost the sides? Now you know how much you can reduce the frosting recipe.
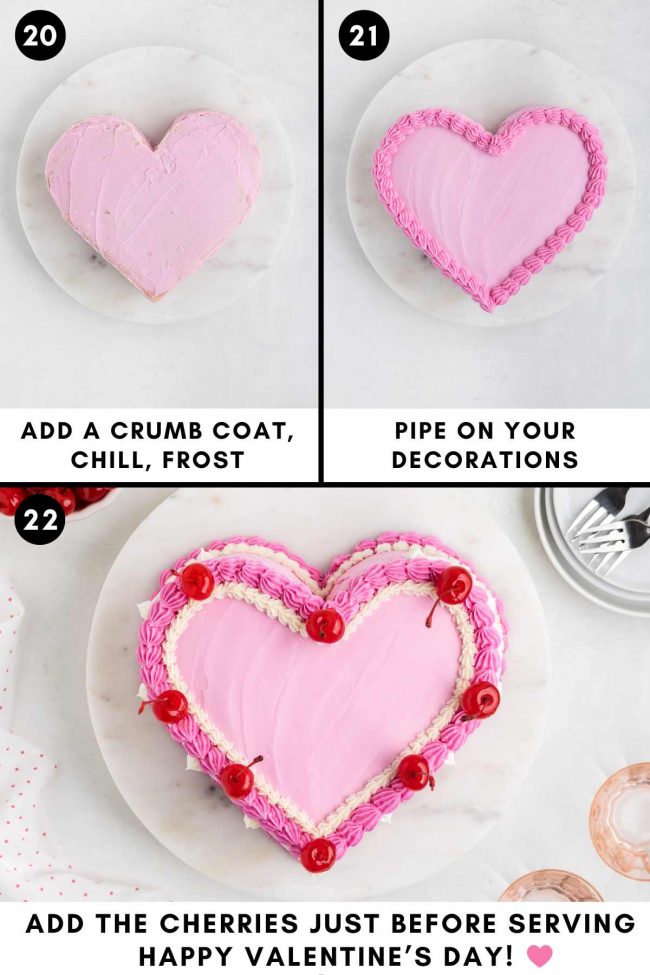
Here comes the stressful part! That is, until you’ve done it once, and you already know it’s really easy.
Both my photographer and I were worried about how this cake was going to come out, but it’s really very simple to make.

Now you can decorate it however you’d like.
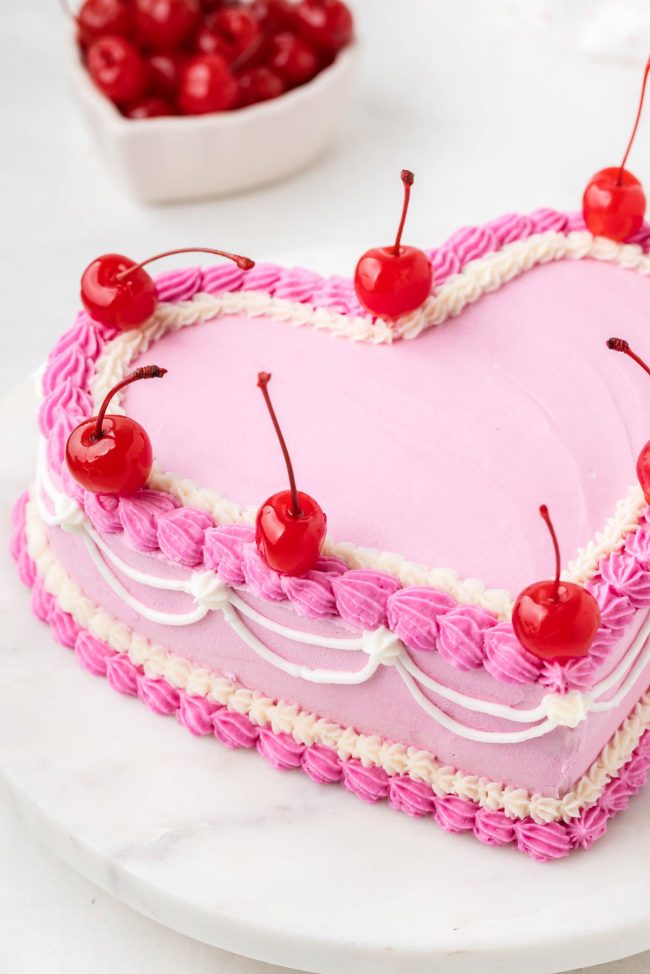
I did a shell border with Wilton tip 32. Here’s a great video showing you how to do it.
She also shows you what the shell border looks like with 3 other Wilton tips.
If you’re new to piping shell borders, it’ll probably take some practice to get it perfect. Start with a few practice shells on parchment paper or a plate before moving on to your heart cake.
The white lines are the only part that’s not super easy. Just lean a cutting board up against something and practice making your lines there.
Or if you think there’s no way for you to possibly make them without screwing up the cake, just skip the lines. The cake is lovely even without them!
Prepare in advance and how to freeze
You can bake, cool and wrap the layers individually in plastic wrap and place them inside a Ziploc bag. They can sit at room temp for 2 days, or you can refrigerate them for up to 3 days.
You can also freeze them for up to 3 months.
To make assembling the cake even easier, use the cake layers straight from the freezer. There’s no need to defrost.
If the layers are too hard to cut through by the time you’ve stacked them, just let them sit for about 15 minutes.
After assembling and putting on the crumb coat, you can freeze the cake for up to a week. For added protection, wrap the cake in plastic wrap, followed by placing it in a larger freezer-safe bag.
If you have leftover frosting after the crumb coat, freeze that, too! You’ll need it to finish the cake.
Freeze the frosting in a freezer-safe, airtight container. While freezing plain cream cheese isn’t usually a good thing, the high-fat nature of cream cheese frosting allows for freezing without issues.
You can even freeze the completed cake. Once solidly frozen, wrap it with plastic and then place in a large freezer-safe bag.
How to store the frosted cake
Because of the frosting, it should be kept refrigerated.
If you’re serving it just a few hours after making it – no need to refrigerate. But ideally, you’d keep the cake refrigerated as long as possible.
If it’s sat in the fridge for longer than 4 hours, then I like to let it sit at room temperature for about 30 minutes before serving.
As I mentioned above, it also freezes great. I always cut my cake leftovers into slices, wrap in plastic wrap, and enjoy a piece every now and then. It takes about 10-30 minutes to defrost, depending on the thickness of the slice.
Alternative topping ideas
If you don’t want to use food coloring, then a white cake with strawberries or raspberries on top would look great. It may not be a vintage heart cake then, but it’ll taste just as delicious. :)
I also love using freeze-dried raspberry powder to color frosting naturally. The color is so pretty and the raspberry flavor can be as strong as you’d like it.
Make sure to use a seedless powder! Or use a sieve to get rid of those. Raspberry seeds in frosting isn’t the most pleasant experience.

You could also write the word LOVE, draw a heart and cover them both with nonpareils like I did in my Chocolate Heart Cake recipe.

Food coloring
As an Amazon Associate, I earn from qualifying purchases. For more info, see my disclosure.
- What you see in these photos is McCormick Nature’s Inspiration Food Colors. I also used them in these Frankenstein Cupcakes, and I love the results.
The ingredients are: corn maltodextrin, beet juice color, ascorbic acid & citric acid.
I got them from Amazon 2 years ago, but they’re unavailable right now. I found them here on Walmart for $5.98.
I used 1/2 teaspoon of the berry color to make pink frosting, used that to fill and cover the cake, and then added another 3/8 teaspoon to make a darker shade of pink for the piping. - I also tested it with Supernatural Kitchen Food Colors.
The ingredients are vegetable juice and beta carotene. When I found these, I bought the entire stock that iHerb had at the moment – minus 1 that I left for someone else. ;) I’m now the proud owner of about 44 packets of food coloring. 😄
I used 3/32 teaspoon of pomegranate + a teeny tiny bit more to make the darker pink.
The packages say you need to dissolve it in liquid first, but when I did that, it consistently watered down the frosting too much, even though I only used a very small amount of water. Adding it directly to the frosting worked fine. - If you want to use Wilton gel coloring or any other food coloring, you certainly can. Just add a tiny bit, stir, and add a little bit more at a time until you’re happy with the result.
Can I bake the full recipe in a large heart pan?
No, the batter needs to be divided between two pans. The cake wouldn’t bake up properly otherwise.
If you’d like to use a heart-shaped pan, I recommend finding a recipe that already calls for one.
I just want a single layer!
This recipe uses an 8″x8″ pan and a round 8″ pan to form a single-layer cake.
I have no idea of the baking time of the 8″x8″ pan. I’m guessing you’d need 3-7 minutes fewer. It’s just a guess.
Their recipe has you baking both layers for the same amount of time, but that’s just plain incorrect. The surface area of an 8″x8″ pan is 64 square inches and for a round 8″ cake, it’s 50.24 square inches.
The round cake only has 78.5% of the surface area of the square pan. So it makes sense to make that it’d need less time.
No vegan option?
Sorry about that. There isn’t a good egg sub for the cake. 4 eggs is just too many.
The same with the frosting. Vegan cream cheese doesn’t work as an exact sub for regular cream cheese in frosting recipes.
They’re not at all like this vintage heart cake, but I do have these lovely Paleo Vegan Raspberry Cream Pies that would be perfect for Valentine’s Day!
So are these Vegan Date Brownies with freeze-dried raspberries on top. And with those, you could use a heart-shaped cookie cutter to make them heart-shaped.
Gluten-free option
Some gluten-free vanilla cakes are great right out of the oven but become denser later. Others have a strange texture from the start. Not this one!
It stays moist and fluffy.
I’ve only tested it with King Arthur Flour Gluten-free Measure for Measure Flour and Bob’s Red Mill 1-to-1 Gluten-free Baking Flour, but the results have been great with both.
The cake is a bit taller and fluffier when made with King Arthur. The cake with Bob’s is a little denser, but not rubbery or a bad kind of dense.
It’s not dense like a cake made with almond paste or something like this Cranberry Almond Cake. Perhaps dense isn’t the best way to describe it.
It’s just not as fluffy. And the edges of the cake aren’t as neat-looking. But that doesn’t really matter since you’ll be frosting the cake.
One final difference is that the BRM version was slower to cook in the middle, making it more difficult to determine when the cake was ready. For that reason, I think KAF has the edge over BRM in today’s recipe.
I haven’t experimented with other brands, so I have no idea if they’d work. I’d hate for your cake not to come out perfectly, so I really recommend KAF or Bob’s. If you try another brand, please share your results below, and I’ll update the post with your tip.
Almond flour, coconut flour, and other substitutes are not intended as direct replacements for all-purpose flour and definitely wouldn’t work.
I hope you’ll enjoy this vintage heart cake! I’d love to hear about it if you try it. :) Thanks!
Vintage Heart Cake

- Prep Time:
- Cook Time:
- Ready in:
- Yield: 12-16 slices
Ingredients
- 2 cups (240 grams) all-purpose flour or for gluten-free, use 2 cups (240 grams) King Arthur Flour Gluten-free Measure for Measure Flour or 2 cups (276 grams) Bob's Red Mill Gluten-free 1-to-1 Baking Flour
- 1 1/4 teaspoons salt
- 2 teaspoons baking powder
- 4 large (50 grams each, out of shell) eggs, room temperature
- 1 3/4 cups (350 grams) granulated sugar
- 1 1/2 teaspoons vanilla extract
- 1 1/2 teaspoons lemon extract (or more vanilla)
- 1 cup (240 ml) milk of choice
- 2 tablespoons lemon zest (omit for a vanilla cake)
- 1/4 cup (56 grams) unsalted butter, cut into pats
- 1/3 cup (67 grams) canola or vegetable oil
- 2 1/2 (8-ounce) packages (563 grams total) full-fat cream cheese, room temperature
- 1 cup + 2 tablespoons (252 grams) unsalted butter, very soft but not melted
- 3 cups + 2 tablespoons (375 grams) powdered sugar
- 1 teaspoon vanilla extract
- pinch of salt
- pink food coloring
- maraschino cherries
For the cake:
For the frosting:
Garnish:
Directions
- Place the rack in the center of the oven. Preheat the oven to 335 °F (168 °C) and line two round 8” pans with parchment paper.
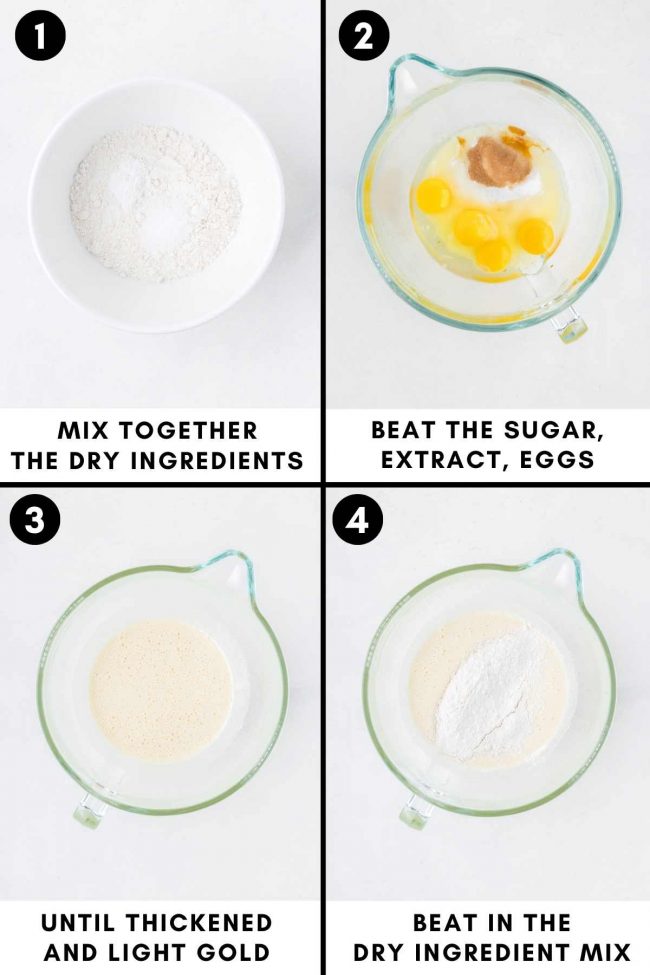
- In a medium mixing bowl, stir together the flour, salt, and baking powder. Set aside.
- In a large mixing bowl with an electric hand mixer or a stand mixer with a whisk attachment, beat the eggs, sugar, vanilla extract, and lemon extract at medium-high speed for about 2 minutes until it's thickened and a light gold color. Should your stand mixer not have a whisk attachment, then beat the mixture for 5 minutes using the paddle attachment.
- Beat in the dry ingredients on low speed just until combined. Use a silicon spatula to scrape the bottom and sides of the bowl and mix briefly to incorporate.
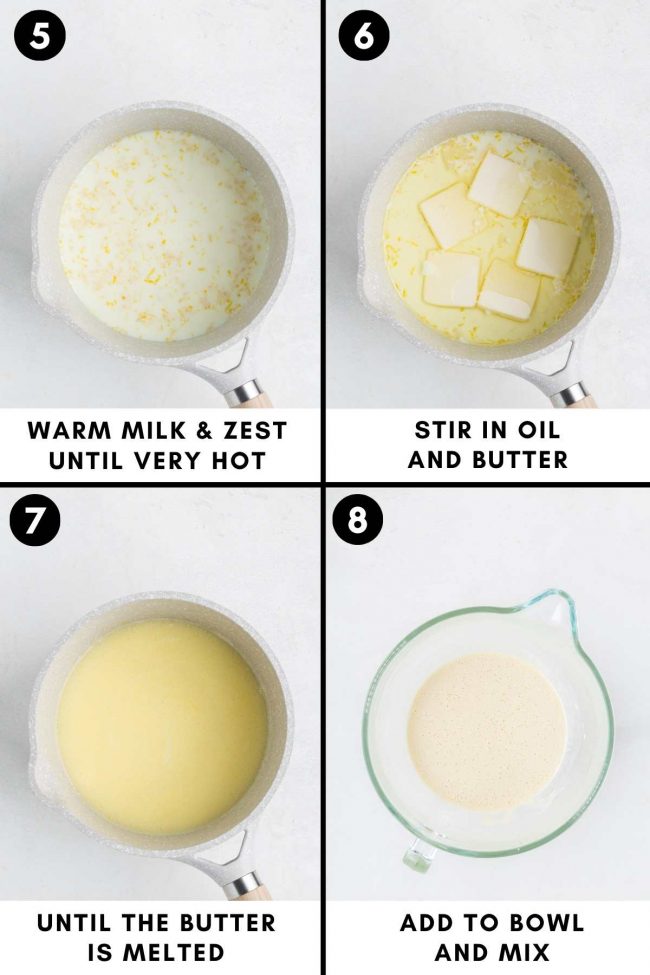
- In a small saucepan, heat the milk and lemon zest over medium heat. You shouldn't let it boil. When you see small bubbles start to appear around the edge of the saucepan, it's ready. The temperature will be 180-185 °F (82-85 °C). Remove the pan from the heat and stir in the butter and oil until the butter has melted.
- Slowly stir the milk mixture into the batter at low speed and mix until totally combined.
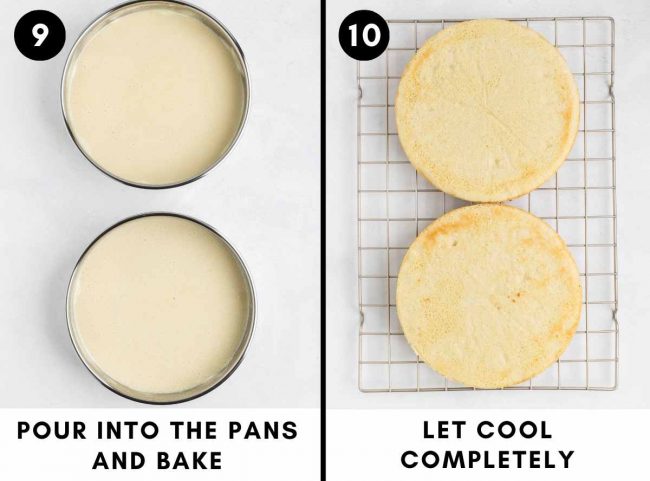
- Divide the batter evenly between the two prepared pans. That’s 580 grams (about 2 3/4 cups) per pan or 598 grams if using Bob's GF flour.
- Bake the for 33-45 minutes or until a toothpick inserted into the center comes out clean and the top is set.
- Remove to a wire rack to cool for 15 minutes and then turn the cakes onto the wire rack to cool completely, about 2 hours. The cake might seem a little dry at this point, but it gets moister as it sits.
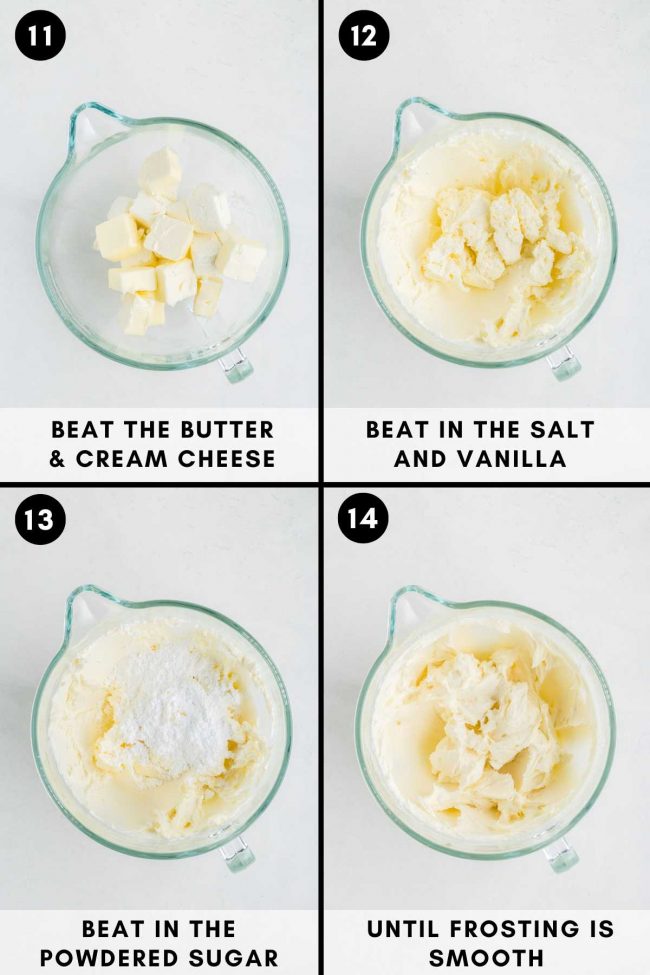
- In a large mixing bowl, beat the cream cheese and butter together with an electric hand mixer or stand mixer at medium speed until well combined. It's okay if it looks a little crumbly.
- Gradually beat in the powdered sugar until totally combined, and then beat in the vanilla and salt.
- Remove 1/2 cup (117 grams) of frosting. That’ll stay white to add some more decorations to the cake.
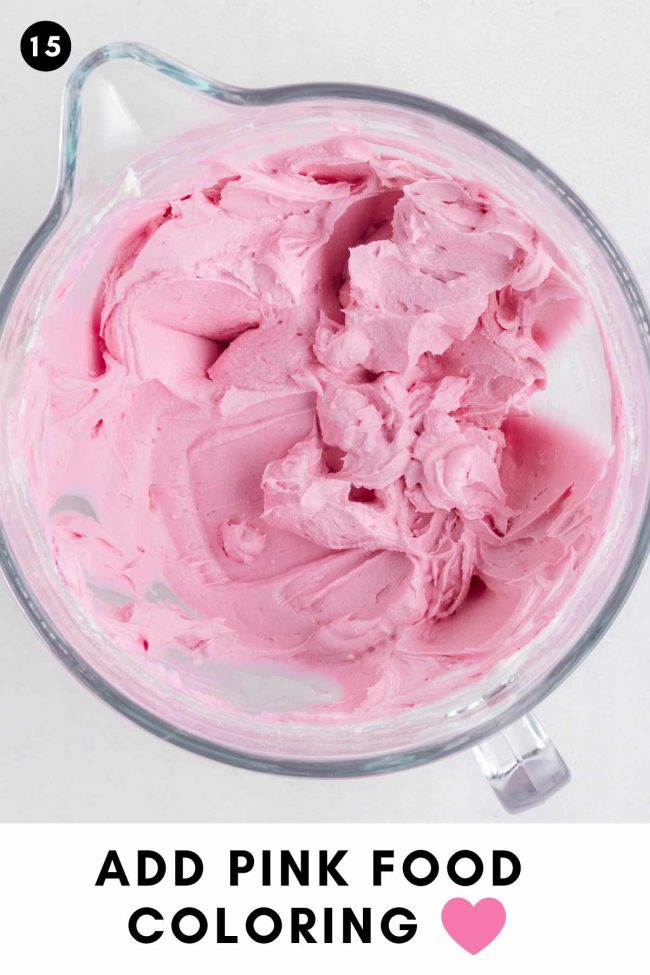
- If using McCormick Nature's Inspiration Food Colors, add 1/2 teaspoon of the berry powder to make the frosting light pink. Beat until combined. If you have specks of the powder in the frosting, just let it sit for a few minutes and then beat again.
- Get out a cake plate that’s big enough for the heart.
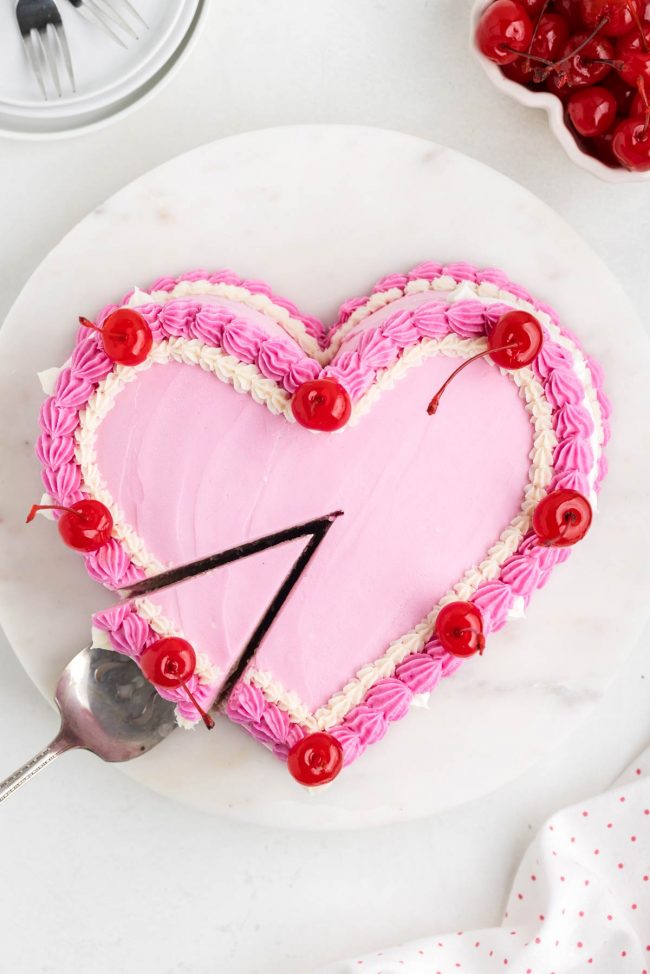
- Transfer a cake layer to the cake plate - you want the first layer of cake to be towards the bottom of the serving dish (and not right in the middle) because the cut-off bits will be added towards the top of the cake to form the rounded top of the heart. If you put the cake plate on top of a cake layer (which is on the cooling rack) and flip everything over, the rounded part will be on top. If you have a different preferred way of transferring cake layers, do whatever you like. It doesn’t really matter if the rounded part of the cake layer ends up on top in the end, as it’s not very domed.
- Spread 3/4 cup (173 grams) of pink frosting on top.
- Add the other layer on top, flat side up.
- Use a ruler and measure out two 5” lines, forming a right angle. This will be the bottom of the heart.
- Cut away those curved bits, but be careful with them as they’re going to help form the top of the heart.
- Use about 2 tbsp frosting to help attach the rounded cut-offs to the main cake piece to form a heart shape. You’ll have to bend them a little.
- My heart shape looked pretty bad at this point, so I cut away a little bit at the very top, in the middle, and then the heart looked perfect.
- Use about 1/3 to 1/2 cup (76-115 grams) as a crumb coat. Spread the frosting over the sides and top of the cake.
- Place in the freezer for about 30-60 minutes or until the frosting is very firm. Or place in the fridge for about 2 hours.
- Frost the rest of the cake. I used about another 3/4 cup (98 grams) on top and then about 1 cup (130 grams) on the sides.
- Place back in the freezer for about 30-60 minutes or the fridge for 1-2 hours to allow the frosting to firm up before piping on the decoration.
- To the remaining pink frosting, add a little more food coloring to make the frosting a darker shade of pink. I added another 3/8 tsp of McCormick berry powder to the remaining pink frosting (about 1 1/3 cup) for the darker pink shell boarder.
- Use tip Wilton 32 to pipe a small shell border around the top and bottom of the cake (see post for a video).
- Use the reserved white frosting to pipe on small dots or whatever you’d like. I used Wilton tip 18 for the white shell border and Wilton tip 3 for the curved white lines.
- If you still have pink frosting leftover, you can add whatever decoration you’d like with that or add a little more pink food coloring for a third shade of pink, and pipe on more stuff.
- Just before serving, place maraschino cherries around the top border.
- Cover and refrigerate the finished cake for up to 4 days. It also freezes great (without the cherries) for up to 3 months.
To make the cake:
Make the frosting:
Assemble the cake:
Decorate the cake:
Store:
Cake base adapted from King Arthur Flour
Join over 12,400 readers and sweeten up
your inbox with new posts for free!
This subscription is free of charge and can be canceled at any time.


12 comments on “Vintage Heart Cake” — Add one!
9 comments are awaiting moderation!
Hey Erin :)
I really want to make this cake for my birthday but I was wondering if the cake layers can be baked the day before so on the day itself only the cake assembling and frosting are left. I’m not very experienced with baking and I don’t want to have to do everything in one day in case I mess up.
Hi Polly! It can be made in advance. Please read the “Prepare in advance and how to freeze” section for more info. :) I hope you’ll love it and that you have a great birthday!
I made this with my daughter who is really into baking right now. She wanted a pink heart, so this was perfect! I did not want to have to buy ANOTHER pan. Thanks for the fantastic recipe! We made it with the lemon ingredients and it was SO SO good. This will be our go to cake from now on. 💗💗💗💗💗
You’re welcome! And thank you for the great feedback! I’m thrilled to hear that you’ll be making the cake again. I hope your daughter had fun. :) Thanks again!
I’ll be hosting a kid’s VDay party, so I wanted to try this out first to make sure I’m not going to embarrass myself. Haha. I am not a cake decorator. I’m happy to say this wasn’t one of those Pinterest fail things! It didn’t come out looking like your photos because I didn’t bother with the piping, but I did a heart in the middle like in that chocolate cake photo and it looks incredible. I had to eat some before anyone came home and saw it. I’ll be making it again for the party and will make it pretty next time!
Oh, yay! This is great to hear. I’m with you on not waiting. 😆 I can’t even wait. 🙈 I’m so glad that the cake came out well and that you’ll be making it again for the party! Thanks so much for your feedback.
I’ve been tasked with making the kindergarten Valentine’s Day cake. I wasn’t sure if this was in my skillset, but you were right. Anyone can do this. I should say that I haven’t decorated it yet, but I did practice and the piping was easy. I made the cake now as practice, but it came out so perfectly I’m just going to shove the whole thing in the freezer. Haha. The kids are going to freak out! The cake is so, so, sooo fluffy.
Aww, yay! I can’t tell you how wonderful this is to hear! I also make trial sweets for the kindergarten. ;) I love that you’re just going to freeze the cake and save it for the kids! Thanks a ton for your lovely comment. :)
I made with with my grandkids a bit early because they were visiting over the week and I won’t see them before VAlentine’s Day. It was much easier than we thought and everyone loved it. The kids had a ball doing the decorating by themselves. The taste was increidble. I’ll make this recipe from now on when we need a white or lemon cake. Thank you.
You’re welcome! I love that you made this with your grandkids early. :) And so fun that they got to decorate it! I wish I could see a photo of the result. :D Thanks a ton for your feedback!
This cake came out SO cute. My niece had her birthday last week so I made this and made it purple. The kids flipped out over it. I just used Wilton. And GIRL! It is so fluffy. You’re right and nobody was saying it wasn’t sweet enough. The last thing the kids needed was more sugar. 😅 I’m going to make this again for my boyfriend for the 14th!
Haha. So right about kids not needing any more sugar at a party. ;) I’m so glad that you liked the cake and will be making it again! I hope your boyfriend likes it just as much. :) Thanks for your comment!