

Witch Finger Cookies (Without Food Coloring!)


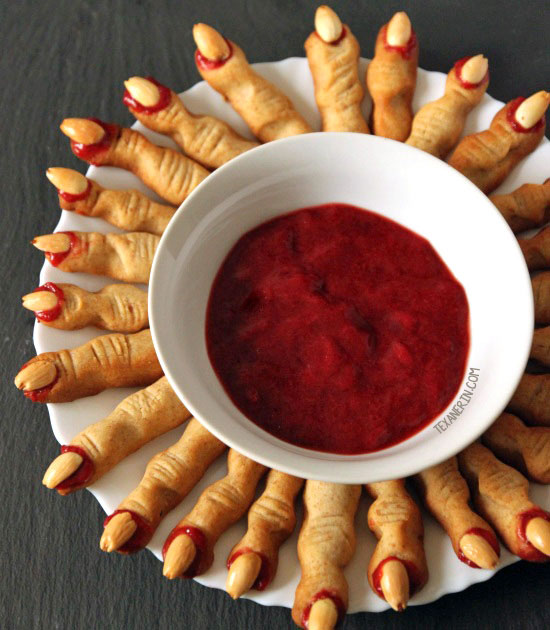
These witch finger cookies are crisp, buttery Halloween cookies shaped like creepy fingers, with almond fingernails and strawberry jam for the “blood.” There’s no red decorating gel needed, and I’ve included a separately tested gluten-free version below.
The knuckles, almond nails and jam around the nail beds make them plenty creepy, but they’re surprisingly easy to shape once the dough is chilled. You can also prepare them ahead of time, which makes them great for Halloween parties.
If you need a witches’ brew to serve alongside the cookies, try this non-alcoholic witches’ brew drink or this witches’ brew cocktail.

A lot of witch finger cookie recipes use red decorating gel around the nails. I prefer strawberry jam because you still get the gory blood effect, but it actually adds something delicious to the cookie.
A fairly smooth strawberry jam works best so it’s easy to dab under the almonds and around the knuckles. You can use store-bought jam or my strawberry jam. Raspberry jam also works.

Ingredients
- Butter – don’t substitute coconut oil or another oil. The cookies are designed to hold the finger shape, and changing the fat can cause them to spread and lose the details.
- Powdered sugar – I’ve only tested these with powdered sugar, so I don’t recommend replacing it with granulated sugar.
- Granulated sugar – this is optional, but I highly recommend it if you want a normally sweet cookie. Without it, the cookies are only lightly sweetened.
- Egg – use a large egg, about 50 grams out of the shell. I haven’t tested an egg substitute in the regular version, and I wouldn’t recommend experimenting here because the dough needs to hold its shape well.
- Vanilla and almond extracts – almond extract is especially good with the strawberry jam and adds a lot of flavor. If you need the regular version to be nut-free, use additional vanilla extract instead.
- Flour – all-purpose flour, white whole wheat flour or a combination of the two work. Don’t simply replace the flour with a gluten-free baking blend. The tested gluten-free version uses a different formula, which you’ll find below and in the recipe card.
- Almonds – blanched almonds make the most realistic fingernails, but there are several alternatives listed below.
- Strawberry jam – this replaces red decorating gel. Choose a jam without very large pieces of fruit so it’s easy to use around the almond nails. Raspberry jam also works well.

Other fingernail ideas
I think blanched almonds look the most realistic, but you can also use:
- Sunflower seeds for a nut-free version. Also replace the almond extract with vanilla
- Raw pepitas (pumpkin seeds), rather than roasted pepitas
- Peanut halves
- Blanched sliced almonds
How to make witch finger cookies

Start by beating together the butter and sugars, followed by the egg and extracts. Mix in the flour and salt just until you have a uniform dough.
Cover and refrigerate the dough for 40 minutes. Chilling makes it much easier to shape and helps the cookies keep their finger shape in the oven.

Work with about one-fourth of the dough at a time, leaving the rest refrigerated. I strongly recommend shaping and baking one test finger before forming the whole batch. That way, you can see exactly how much your dough spreads and whether you want to make the remaining fingers thinner or change the knuckle details.
Roll the dough to about the thickness of your pinky finger, but make the fingers slightly thinner than you want the baked cookies to be because they spread a little. Vary the lengths slightly for more realistic-looking fingers.

Press an almond firmly into one end of each finger for the nail. If you’re not using almonds, one of the alternatives above can be used instead.

Pinch the dough around the middle to form a knuckle. Then use a small, sharp knife to make shallow lines across the knuckle. Vary the length of the lines rather than making them perfectly even so the fingers look more realistic.

Arrange the fingers about 1 inch (2.5 cm) apart on a parchment-lined baking sheet. Bake at 325 °F (165 °C) for 17-22 minutes, or until they’re just lightly golden. Let them cool completely on the baking sheet.

Once they’re cool, gently remove each almond. Spoon a little strawberry jam into the indentation, replace the almond and press just enough for some jam to ooze around the nail. Add more jam around the knuckles if you want them extra gory.
Karl said, “These were way easier than I thought they’d be! I’m bad at this kind of stuff, but they came out perfectly. Thank you! My kids are gonna freak out!”

What do witch finger cookies taste like?
These witch fingers are somewhere between shortbread and butter cookies. They’re crisp and buttery, with almond and vanilla flavor and strawberry jam.
Without the optional granulated sugar, they’re only lightly sweet. I prefer adding it for a more normally sweet cookie, especially if you’re making them for kids or a Halloween party.

Gluten-free option
The gluten-free witch fingers require their own formula. Simply replacing the all-purpose or white whole wheat flour with a gluten-free baking blend didn’t work well in my testing.
When I used a gluten-free blend by itself, the cookies were sandy, spread too much and developed little cracks. Adding more baking blend to make the dough firmer only made the texture worse.
The solution was blanched almond flour. I originally made the gluten-free version with Bob’s Red Mill 1-to-1 Gluten-free Baking Flour plus 2/3 cup (66 grams) almond flour. The almond flour firms up the dough without giving the cookies that sandy texture.
I later tested the recipe with 2 2/3 cups (333 grams) King Arthur Measure for Measure Gluten-Free Flour and 1 egg white, and that batch came out looking even better. That’s now the primary gluten-free version in the recipe notes, but I’ve included the original Bob’s version there as well.
The gluten-free fingers don’t hold every little detail quite as perfectly as the wheat version, and you may see some small cracks, but they still look great.

The gluten-free cookies in the photo above were made with the Bob’s Red Mill version and broken pieces of cashews because that’s what I had on hand. Blanched almonds make much more convincing fingernails.
The gluten-free dough didn’t need chilling in my testing. The baked cookies are very fragile while they’re still warm, though, so let them cool completely and sit for about 2 hours before transporting them.
There’s no substitute for the almond flour in the gluten-free version, so you really do need it for this recipe. If you’re wondering what to do with the rest of the bag, I have lots of almond flour recipes.
Unfortunately not. Most regular sugar cookie and shortbread recipes spread too much to keep the finger shape. I know because I’ve tried. This recipe was tested specifically to hold the knuckles and almond nails.
For the regular version, you can use all-purpose flour, white whole wheat flour or a combination of the two. Don’t make a 1:1 gluten-free flour swap; use the dedicated gluten-free recipe instead.
Measure the flour by weight if possible, give the regular dough the full 40-minute chill and work with about one-fourth of the dough at a time while leaving the rest refrigerated. Flour and butter can also behave differently outside the US. I strongly recommend baking one test finger before shaping the whole batch so you can see how your dough behaves in your oven.
Yes. The regular dough can be refrigerated for up to 2 days, and you can also freeze the dough to bake another day. The baked cookies can be made ahead and stored in an airtight container until closer to serving time, then decorated with the jam. Once you’ve added the jam, refrigerate them in an airtight container. The recipe keeps for up to 1 week in the refrigerator. They also freeze great! I didn’t have any issues with them once they thawed.
Yes. Add 1/8 teaspoon green food coloring to the wet ingredients, then add more if needed. Gel coloring will give you the brightest green. Natural green food coloring can also be used, but the finished color will generally be more muted.
The regular version can be made without nuts by replacing the almond extract with additional vanilla and using sunflower seeds or raw pepitas instead of almonds for the fingernails. The tested gluten-free version can’t be made nut-free because it requires almond flour.
More fun Halloween recipes
- Halloween mac and cheese – creamy mac and cheese colored with a natural ingredient for a spooky Halloween dinner.
- Halloween cookie cake – a giant chocolate chip cookie loaded with Halloween candy and decorated for the holiday.
- Spider cupcakes – chocolate cupcakes topped with ganache and decorated to look like spiders.
- Monster burgers – spooky burgers with cheesy teeth and olive eyes. These Halloween meatballs are another fun savory option.
- Halloween fruit salad – an easy way to add something fresh and colorful to a Halloween party spread.

Please share your feedback by leaving a ✍️review and ⭐ rating – it helps me and others! I would really appreciate it. 🩷
This recipe was originally published in 2011. The photos were updated in October 2021. I’m keeping the old photo below for longtime readers who are trying to figure out whether this is the witch finger recipe they made years ago. :)

Witch Finger Cookies (without food coloring!)
Ingredients
- 1 cup (226 grams) unsalted butter softened
- 1 cup (115 grams) powdered sugar
- 1/2 cup (100 grams) granulated sugar highly recommended if you'd like a regularly-sweetened cookie
- 1 large egg 50 grams, out of shell
- 1 teaspoon almond extract
- 1 teaspoon vanilla extract
- 2 2/3 cups (334 grams) all-purpose flour see notes for gluten-free version
- 3/4 teaspoon salt
- 3/4 cup (105 grams) blanched almonds
- 1/2 – 1 cup (118 to 236 ml) strawberry jam
Instructions
- In a large mixing bowl, beat together the butter and powdered sugar (and granulated sugar, if using) together until fluffy.1 cup (226 grams) unsalted butter, 1 cup (115 grams) powdered sugar, 1/2 cup (100 grams) granulated sugar
- Add the egg, almond extract, and vanilla extract and mix.1 large egg, 1 teaspoon almond extract, 1 teaspoon vanilla extract
- When well combined, add the flour and salt.2 2/3 cups (334 grams) all-purpose flour, 3/4 teaspoon salt
- When thoroughly combined, cover with plastic wrap and refrigerate for 40 minutes or up to 2 days.
- Preheat your oven to 325°F (165°C) and line a baking sheet with a piece of parchment paper.
- Take about a fourth of the dough out of the fridge and begin rolling out the fingers. I recommend baking one test finger to begin with. Then you can make sure all the fingers come out the way you want them to. That way you don’t spend all your time rolling out all the cookies only to find out that you should have made them thinner or done the wrinkles a different way.
- I rolled them out the thickness of my pinky finger, but a bit longer.
- Add an almond to the tip for the fingernail, and press down to make sure it’s secure.3/4 cup (105 grams) blanched almonds
- Form a knuckle by squeezing around the middle.
- Use a sharp knife for the wrinkles in the knuckles and vary the length. That’ll create a more realistic finger.
- Place on the prepared cookie sheet, leaving about an inch (2.5 cm) between them. Repeat with the rest of the dough until the cookie sheet is full.
- Bake for 17-22 minutes or until slightly golden.
- Let the cookies cool on the sheet, and then remove the almonds from the cookies. Add some jam in the cavities and then put the almonds back, making sure you used enough jam for them to ooze a little. Also, add some jam around the knuckles for extra nastiness. I used about 1/2 cup jam and used the rest as “dip.”1/2 – 1 cup (118 to 236 ml) strawberry jam
- Refrigerate in an airtight container for up to 1 week.
Notes
- Flour – you can use all-purpose flour, white whole wheat flour or a mix of the two. For the gluten-free version, use the separate recipe below.
- 1 cup (225 grams) unsalted butter
- 3/4 cup (150 grams) granulated sugar
- 1 large egg white
- 1 teaspoon almond extract
- 1 teaspoon vanilla extract
- 3/4 teaspoon salt
- 2 2/3 cups (333 grams) King Arthur Measure for Measure Gluten-Free Flour
- 2/3 cup (66 grams) blanched almond flour




I followed the directions with the added sugar. They taste great,however, I made them a little large. They are still good but I should have made them as she suggested, the size of my pinky. Thanks for the recipe. It will be a new tradition. I’ve always made them using cheese. This is do much better.
I’m so glad that you enjoyed them! I’ve also made them a little too big a few times. Kind of funny looking. :D Thanks for your feedback!
I won First Place for the best “freaky food” at our neighborhood’s Halloween party. To save space on the buffet table, I put jelly in the bottom of an 11x7x4” high serving bowl and stood the cookies on end in the bowl. It was a huge hit. People were afraid to taste it because it looked so creepy, and didn’t know what to expect until I told them. They all loved the flavor. Making these again, for sure.
I’m really glad to hear that! I love that you won a contest with them. :) Thanks for your feedback! I hope they’ll be enjoyed as much next year.
I saw that you mentioned in the recipe that you have a gluten-free option – I don’t see it in the instructions?
Hi! It’s in the notes of the recipe (at the bottom). It’s too different from the traditional recipe so I had to list it elsewhere. This week, I tried them (meaning the gluten-free version listed in the notes section) using 2 2/3 cups (333 grams) King Arthur Flour Measure for Measure Gluten-free Flour, added 1 egg white, and the result is amazing. They came out looking better than the ones with Bob’s Red Mill. I hope that helps!
I made a few just to test it out so I know what to prepare for our upcoming Halloween party and these tasted soo good! I may have to make some more just for myself before the party. ;) Thanks for sharing!
Haha. Nothing wrong with that. :D I’m so glad that you enjoyed them! Thanks for your comment. :)
Hello, I did this but they didn’t hold their shape in the oven and returned really “flat”. I don’t know what I did wrong. Do you think it would help if I refrigerate de fingers before going to the oven? I used only powdered sugar I don’t know if that makes a difference?
Hi there! You can try refrigerating them, but they really shouldn’t be doing that, even when you just use powdered sugar. If you followed the recipe exactly and didn’t make any changes at all, do you maybe live outside of the US? Flour and butter can work very differently depending on what country you live in. I’m from the US and make my recipes for a US audience (I them with US brands), but live in Germany. If I made these with regular German butter and flour, they would absolutely spread and be a mess. I hope we can get the problem figured out. :)
I made these as a gift idea for my friend.
When she opened the box, she totally freaked out but at the same time laughed so hard! She thought they were real fingers! Haha. Anyway, I had fun making it at the same time, it also tastes great! More recipes like this, please!
Haha. I love that! You were so nice to make these for her! I’m so glad she enjoyed them. :) Thanks a bunch for your feedback!
Can I freeze the dough, and bake another day? Would love to make these with my students. We only have 70 mins in a class.
Yes, you can! I hope everyone has fun and enjoys them. :)
I’ve been thinking about what to prepare for our Halloween party and came across this recipe. I tried it and it’s actually delicious!! though it looked terrifying, the flavors actually worked. This is definitely on top of my food list for our Halloween party next week!
I’m so glad that you enjoyed them! And awesome that you’ll be making them again for your party. :) Thanks so much for your feedback!
Oh SO creepy!! Great recipe! Will be making these for Halloween, and I’m imagining how the kids would react to this. Do you have other alternatives for the Strawberry jam?
Raspberry? ;) You could also use decorating gel! Thanks a bunch for your comment. I’m so glad that you liked the cookies!