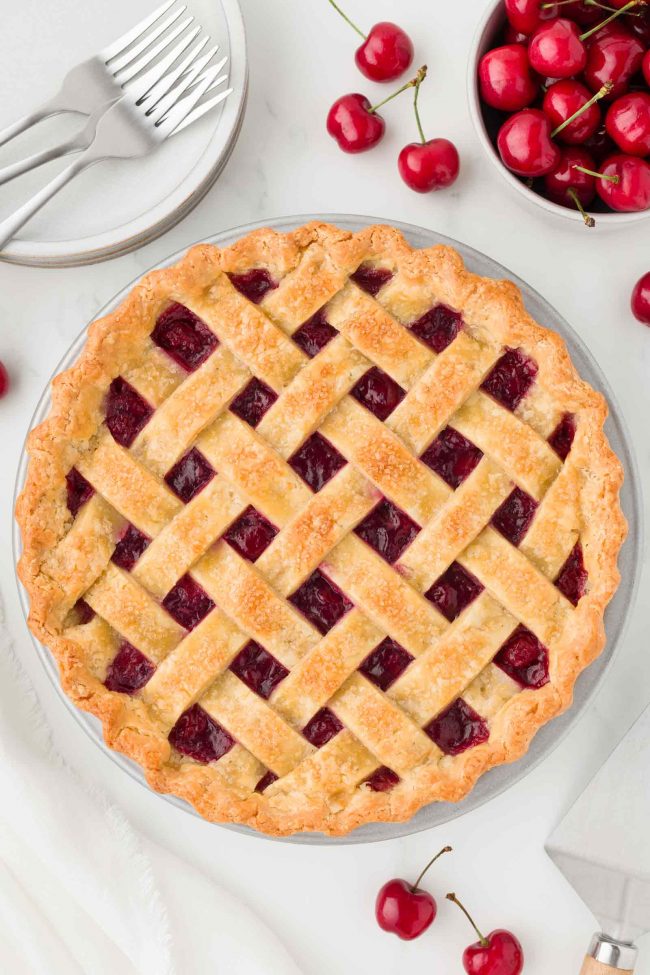
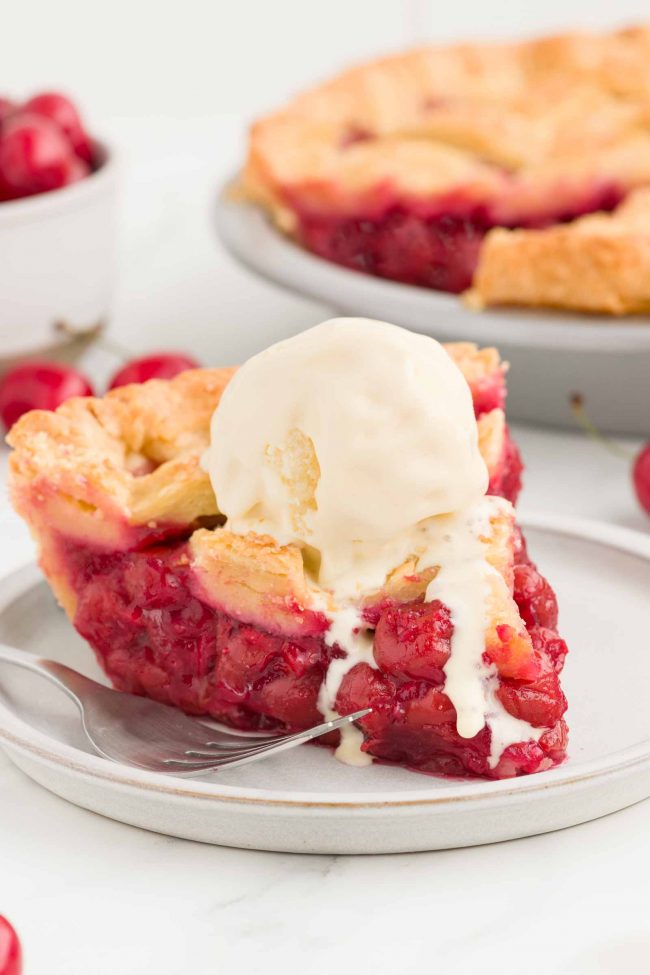
This tart cherry pie is the perfect dessert for any occasion, but especially great for summer picnics and July 4th. It blends the sweet and tangy flavors of sour cherries in a flaky, golden crust. It can be made year-round because it uses frozen cherries for the homemade chilling filling and the crust can be made with all-purpose flour or gluten-free flour. There’s also a vegan option!
If you’re a fan of cherry pie, you know there’s something magical about the combination of tart cherries nestled in a buttery, crisp crust.
But for many people (like me!), the idea of pitting so very many fresh cherries can be a deterrent. That’s where frozen tart cherries come to the rescue.
For the pie crust, I used my Gluten-free Pie Crust Recipe, but you can also use all-purpose flour in it.
You can actually use any flaky pie crust recipe you’d like.
You could also use a refrigerated or frozen pie crust. When it’s time to make the pie dough, start with Step 9.
If using a frozen pie crust, you can pour the cherry filling directly into the frozen crust unless the package directions say to let it defrost a bit first.
I want my pie crust crisp, so I’m all for blind-baking, but it’s definitely not necessary for this recipe!
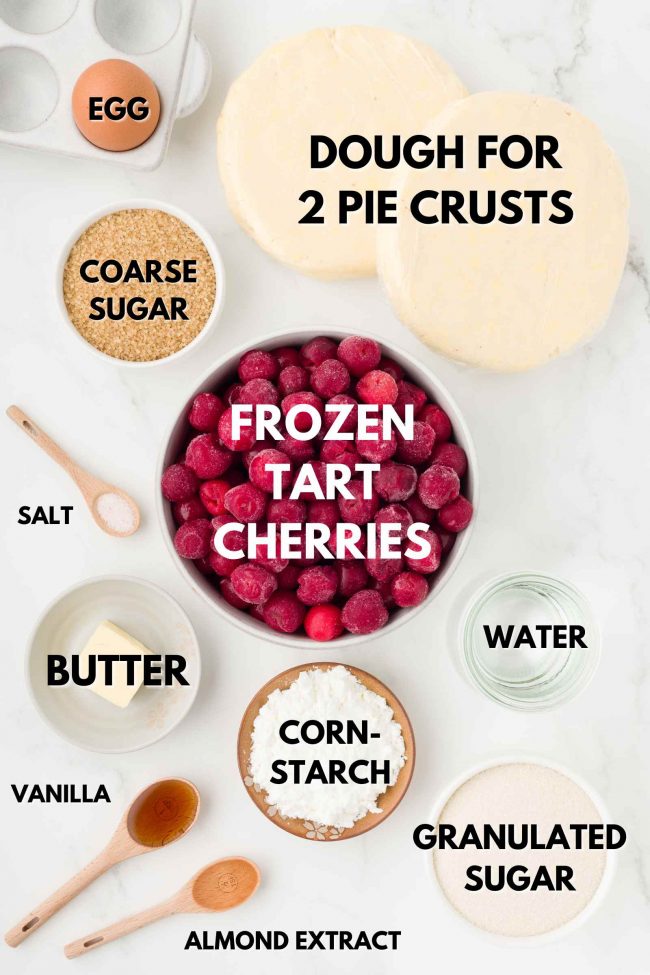
Ingredients
Here’s an overview of what you’ll need. Note that the ingredients aren’t to scale. So you don’t need so much coarse sugar to sprinkle over the pie crust or that much cornstarch, and you’ll need more cherries.
Why frozen cherries?
Using frozen tart cherries is super convenient. They’re already pitted and ready to use, saving you the time and annoyance of pitting fresh cherries.
Frozen tart cherries are available all year round, unlike fresh cherries, which have a relatively short season. This means you can enjoy a delicious tart cherry pie any time of the year, regardless of the season.
Frozen cherries are typically harvested and frozen at their peak ripeness. This ensures that you get consistently flavorful cherries for your pie, which might not always be the case with fresh cherries that can vary in ripeness and quality.
Where to buy
You can find frozen tart cherries in the freezer section of some grocery stores. They’re the standard variety of frozen cherries where I live, Germany, but several photographers I asked in the US didn’t have access to them.
Almost every larger grocery store like Kroger, Safeway, H-E-B, etc. have frozen sweet cherries, but tart are more difficult to find. I actually wrote the US tart cherry association two times to ask if they had any tips on where to find the frozen ones in California, where my main photographer lives, but never got a reply.
If you live somewhere where you can’t buy them, you might have to use fresh tart cherries. Or just use frozen or fresh sweet cherries! More on all those options below.
I don’t know if every location carries them, but I looked on Instacart and found that these stores carry them.
- H-E-B (Texas)
- Central Market (Texas)
- Meijer (Michigan, Ohio, Indiana, Kentucky, Illinois and Wisconsin)
- Hy-vee (Illinois, Iowa, Kansas, Minnesota, Missouri, Nebraska, South Dakota and Wisconsin)
- Chef’Store (Arizona, California, Idaho, Montana, Nevada, North Carolina, Oklahoma, Oregon, South Carolina, Texas, Utah, Virginia, Washington) – Here’s their store locator.
They have an 80-ounce bag of Dole Red Tart Pitted Cherries that sells for $25.79 at the few locations I came across when looking on Instacart. When I search the Chef’Store website for tart cherries, I don’t get any results, but they’re there on Instacart, so they exist in some stores at least.
You don’t need to look at buying them online unless you want to pay some crazy prices. Trust me. I spent a whole day desperately looking for frozen tart cherries in the US because I really wanted to share this pie with you all!
Can I used dried tart cherries?
There are pie recipes that already call for dried cherries. I would really recommend using one of those as you can’t just sub dried in for the fresh or frozen ones.
It seems as though you have to rehydrate dried cherries, and there’s quite a bit to it.
Can I use canned tart cherries?
A 15-ounce can of tart cherries is equal to about 1 1/2 to 1 3/4 cups of cherries.
This recipe calls for 2 pounds or 907 grams of frozen cherries.
1 cup of frozen tart cherries = 113 grams. That means you need about 8 cups of frozen cherries for this recipe. It sounds crazy, but remember they cook down when you make the filling.
To get 8 cups of cherries from a 15-ounce can, you’d need 6 cans of cherries. I looked on Instacart and a 14.5-ounce can of Oregon Red Tart Cherries is $7.99. That’s $48.
So, that’s absurd. There are recipes calling for canned tart cherries, and they only require 3 cans. So your best bet is to make one of those recipes (although it’d still be $24!).
How to use fresh tart cherries
If you have access to fresh tart cherries and want to use them instead of frozen, here are the adjustments you need to make:
- Pit the cherries. This can be done using a cherry pitter or by hand. Be sure to remove all the pits to avoid any unpleasant surprises in your pie.
- Decrease the cornstarch to 2 tablespoons and use 4 teaspoons of water to make the slurry. You can make and add more cornstarch slurry, if needed.
- You won’t need to cook the filling as long before adding the cornstarch slurry. Just keep a close eye on it!
How to use fresh sweet cherries
You need to do all the things listed in the previous section for fresh tart cherries AND decrease the sugar in the filling to 2/3 cup (133 grams). Taste the filling and add more, if desired. You might want to use up to 3/4 cup (150 grams) total.
How to use frozen sweet cherries
You’ll need less sugar. So decrease the sugar in the filling to 2/3 cup (133 grams). Taste the filling and add more if you want. You might want to use up to 3/4 cup (150 grams) of sugar total.
How to make the filling
The full recipe is at the bottom of the page, but here’s a step-by-step overview.
You can make either the filling or the pie dough first. Both of them need to chill, so the order doesn’t really matter.
One tip is not to cook the filling too long. I did that the first time. I figured if it was really thick, it’d make the pie easy to cut and that it wouldn’t bubble over onto the crust.
It was easy to cut, but instead of the extra moisture cooking off while the pie was baking (which is supposed to happen when baking a fruit pie), the filling just kind of spluttered around and made things a bit messy.
How to make the crust
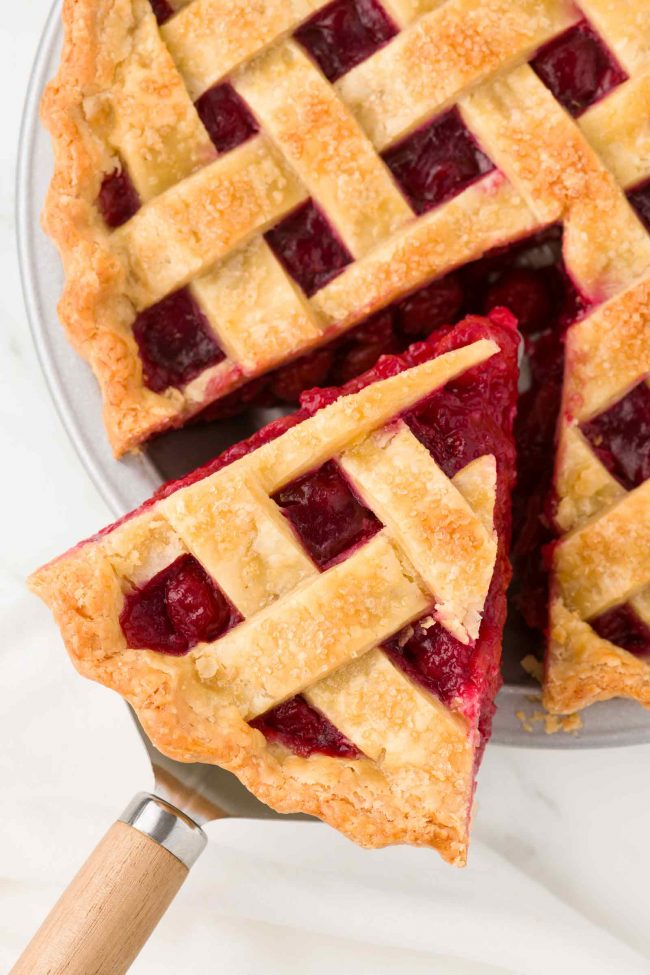
Creating a lattice pie crust can seem intimidating, but with a bit of practice and patience, it becomes… not that terrible. ;)
Tips for creating the lattice top:
- Ensure your dough is well-chilled before rolling it out. This prevents it from becoming too soft and sticky.
- Roll out the dough to an even thickness (about 1/8″ or .3 cm) to ensure uniform baking.
- For evenly sized strips, use a ruler and a sharp knife or pizza cutter. A pastry wheel can also give you decorative edges.
- Strips can be any width, but 1/2-3/4″ (1.25-1.9 cm) wide is common for a classic look.
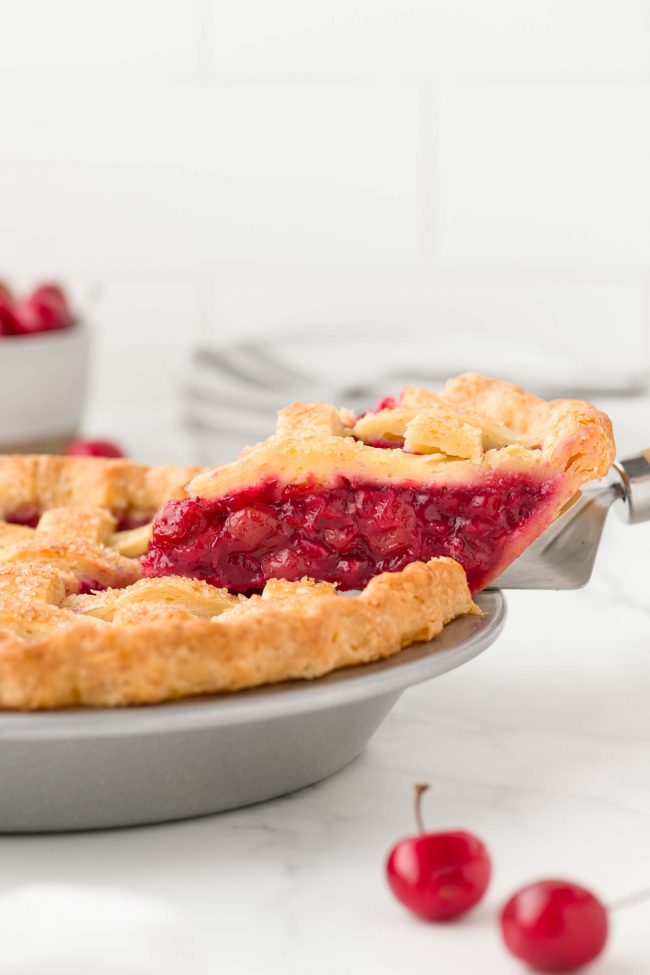
I formed somewhat of a thick and tall crust edge around the rim to prevent pie filling from bubbling over. I even used some of the extra dough from the bottom crust and the cut-off overhang to help with forming the thick edge.
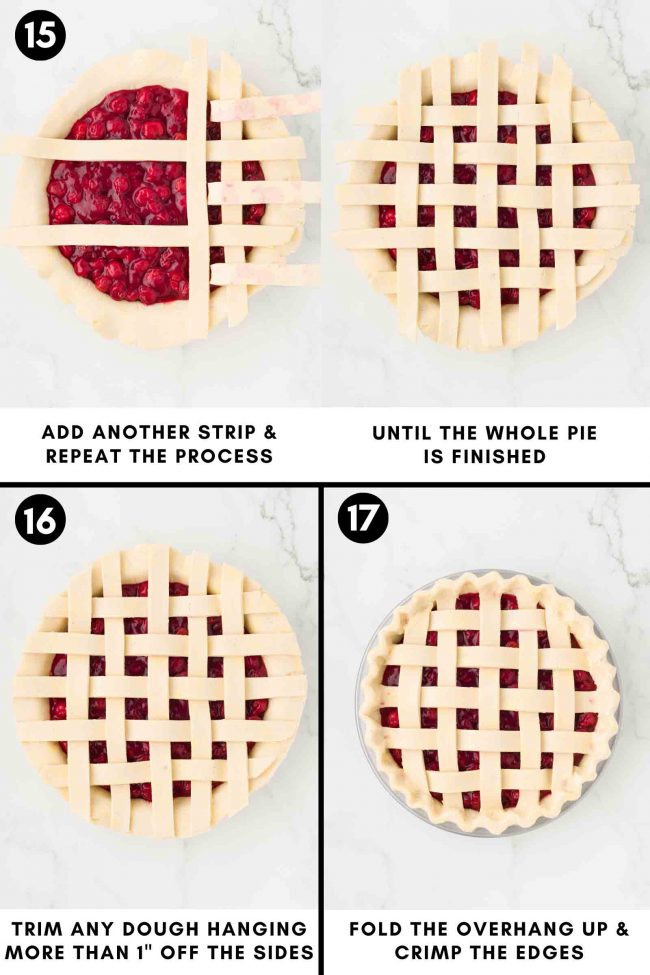
If you have the time and patience to crimp the sides – great! If not, your pie will be just as delicious. :)

Take your time during the weaving process. Rushing can lead to tearing or uneven strips. I know this because every pie I’ve made when rushing has been pretty ugly.
The more you practice, the better your lattice will look. Don’t be discouraged if the first few attempts aren’t perfect.
If the pictures and the descriptions in the recipe don’t make sense to you, I get it!
It’s hard to grasp the first time. So here’s a helpful how-to video I found.
This is just for the method of how to create the lattice design. I intentionally did a few things differently like trimming the dough and using the egg wash later in the process to form a thicker crust edge.
Make ahead
You can definitely make this tart cherry pie in all one go, but I much prefer to prepare the crust dough and filling the day before.
That way, I’m not already feeling annoyed when it’s time to do the lattice crust on the day of baking. ;)
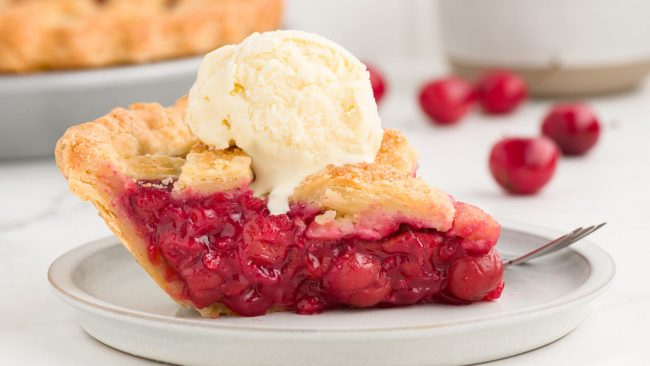
Keep in mind that the warmer the freshly baked pie is, the runnier the filling will be. The pie you see in the photos sat overnight.
Because crust is always best the day of baking, I recommend making the pie dough and filling a day ahead of baking. Then you can bake the pie the next morning which will give it time to settle and firm up before serving.
The dough
You can prepare the pie dough up to 3 days in advance. After making the dough, form it into two discs, tightly wrap with plastic wrap and refrigerate. When you’re ready to use the dough, let it sit at room temperature for about 10 minutes to soften slightly before rolling it out.
Pie dough can also be frozen for up to 3 months. Wrap the discs tightly in plastic wrap and then place them in a resealable freezer bag. Thaw the dough overnight in the refrigerator before using.
The filling
The cherry filling can be made up to 3 days in advance and stored in an airtight container in the refrigerator. This makes pie assembly quicker on baking day.
You don’t want to fill the pie with hot or even warm pie filling, so it needs to chill, anyway.
How to store
If you plan to eat the pie within 2 days, you can store it at room temperature. Cover the pie loosely with aluminum foil or plastic wrap to keep it fresh.
For storage beyond 2 days, cover the pie with plastic wrap or aluminum foil and place it in the refrigerator. The pie will keep well for up to 4 days. To serve, you can enjoy the pie cold, or reheat individual slices in the oven until warmed through.
To reheat, preheat your oven to 375 °F (190 °C). Cover the edges of the crust with foil and place the pie on a baking sheet. Heat it for 10-15 minutes, checking periodically to make sure that the crust isn’t burning. This method helps dry out any moisture and recrisp the crust.
But you’re not going to get it as crisp as when it’s fresh. But it’s still better than microwaving it!
How to freeze
Freezing the whole pie
I haven’t done this with this cherry pie, but this is what I would do based off of other fruit pies that I’ve frozen:
Freeze it unbaked – if you want to freeze the pie before baking, assemble the pie as directed but do not bake it. Wrap the pie tightly in plastic wrap, then in aluminum foil, and place it in the freezer.
When you’re ready to bake, do not thaw. Simply add an additional 15-20 minutes to the baking time, covering the crust edges with foil if they brown too quickly.
Freeze it after baking – to freeze a whole baked pie, allow it to cool completely. Wrap the pie tightly in plastic wrap and then in aluminum foil.
Then place in a large Ziploc bag. Freeze for up to 3 months. To serve, thaw the pie in the refrigerator overnight and then reheat in a 350 °F (175 °C) oven for about 15-20 minutes or until warmed through. You’ll probably want to cover the edges of the crust with foil or use a pie shield.
Freezing tart cherry pie slices
To freeze individual slices, I wrap each piece in some plastic wrap. I then put them in a Ziploc and make sure not to squish them when putting them in the freezer.
This is how I usually freeze my leftover pie. When I work on a new pie recipe, I make them several times, taking a few slices from each and then freezing the rest.
If you want very neat slices and have lots of freezer space, you can place the slices on a baking sheet and freeze until solid. Then wrap each slice in plastic wrap and then place them in a resealable freezer bag. Thaw slices in the refrigerator overnight and reheat as desired.

Gluten-free version
I used cornstarch in the cherry filling so that it’s naturally gluten-free, meaning you only have to worry about the crust.
I’ve tested the crust called for in the recipe with:
- Bob’s Red Mill 1-to-1 Gluten-free Baking Flour – the clear winner! SUPER flaky crust. It sounds like you’re crunching a bunch of chips when cutting through the crust.
- Authentic Foods Multi Blend Gluten-free Flour – the 2nd place winner! This is what the photographer used in these photos. I don’t have access to this flour where I live, but the recipe for their blend is actually found here.
And that’s what I used to test the recipe. Whether you buy it or make it yourself, you’ll want to add 1/4 teaspoon xanthan gum.
My photographer first used the Authentic Foods store-bought mix without adding any additional gum and found that the additional 1/4 teaspoon really helped. - King Arthur Flour Gluten-free Measure for Measure Flour – KAF is better than Bob’s in some recipes, but not this one. It was good for a GF crust.
- Cup4Cup Multipurpose Flour – I’ve heard people raving about this flour for years. It was my first time using it, and it’s just not made for this recipe. The results were good for a gluten-free crust, but not phenomenal like with Bob’s.
- Namaste Foods Gluten-free Organic Perfect Flour Blend – nope. Save this flour for another recipe because you don’t want to use it here.
- The homemade blend I used in my Gluten-free Banana Bread, which is a mix of white rice flour, potato starch, tapioca starch, and xanthan gum. I could already tell when mixing it up that this was going to be a weird crust. Do not try this. ;)
When made with Bob’s, this is the only flaky pie crust I’ve ever actually liked. No more picking at just the filling! Now my family and I pick at the crust as soon as it’s out of the oven.
Vegan version
You can use Violife vegan butter in place of the butter in the crust and filling (I’ve tested this out), and then choose one of these vegan egg wash subs to brush over the top of the pie crust.
They did a great experiment with loads of options and photos. So you can pick whichever sounds and looks best to you!
I hope you’ll enjoy this tart cherry pie! If you have any questions, feel free to leave them below. :)
Tart Cherry Pie

- Prep Time:
- Cook Time:
- Ready in:
- Yield: 8 slices
See notes for the vegan version!
Ingredients
- 2 pounds (907 grams) frozen pitted tart cherries
- 1 cup (200 grams) granulated sugar
- 1/8 teaspoon salt
- 3 tablespoons (28 grams) cornstarch
- 2 tablespoons water
- 1 tablespoon (14 grams) unsalted butter
- 1 teaspoon vanilla extract
- 1/2 teaspoon almond extract
- dough for 2 pie crusts, not baked (use a double recipe of this Gluten-free Pie Crust, which can also be made with all-purpose flour)
- 1 large egg, room temperature
- 1 tablespoon water or milk
- 1 tablespoon raw cane sugar or granulated sugar
For the filling:
For the crust:
For the egg wash:
Directions
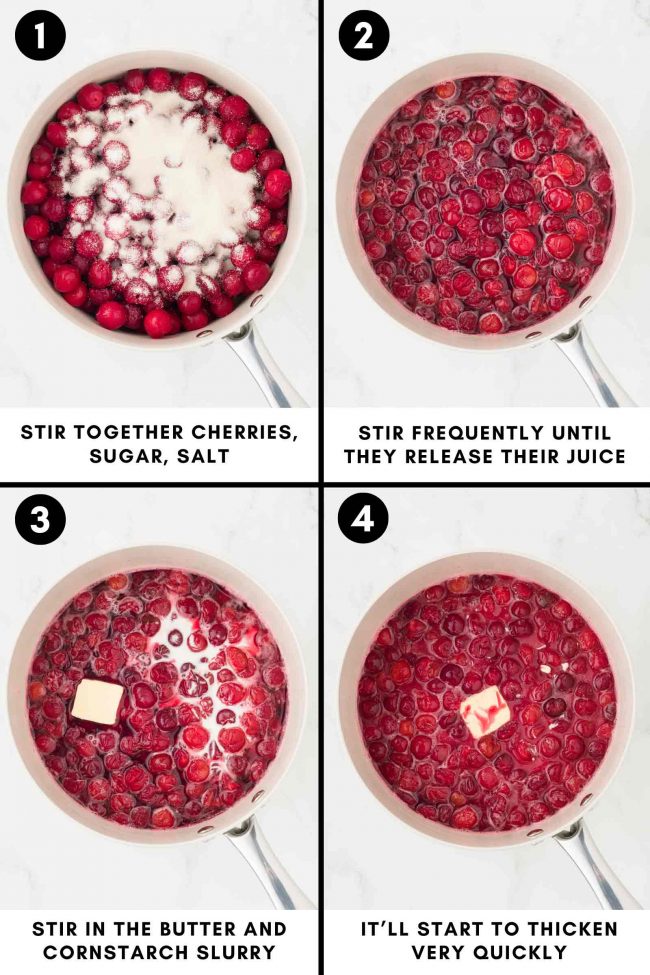
- In a medium saucepan over medium-high heat, stir together the still-frozen tart cherries, sugar and salt.
- Stir very frequently until the cherries start to release their juice, which will take about 9 minutes, but this will vary on your pan size, type, etc.
- Mix together the cornstarch with the water in a small bowl.
- Stir in the butter and the cornstarch slurry.
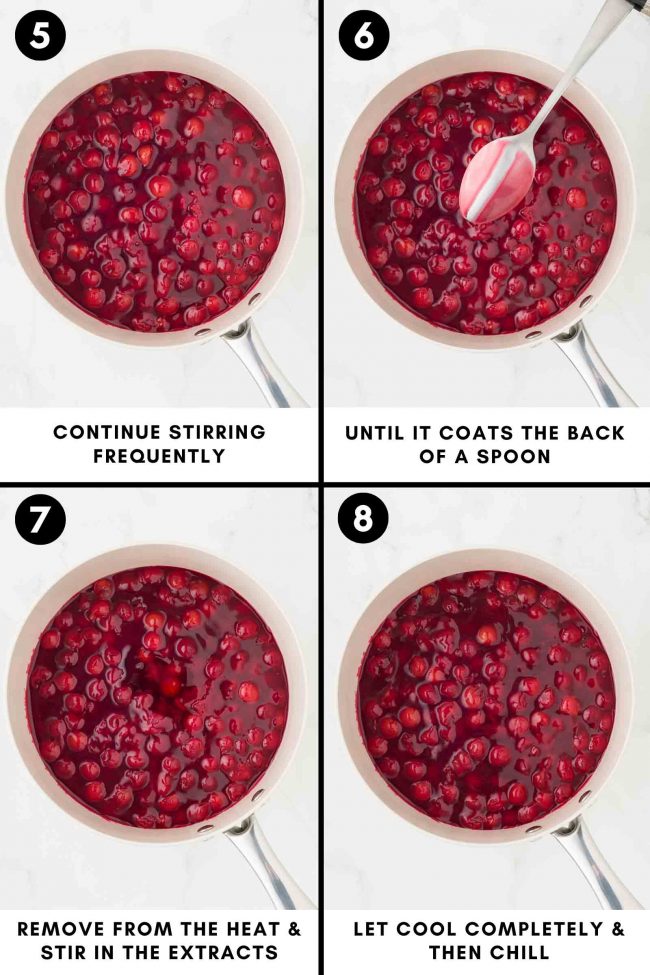
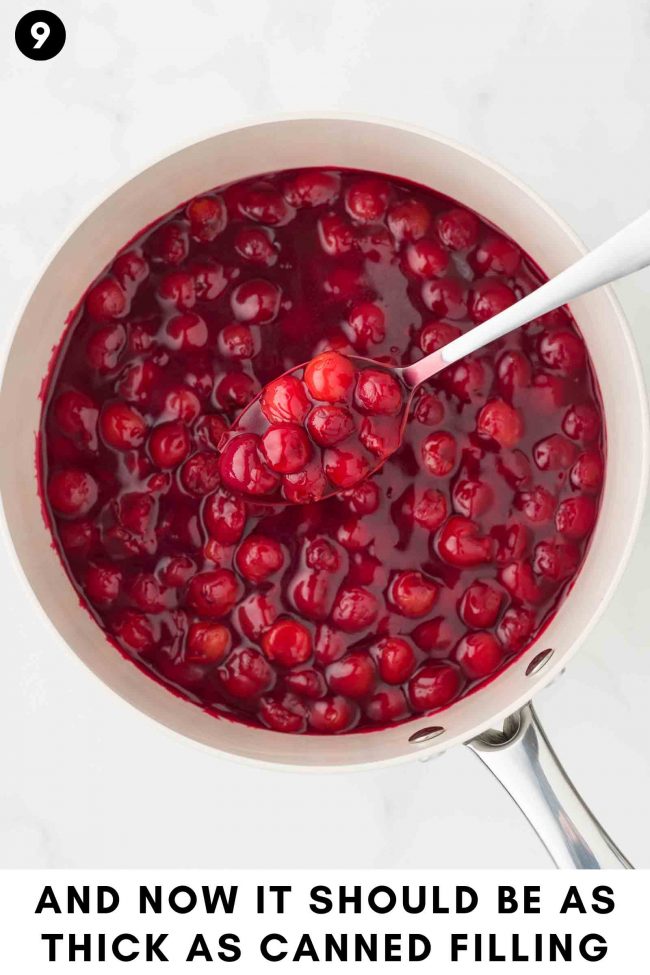
- Continue stirring very frequently until the mixture has thickened and coats the back of a spoon. This will take about 5-8 minutes. You’ll hear bubbling under the surface. You might start to get some bubbles around the edges. If it starts simmering before it thickens, turn the heat down to low or even off. You don’t really want to let it simmer. If you overcook cornstarch, it’ll cause stuff to break down. The cherry mixture shouldn’t be as thick as canned cherry pie filling right now.
- Remove the saucepan from the heat. Stir in the vanilla extract and almond extract.
- Place on a wire rack to cool completely, about 1-2 hours. Then refrigerate until cold, about 2-3 hours. You can also chill it overnight or up to 3 days.
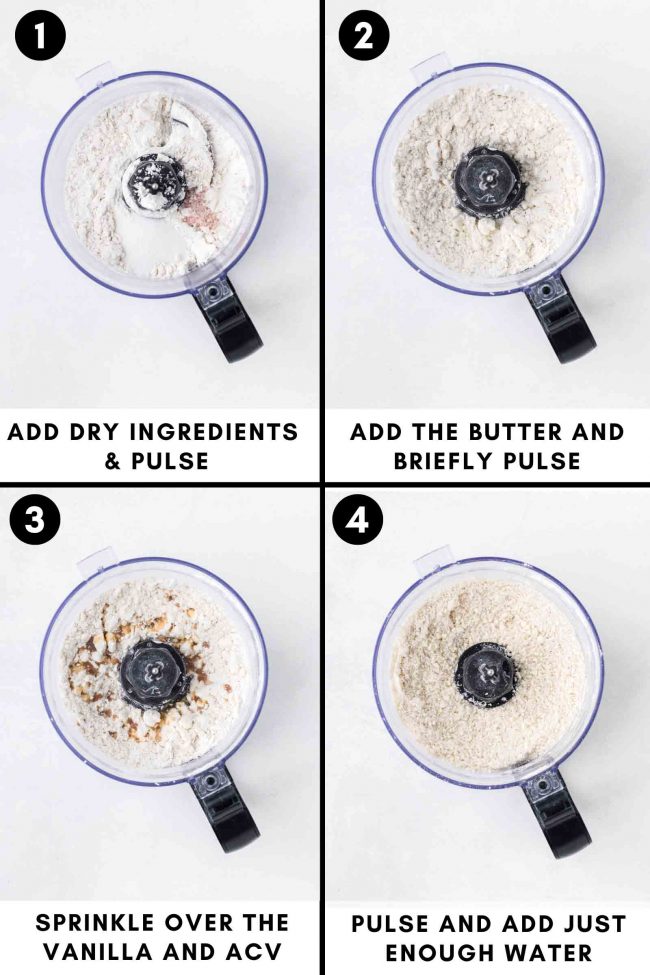
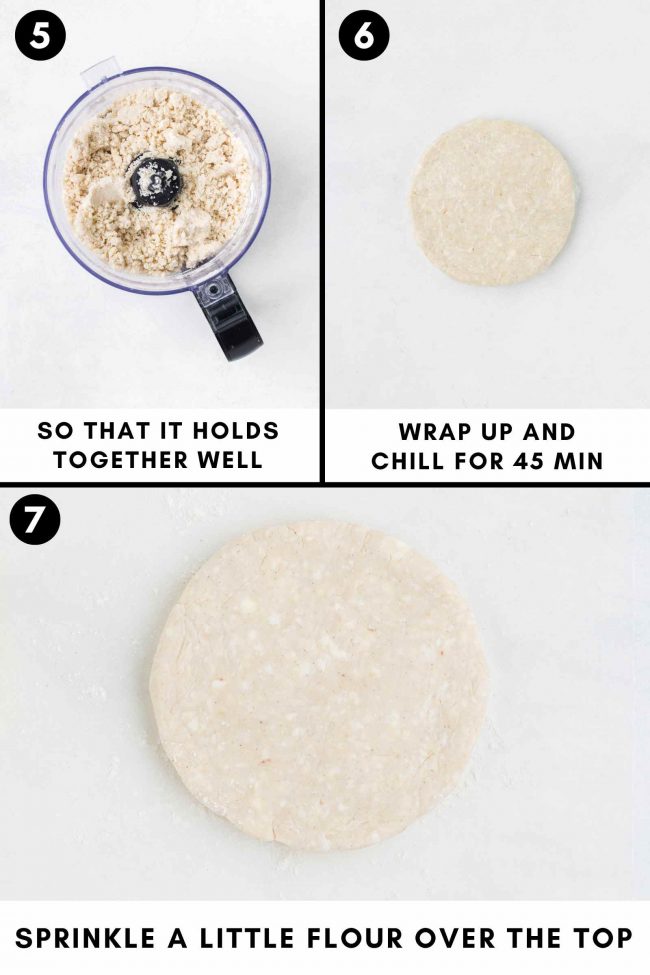
- While the filling is cooling, prepare the crust. When the dough is ready, separate it into two discs that are equal in weight (mine were 345 grams each, but this will depend on your flour mix and how much water you use) and refrigerate, but don’t stack them on top of each other. This allows them to chill more evenly and quickly. Chill the dough for a minimum of 45 minutes and up to 3 days.
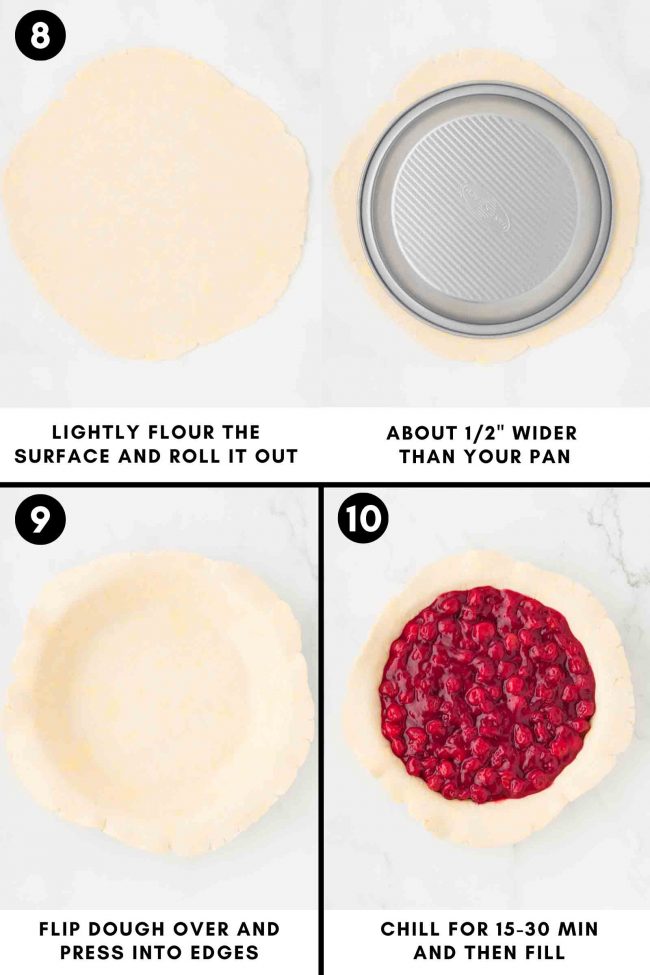
- Get out a 9” (23 cm) pie pan. Take out one disc of dough. Lightly flour a piece of parchment paper and place the unwrapped dough on it. Sprinkle a small amount of flour over the dough.
- Cover the dough with plastic wrap or another piece of parchment paper and roll it out to be approximately 1/2” (1 1/4 cm) wider than the top circumference of your pie plate.
- Remove the plastic wrap or parchment covering the pie crust, place the ungreased pie pan on top of the dough, and flip over the dough and pan. Press the dough down around the edges at the bottom of the pan, then remove the parchment paper. Don’t trim the dough around the edges.
- Place the pan on a baking sheet or something so that you don’t make a mess in your fridge. Chill the crust, uncovered, for 15-30 minutes before filling. You don’t want it to get too chilled, or else it’s too hard to tuck the pie crust strips into the dough on the rim of the pie pan.
- While it’s chilling, prepare the lattice crust strips.
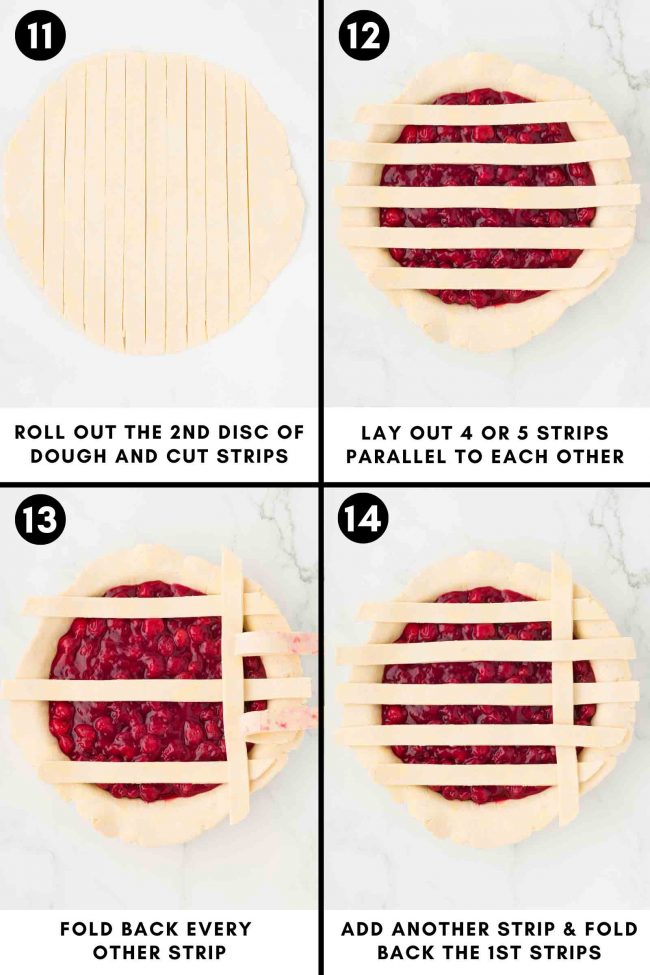
- Roll out the second portion of dough into a similar-sized circle for the lattice strips.
- Using a sharp knife or pastry wheel, cut the rolled-out dough into even strips. The width can vary based on your preference, but 1/2 to 3/4 inch is standard. Using a ruler can help you get even strips.
- Scoop the chilled cherry filling into the crust. Make sure that the filling is spread evenly; it shouldn’t be mounded, with the center higher than the sides. You want the filling to touch the edges of the pan.
- Lay out 4-5 strips parallel to each other across the top of the filled pie, leaving some space between each strip.
- Fold back every other strip most of the way, then lay another strip perpendicular to the folded-back strips. Unfold the folded strips over the perpendicular strip. Fold back the alternate strips that were not folded the first time, lay down another perpendicular strip, and unfold the strips again. Repeat this process until the entire pie is covered in a lattice pattern.
- Use scissors to trim any dough that’s hanging more than 1” off the sides of the pan.
- Fold the overhang up and towards the center of the pie, which will tuck the ends of the strips into the overhang.
- Press to seal. I formed somewhat of a thick and tall edge around the rim to prevent pie filling from boiling over. I even used some of the extra dough from the bottom crust and the cut-off overhang to help with that.
- Crimp the sides if you'd like.
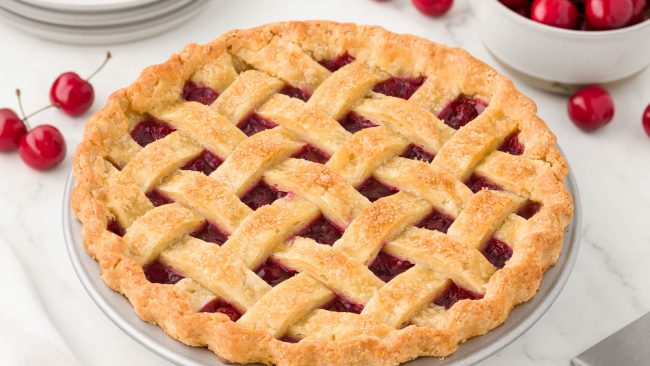
- Chill the whole pie, uncovered, for 30 minutes before baking. While it’s chilling, place a baking sheet that’s big enough to catch any spillage in the lower third of the oven on the rack. Preheat the oven to 425 °F (218 °C). Mine takes 10 minutes to reach that temperature, so I start preheating the oven 20 minutes after I put the pie in the fridge.
- After 30 minutes of chilling, whisk together the egg and water in a small bowl. Brush the lattice and the edges of the crust with the egg wash. Sprinkle the coarse sugar over the lattice crust.
- Place the chilled pie on the hot baking sheet in the preheated oven.
- Bake for 15 minutes, then lower the temperature to 375 °F (190 °C) and bake for another 30-35 minutes. The filling will be a bit bubbly on the sides of the pan, and the top will be golden brown. Use a pie shield or cover the crust with foil if it starts to brown too quickly (I didn't need to do this).
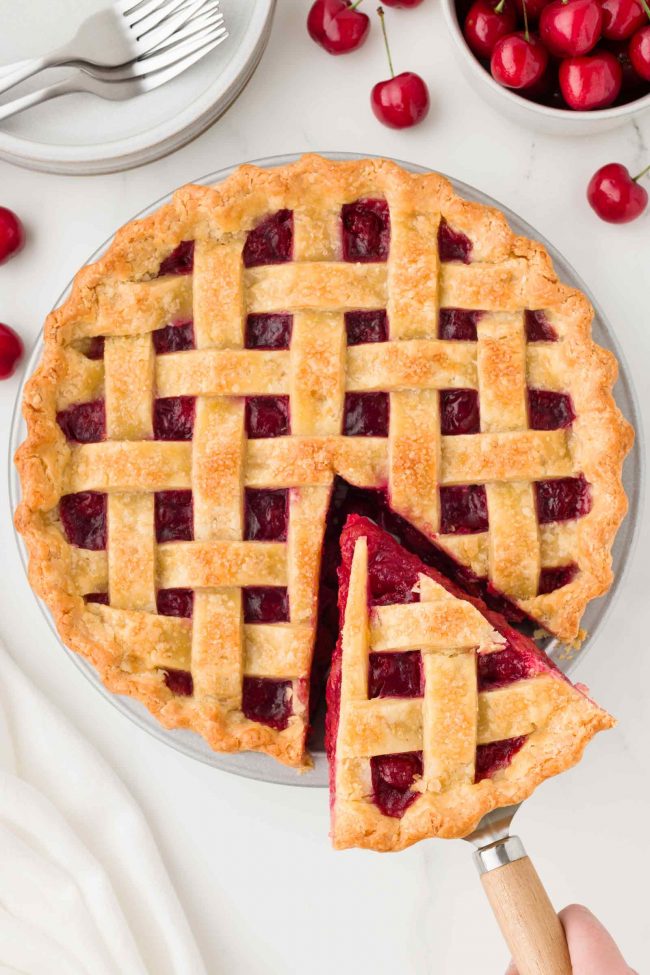
- Remove to a wire rack to cool at least 2 hours. The warmer it is, the runnier the filling will be. The pie you see in the photos sat overnight. Because crust is always best the day of baking, I recommend making the pie dough and filling a day ahead of baking. Then you can bake the pie the next morning which will give it time to settle and firm up before serving.
- If you plan to eat the pie within 2 days, you can store it at room temperature. Cover the pie loosely with aluminum foil or plastic wrap to keep it fresh. For storage beyond 2 days, cover the pie with plastic wrap or aluminum foil and place it in the refrigerator. The pie will keep for up to 4 days. See post for tips on reheating and freezing.
Prepare the filling:
Prepare the crust:
Assemble the pie:
Bake:
How to store:
Notes
- To make it vegan, use Violife vegan butter in the crust and filling, and choose one of these vegan egg wash subs.
Join over 12,400 readers and sweeten up
your inbox with new posts for free!
This subscription is free of charge and can be canceled at any time.


11 comments on “Tart Cherry Pie” — Add one!
3 comments are awaiting moderation!
I decided to bake a cherry pie for Christmas this year when I found frozen tart cherries for sale at Azure Standard. Then I had to locate a recipe tailored for frozen cherries, which led me here. My whole family raved about the flavor and texture of the pie made with frozen cherries; itv was so much better than the lifeless, mushy canned cherries.
I’m so glad that you found the recipe and that your family enjoyed it! Lifeless and mushy is such a great way to describe canned cherries. 😆 I totally agree with you. Thanks a bunch for your feedback and I wish you a nice start to 2025!
This is a fabulous summer pie, Erin!!! I can find frozen cherries at Kroger and Whole Foods—they worked great!!
Cherries shrink a bit when cooked (not as much as apples do), so you don’t need as many canned ones as you think. My mom used to make them with three cans of cherries (back when the can was a full pound).
I’m sorry for just now seeing your message! And yes, I definitely think people should use a recipe already calling for canned cherries if that’s what they want to use. :) It’s too troublesome to convert from a recipe using frozen cherries.
I’m so glad that you posted this! We had just home come from cherry picking and then your newsletter came in. I made this right away and it was PERFECT. Loved the crust, loved the filling. My family of 4 ate it in one sitting! We couldn’t even wait for it to cool properly. THANK YOU! 😍
You’re welcome! I’m so glad that it came out well and that your family enjoyed it so much! I can totally see 4 people finishing it off in one sitting. ;) Thanks so much for your feedback!
This pie is fantastic! It tasted so good, especially with ice cream on top. Will definitely be making this pie for Thanksgiving!
Oh, yay! I’m so glad that it made the Thanksgiving list. :D Thanks so much for your comment!
You have made a lovely pie! We have 2 sour cherry trees in our backyard. Every year we pick a lot of them. Pit them and freeze. It’s a lot of work but we love the pie. They are expensive and hard to find to buy, plus ours are organic, so worth the effort.
Thank you! And wow. A cherry tree sounds really nice! If I had cherry trees, I would definitely also pick, pit and freeze them. :) I hope you’ll get to try the pie out!