

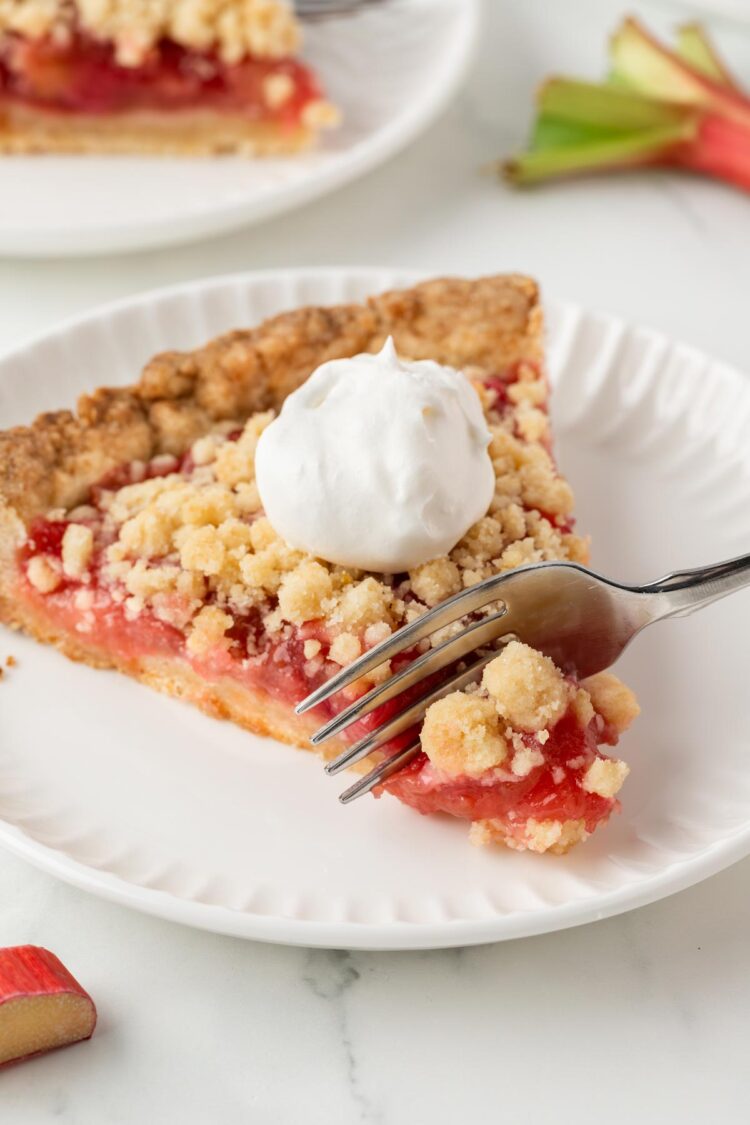
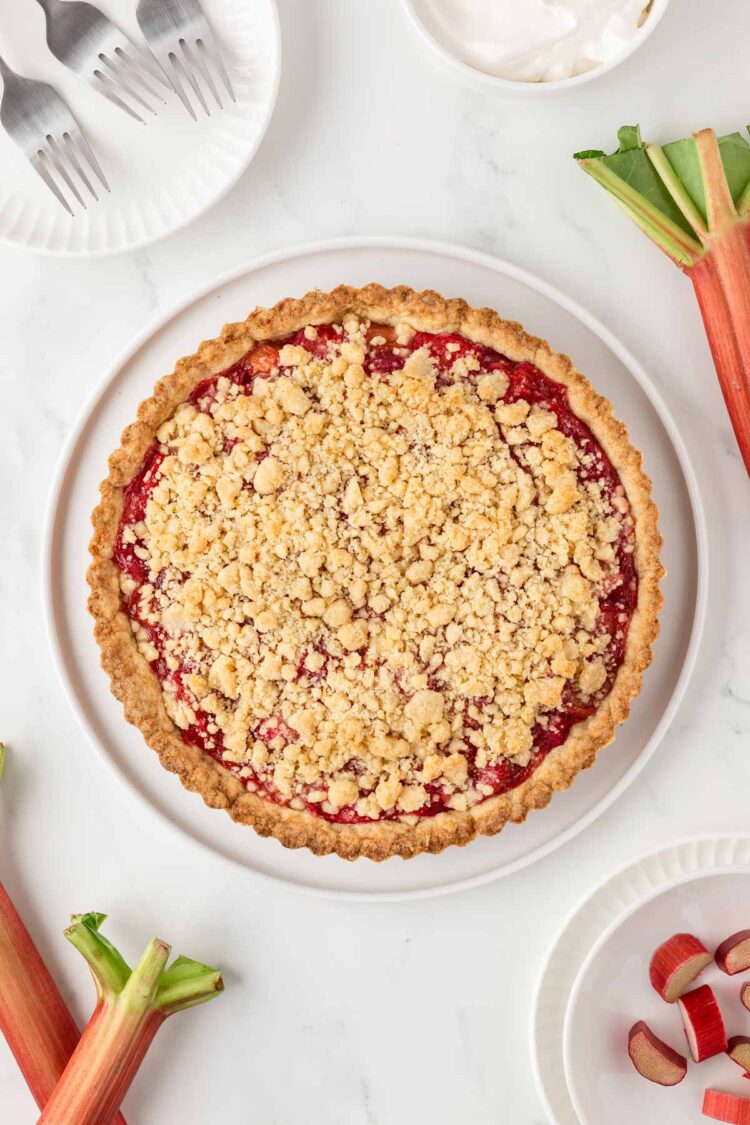
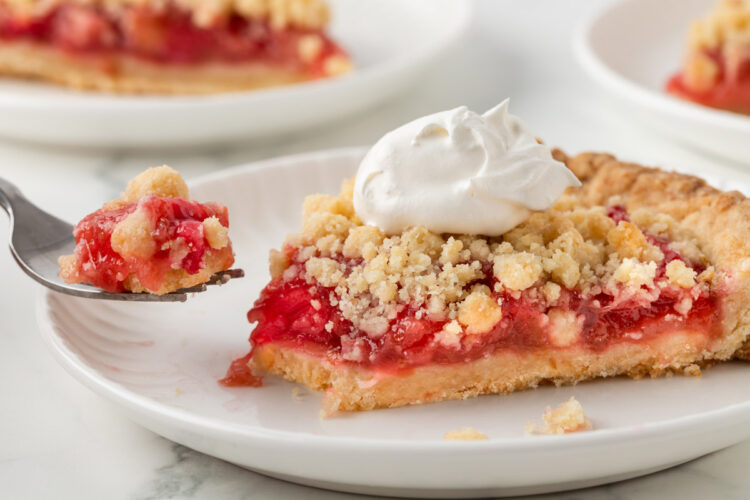
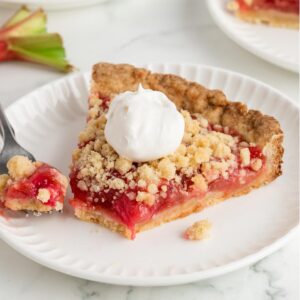
Rhubarb Tart
This rhubarb tart has a buttery press-in crust, a thick rhubarb filling, and a crumb topping made from the same exact mixture as the crust. You simply reserve part of the crust mixture for the topping, which keeps the recipe simple and gives the tart a nice contrast between the crisp crust, soft filling, and crumbly topping.
The filling is cooked on the stovetop first, which gives it a firmer texture and keeps the tart from turning watery after baking. It can be made traditionally or gluten-free, vegan and dairy-free.
I’m super excited about this tart! I recently found myself with a massive amount of rhubarb, and since I was in a rush, I quickly made one of the recipes that was at or near the top of the google search results for rhubarb tart.
In that recipe, you mix the raw rhubarb together with the sugar and a few other ingredients and spread it directly over the crust before baking. I remember thinking there was no way the crust was going to stay crisp, and I was right. I don’t know if other people actually like soggy crusts or if they just don’t mind them, but I definitely do not.
So with this recipe, the filling is cooked on the stovetop first, which helps it thicken properly and keeps the tart from turning watery after baking. The filling itself isn’t overly sweet, and the lemon helps brighten the rhubarb flavor without making the tart taste like lemon.
And you don’t need to blind bake the crust first! I almost always do this, but it’s totally unnecessary for this recipe.
Frozen rhubarb works just fine here, so you don’t have to wait for rhubarb season to make it.
If you’re looking for more rhubarb recipes, I also have these Rhubarb Bars, this creamy Rhubarb Fool, this Strawberry Rhubarb Crisp, and this Rhubarb Cake.
- Cooked filling – pre-cooking the rhubarb gives the tart a thicker, more stable filling.
- Press-in crust – no rolling pin or pie dough experience needed.
- Crumb topping – uses the same mixture as the crust, which keeps things simple.
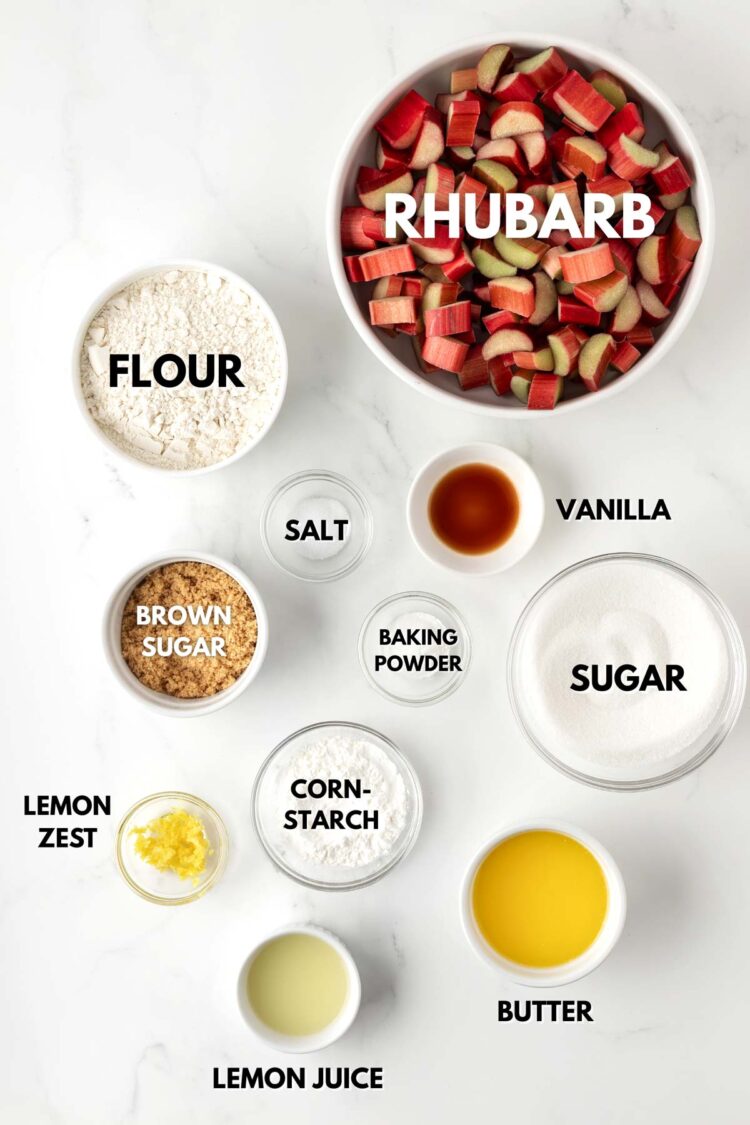
Ingredients
These are just some notes on selected ingredients. Please scroll down for the full recipe.
- Rhubarb – if using frozen, please read the notes at the bottom of the recipe!
- Cornstarch – I highly recommend weighing it because cornstarch measurements can vary a lot depending on how it’s scooped.
- Lemon zest – helps brighten the filling and balance the rhubarb flavor. You can omit it if you like, but I think it’s a good addition. I’ve also used cinnamon in place of the lemon flavor, and everyone agreed the lemon version was better.
- Butter or coconut oil – the tart in the photos uses regular butter. For a dairy-free or vegan version, use the coconut oil + water option in the recipe instead of doing a straight swap. Coconut oil is 100% fat, while butter is only about 80–84%, which means using it 1:1 can make the crust/topping too greasy. Using slightly less coconut oil plus a little water better mimics how butter behaves. I recommend refined coconut oil so the crust and topping don’t taste like coconut. Vegan butter also works, and in that case you should use the same amount as the butter called for.
If you’re wondering if you can just use Rhubarb Compote or Rhubarb Preserves in place of the cornstarch-thickened filling in this recipe, I wouldn’t recommend it. You need some starch to keep the filling thick enough to not soak the crust.
Fresh vs. Frozen Rhubarb
Fresh rhubarb was used in the tart in the photos, but I’ve also tested it with frozen. Both versions tasted the same, but please note that frozen rhubarb often loses its pink color. Mine was more of a beige color.
Frozen rhubarb also usually releases more liquid while cooking, so the filling may need longer on the stovetop.
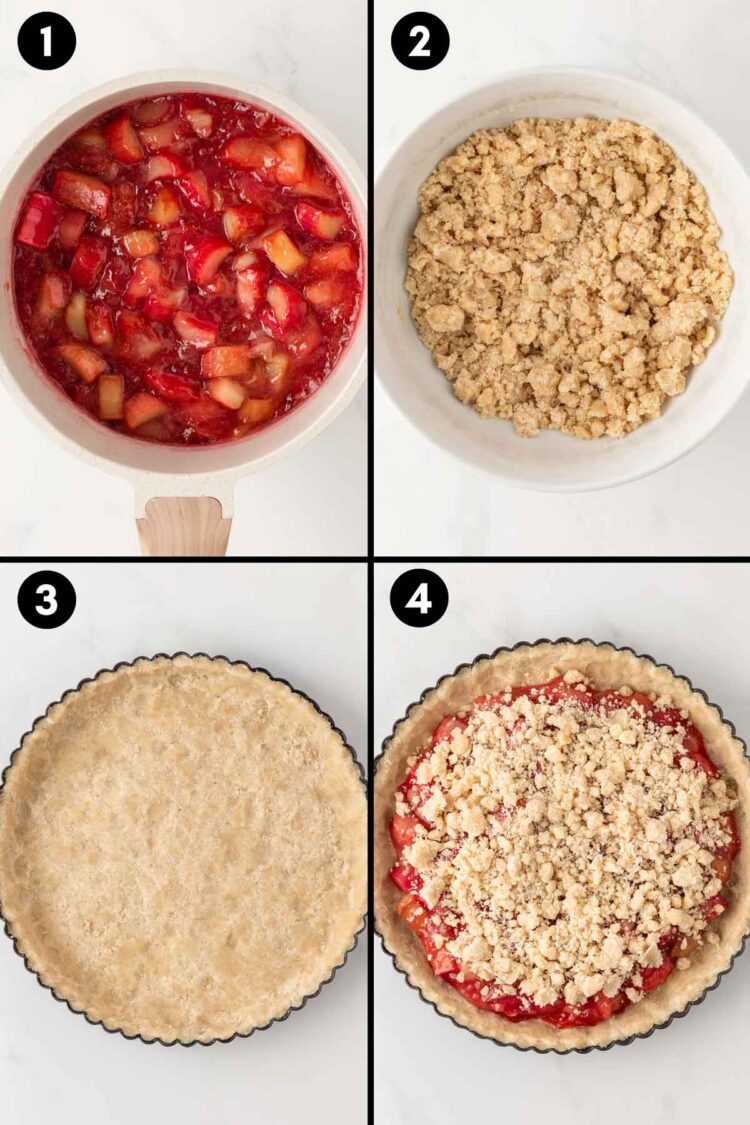
How to Make It
You’ll start by cooking the rhubarb filling on the stovetop until thickened. After the filling cools, make the crust and topping mixture, reserving part of it for the topping.
Press the remaining mixture into a 9-inch (23cm) tart pan, spread the cooled filling over the crust, and sprinkle the topping over the top. Bake until the topping looks baked through and lightly golden.
- Weigh the cornstarch – too much can make the filling overly firm or gummy.
- Let the filling cool completely – spreading warm filling onto the crust would likely make your crust mushy.
- Don’t bring the crust all the way up the tart pan – the filling should stay contained within the crust border.
- Press down the topping gently – this helps prevent small bits from overbrowning.
Troubleshooting
- Filling too loose – the cornstarch may not have fully boiled long enough to activate.
- Crust too crumbly – the mixture may not have been pressed firmly enough into the pan.
- Topping browning too quickly – loosely tent the tart with foil near the end.
- Filling leaking into the crust edge – the filling may have been spread too close to the sides.
How to Make Ahead, Store and Freeze
If making this the day of serving, just keep it covered loosely with plastic wrap and keep it on the counter. If you put it in an airtight container, it’ll soften more quickly because the trapped moisture gets absorbed back into the crust and topping.
If you want to serve it on day 2, cover and refrigerate it. I recommend loosely covering it rather than storing it in an airtight container. The topping will still soften some in the fridge because of the moisture in the filling, but loosely covering it helps slow that down a bit.
Chilling doesn’t make the tart soggy because the filling is already cooked down and thickened on the stovetop before baking, so there isn’t excess liquid continuing to seep into the crust as it sits. The crust and topping just gradually lose their crispness over time from the normal moisture in the filling.
You can freeze the baked tart for up to 2 months, but keep in mind that the crust will be very soft after thawing. It’s pretty much impossible to get it fully crisp again (I really tried!).
more fruity tarts
All of these can be made traditionally or gluten-free.
- Fruit Tartlets – mini tartlets with pastry cream (or cream cheese filling) and fresh fruit on top. These are especially great for baby showers, Mother’s Day or picnics and BBQs!
- Raspberry Tart – this is one of my favorite recipes ever! It has a no-bake cheesecake filling with raspberry sauce on top.
- Cheesecake Tart – combines a creamy cheesecake filling with a graham cracker crust.
- Peach Tartlets – individual tartlets topped with peaches and a buttery crust.
- Blueberry Tartlets – small blueberry tartlets that are great for summer.
Rhubarb Tart
Ingredients
For the filling:
- 1 pound (453 grams) chopped fresh or frozen rhubarb about 4 cups or 4 large stalks, cut into 1/2” pieces
- 3/4 cup (150 grams) granulated sugar
- 1 tablespoon lemon zest
- 1/4 teaspoon salt
- 2 1/2 tablespoons (25 grams) cornstarch please weigh this!
- 2 tablespoons lemon juice
- 1/2 teaspoon vanilla extract
For the crust + topping:
- 2 cups (250 grams) flour see notes
- 1/2 cup (100 grams) granulated sugar
- 1/4 cup (50 grams) brown sugar
- 3/4 teaspoon baking powder
- 1/4 teaspoon salt
- 3/4 cup (168 grams) melted unsalted butter or for dairy-free and vegan, use 2/3 cup (150 grams) refined coconut oil + 1 tablespoon water
- 1 teaspoon vanilla extract
Instructions
Make the filling:
- To a medium saucepan, add the chopped rhubarb, sugar, lemon zest, and salt. Bring the mixture to a boil over medium-high heat while stirring frequently. Once it reaches a boil, turn the heat down slightly but maintain a steady simmer.1 pound (453 grams) chopped fresh or frozen rhubarb, 3/4 cup (150 grams) granulated sugar, 1 tablespoon lemon zest, 1/4 teaspoon salt
- Continue to cook the rhubarb for about 7-10 minutes, or until it has reduced and thickened quite a bit.
- In a small bowl, whisk the cornstarch with the lemon juice to create a smooth slurry. Pour this mixture into the simmering rhubarb while stirring constantly to prevent any clumping.2 1/2 tablespoons (25 grams) cornstarch, 2 tablespoons lemon juice
- Allow the mixture to come back to a boil and cook for just 1 minute. This activates the cornstarch to ensure a firm set for the tart.
- Remove the pan from the heat and stir in the vanilla extract. Let the filling cool completely, about 40 minutes, before spreading it over the tart crust. I start preparing the crust/topping 30 minutes after the filling is done cooking.1/2 teaspoon vanilla extract
Make the crust/topping:
- Preheat the oven to 350 °F (175 °C). Place a rimmed baking sheet on a rack in the lower third of your oven. This is on the off chance that something leaks, helps the crust brown better and makes removing the tart from the oven easier. Get out a 9” non-stick metal tart pan with a removable bottom.
- In a large mixing bowl, stir together the dry ingredients (flour through salt).2 cups (250 grams) flour, 1/2 cup (100 grams) granulated sugar, 1/4 cup (50 grams) brown sugar, 3/4 teaspoon baking powder, 1/4 teaspoon salt
- Add the vanilla to the melted butter and stir into the dry mixture. Use a wooden spoon to combine it the best you can, then use your hands to bring it together. It’ll look soft and slightly clumpy. It won’t form a smooth ball, but it should hold together when pressed between your fingers.3/4 cup (168 grams) melted unsalted butter, 1 teaspoon vanilla extract
- Reserve 200 grams (a little less than 1 cup) to use for the topping.
- Press the remaining mixture into the ungreased tart pan, only going about 2/3 up the sides of the ungreased tart pan.
- Leaving a 1/2" border around the edge, ensuring the filling doesn't touch or go over the sides of the crust, spread the filling over the unbaked crust and smooth it into an even layer using a spatula.
- Sprinkle the remaining topping over the top of the rhubarb mixture and very gently press down so no pointy bits are sticking up (you don’t want them to burn).
- Very carefully place the tart on the preheated baking sheet and bake for 33-38 minutes or until the topping is clearly baked and turning a very light brown. My filling didn’t bubble at all, and it was fine. The sole purpose of baking the tart is to bake the crust and topping.
- Remove the tart and baking sheet from the oven and place on a cooling rack to cool for 30 minutes or until you can easily remove the tart pan from the baking sheet without burning your hands.
- Place the tart pan on the cooling rack to cool for another 1-2 hours.
- If making this the day of serving, just keep it covered loosely with plastic wrap and keep it on the counter. If you put it in an airtight container, it’ll soften more quickly because the trapped moisture gets absorbed back into the crust and topping. If you want to serve it on day 2, cover and refrigerate it. I recommend loosely covering it rather than storing it in an airtight container. The topping will still soften some in the fridge because of the moisture in the filling, but loosely covering it helps slow that down a bit.
Notes
- If using frozen rhubarb, please note that frozen rhubarb often loses its pink color. Mine was more of a beige color (the photos show a fresh rhubarb tart). Frozen rhubarb also usually releases more liquid before thickening, so the filling may need a tiny bit longer on the stovetop.
- For the flour, you can use all-purpose flour, or for a gluten-free version, use 2 cups (250 grams) King Arthur Flour Gluten-free Measure for Measure Flour or 2 cups (276 grams) Bob’s Red Mill 1-to-1 Gluten-free Baking Flour. Both version came out great!
- The nutrition information provided is calculated as a courtesy and is only an estimate. I am not a licensed nutritionist or dietitian. For the most accurate nutritional data, consult a professional or use your preferred calculator.


Get New Recipes In Your Inbox!
Subscribe to get all the latest healthy sweets & treats delivered straight to you!