

Jack Skellington Cake Recipe
This Jack Skellington cake has an ultra-moist chocolate cake base with vanilla cream cheese and black cocoa cream cheese frosting. The stripes are surprisingly easy for someone with no decorating skills, as is the Jack Skellington face. You can make it with all-purpose, whole wheat or gluten-free flour.
Before anyone runs off thinking that this is a complicated cake, let me share this feedback from my photographer: “Your instructions were SUPER helpful and well written. A three-layer cake did seem a bit daunting at first, but I was actually surprised how easy it was when following your directions!”
Also, I can not stress this enough – I am not a cake decorator! Neither is my photographer, and my stripes came out looking like hers.
I like to get things done quickly, and I don’t have the patience or skill for anything fussy. If I can make these stripes, so can you.
If you don’t even want to try, you can skip them. Maybe you want black frosting over the entire cake and then just add a white face?
That would definitely be easy. Just make sure to adjust the amount of black vs. white frosting.
This was supposed to be an easy recipe to create. The plan was to use my Dairy-free Chocolate Cake recipe (it’s the famous Hershey’s One Bowl Chocolate Cake Recipe) and the same cream cheese frosting I use in every other cake recipe.
11 attempts later, and I finally nailed the recipe. :D If you’ve made this cake before and found it too sticky or hard to handle, I’ve fixed that. I explain how below.

A great cake any time of year
I brought half of my final decorated Jack Skellington cake to the kindergarten for the teachers, but they ended up sharing it with the kids, and despite some confused little ones, it was a hit.
I then used a few of the frozen layers from the failed attempts (they were delicious, just too sticky) and frozen cream cheese frosting for a cake I brought to the kindergarten summer fest. I’ve never had so many people come up to me just to say how much they loved a dessert.
I felt like a dork for bringing a Halloween-ish cake to a party in July, but nobody minded. :D
If you’re viewing this post outside of the Halloween season, how about adding some ground freeze-dried raspberries to the white portion of the frosting for a dark pink and black striped cake?
I used some of the leftover cake layers to do just that (my freezer had a section full of frozen cake layers for a few weeks!), and it was incredible.
Or you could just add food coloring to the white frosting if you have some food coloring you like.
I almost never use food coloring, but I used McCormick Nature’s Inspiration Food Colors on these Frankenstein Cupcakes. The colors weren’t very vibrant, but at least the ingredients are decent. I’m still on the hunt for something more intense.

Ingredients
- Granulated sugar – you can use coconut sugar if you prefer.
- Flour – you can use all-purpose, whole wheat, white whole wheat or one of the gluten-free options I talk about below.
- Cocoa powder – I used Dutch-process. If you use regular Hershey’s cocoa powder, your cake will be lighter brown than mine.
- Black cocoa powder – if you prefer to use regular cocoa powder in place of this in the cake, you can, but the black cocoa does result in a slightly darker cake color. And besides, you need it, anyway, for the frosting. You must use black cocoa powder in the frosting.
- Eggs – you can use chia eggs to make this cake eggless, but there’s no way to make this Jack Skellington cake vegan due to the cream cheese frosting.
- Milk – you can use any kind you’d like. I always use unsweetened cashew milk.
- Oil – I use olive oil, but it works great with canola oil, vegetable oil or whatever neutral oil you’d like. Just don’t use a very expensive, flavorful bottle of olive oil. I use store-brand organic olive oil from Aldi or Lidl and can never taste the olive oil in the cake once it’s cooled.
- Boiling water – it seems like a LOT of water, and the batter will be super thin, almost like water, but the full amount is needed.
- Vanilla extract, baking powder, baking soda and salt

- Cream cheese – this is for the frosting. No subs are possible. The same applies to the other ingredients for the frosting listed below.
- Butter – make sure it’s room temp so it’s easy to beat in with the cream cheese.
- Powdered sugar – if it’s very lumpy, you might want to sift it or blitz it in a high-speed blender to get it light and powdery again.

What is black cocoa powder?
Black cocoa powder is made from the same beans as regular cocoa powder, but it is treated with an alkaline solution to reduce its acidity.
The different processing methods add to its intense chocolatey flavor and stark color. It’s also less bitter than regular cocoa and more soluble, making it a great addition to frostings, ganache, chocolate sauces and even smoothies.
It’s what gives Oreos their distinct flavor. However, you can’t always use it as a substitute for regular Dutch-process cocoa.
I used it in my Kladdkaka as a direct sub for the cocoa. When I dug in, right after it came out of the oven, I panicked, thinking I had forgotten to add the sugar.
Later on, I could taste some sweetness, but it was somehow kind of gross. And after sitting overnight, it tasted like BRISKET. I let it sit another day to see what magical transformation would happen next, but it stayed brisket-flavored.
So! If you feel like experimenting with black cocoa, you might want to make a smaller batch of something before wasting your ingredients on something that’ll end up in the trash.
Can I use all black cocoa?
I had hoped for a black or almost black cake, but using all black cocoa didn’t change the color all that much.
Or the taste! So there’s really no need to use all black cocoa. It’s quite expensive, so it’s better to save it for recipes where it does make a huge difference, like in these Black Cookies.
What brand to buy
For the European readers, I tested my black cocoa recipes with Van Houten Intense Deep Black Cocoa.
It’s now called Noir Intense and is sold under the brand name Cacao Barry. Everything I’ve made has come out perfectly black and delicious. Except the previously mentioned kladdkaka, but that’s not the brand’s fault.
My photographer lives in the US, so for her, what I did was read a ton of reviews on Amazon and pick the one with the best reviews and price. Almost all of them were tied in terms of ratings, so I chose the cheapest one at the time.
She used Modern Mountain black cocoa powder in the black cookies I mentioned above, and they looked exactly like my Van Houten/Cacao Barry cookies.
But then she sent me a picture of my Black Ice Cream, asking if it was supposed to be brown. It is not!
So I read more reviews and had her get the black cocoa from The Cocoa Trader, and the ice cream came out black. Or SUPER dark grey and almost black, but not jet black.
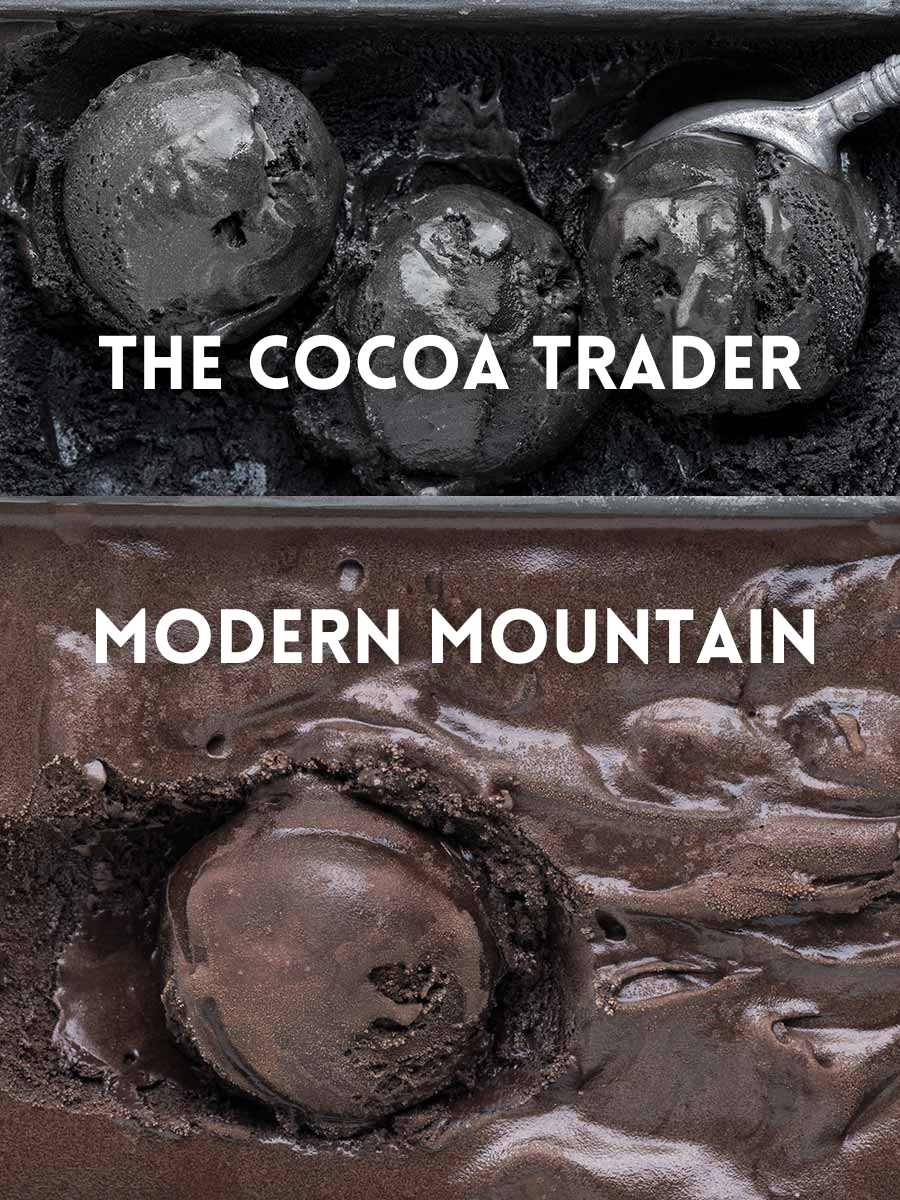
So I highly recommend buying The Cocoa Trader’s black cocoa to guarantee that your results look like the photos here. I haven’t tested this recipe with Modern Mountain or anything other than the 2 brands I’ve mentioned.
A brown Jack Skellington cake would just be sad. I wouldn’t want to risk that.
Warning!
As black cocoa powder travels through your digestive system, it retains its color.
I hope you appreciate the warning. ;) I wanted to save you the trouble of googling and panicking. Black usually signals an immediate trip to the doctor, it seems.
But after eating this cake, it’s just the black cocoa powder. And if you have small kids, they’ll probably find this quite amusing.
How to make the cake
It’s a super-easy one-bowl recipe. If you’ve made this cake before, note that the batter is thicker than the original Hershey’s recipe (and my adaptations).
It’s usually almost as thin as water, but I reduced the liquids by 25% to make the cake less sticky and easier to handle.

Many, many reviewers have said that this is the best chocolate cake ever, and I agree. I’ve been making it for over 15 years.
I’ve stopped trying other cake recipes and ordering cake from bakeries because they’re always disappointing. This is the perfect cake!
If you have questions about the recipe, check out my Healthy Chocolate Cake post, as I believe I’ve answered everything. :)
If not, feel free to ask below! I’d love to help make this cake a success for you.

The frosting
I’m SUPER in love with this frosting recipe. Not only does it taste amazing, but it’s incredibly easy. You don’t have to create two separate frosting recipes, or even worse, separate frosting and filling recipes.
You make one huge bowl of cream cheese frosting, and then divide it up. To one-third of the frosting, you add black cocoa powder.
And this creates the most amazing Oreo-flavored frosting!
To the remaining 2/3 of the frosting, add more butter, which helps make the frosting firmer and easier to decorate with.
If you live outside the US or Canada, please read the notes at the bottom of the recipe. You have to get rid of some of the whey before making frosting with non-US cream cheese. It’s easy. Just annoying.

How to assemble the cake
Some tips before you get started:
- The tops of my cake layers weren’t flat but not very rounded, either. You can see in the photos that the top of the cake is a little domed with uneven layers. If that bothers you, then you can certainly level them.
- Choose a cake plate with flat edges, like in the photos, and not a rim. The first time I put this cake together, I used a plate with slightly curved edges that sloped upward. This was really stupid because it made it impossible to cut a slice neatly.
- It also made it more difficult to pipe on the stripes at the bottom of the cake.
- If you’re going to use a turntable when piping on the stripes, then choose a serving plate that will fit on the turntable without issue.
On top of the first two layers, I spread 1 cup (229 grams) of vanilla frosting. I ended up with 1/3 cup + 1 tsp of leftover vanilla frosting when the whole cake was done.
The photographer also used 1 cup between the layers and had JUST enough vanilla frosting to finish up the cake. But she had an extra white and black stripe on her cake compared to mine.
That must be because she was applying less pressure when piping, so her lines were thinner. Therefore, she needed to add an extra 2 lines.
So, what you can do is measure and mark where to put each line so that you have a total of 7 lines, or you can use 1 cup MINUS 2 tablespoons of frosting on top of the bottom 2 layers of cake.
That means, even if you make thinner lines like the photographer and make 9 lines, you’d still end up with 1/4 cup of frosting at the end.
Or you can just use 1 cup of frosting between the layers and eyeball the stripes. You should have just enough frosting for the face, but a safety net is better.
If you do just eyeball it, maybe have more cream cheese on hand and make half a batch of my Healthier Cream Cheese Frosting (it just uses less sugar than normal – there aren’t any strange ingredients), so you have plenty for the face.
I finished my cake with 2/3 cup (150 grams) of black frosting, so you’ll have plenty left over, regardless of whether you make 7 or 9 lines.
This frosting also freezes great, but it’s also quite delicious on a spoon, so you might not need to freeze it.

Crumb coat
A crumb coat is a thin layer of frosting applied to a cake before the final coat of frosting. The purpose is to seal in the crumbs so that when you pipe on your decoration, they don’t get mixed in with the piped stripes.
Use 1/2 cup (115 grams) of vanilla frosting as a crumb coat. It doesn’t sound like a lot of frosting, but it works just fine.
Keep the frosting refrigerated until ready to use. And if you ever think it’s not firm enough, place it back in the fridge. Things get sloppy with melty frosting.
Spread it all around – just the sides of the cake. I did this using room temp, freshly baked cakes in a very, very warm kitchen, and you could see the crumbs. Very ugly.
I should have at least chilled the frosting a bit more. However, it didn’t matter because once you apply the stripes, you can no longer see the crumb coat.
When the crumb coat is done, spread 1/2 cup (115 grams) of chocolate frosting over the top of the cake. The first stripe going down the cake will (likely) be black, so you don’t have to fuss with making the frosting on the top look perfect around the edges.
Place the cake in the freezer for 20-30 minutes after putting on the crumb coat (or 1-2 hours in the fridge). You can also refrigerate it overnight to help break up the workload.

How to make the stripes
I was in a rush to complete this cake, so I used freshly made cream cheese frosting (in the recipe, I recommend chilling it first) on a freshly baked cake (I also recommend chilling or freezing the layers), and my piping looked quite unappealing.
But once you use a bench scraper to smooth the sides, they look great! I was shocked. I was squealing and sending pictures to half of the people I know.
To make the stripes: make sure your frosting isn’t runny – it should be easy to pipe. I used a cutting bag with a 1.6cm (.63in) wide opening when laying the bag flat. When you open the bag, the hole was about 1cm (.4in).
Cut two disposable bags so you have the right size hole, or use a tip that has that size.
Fill one bag with chocolate and one with vanilla frosting.
Start by piping a ring of chocolate frosting around the base of the cake. You can see how in the video below.
I’ve seen some people use huge amounts of frosting for this, but I didn’t do this, my photographer didn’t do this, and neither did Georgia’s Cakes in the video. It’s not needed!

I LOVE this frosting, but huge, fat stripes around the cake would be overkill.
Then make a white stripe above the black, and alternate until you get to the top. I think it’s best to end up with a black stripe on top, but it’s not a big deal if you have a white stripe at the top.
Ideally, you only want 3 white stripes to ensure you have enough frosting for the face. The photographer made 4 white stripes and had just enough frosting in the end.
When I was reading how to make these stripes, I was so confused. I’m sure my descriptions are just as confusing.
But it’s actually really difficult to mess this up.
So watch how she does it:
I was so scared when it was time to use the bench scraper (but I hadn’t watched the video). Please watch the video! It’ll make you feel much more confident. :)

Gluten-free version
I love using King Arthur Flour Gluten-free Measure for Measure Flour and think it often outperforms Bob’s Red Mill 1-to-1 Gluten-free Baking Flour, but not in this recipe.
The first 7 failed attempts were because the cake collapsed while cooling and/or were super sticky. I changed the amount of baking powder, baking soda, water, flour, and the amount of black cocoa.
None of those things made any difference. I got angry wasting all that super expensive flour (I live in Germany, so I pay about double the already expensive price to have it shipped over here) and switched over to Bob’s Red Mill, which is a little cheaper.
It immediately worked. Gah. So that’s what you see in the photos. The all-purpose and whole wheat versions look exactly the same.
But the cake was stickier than usual. I’m assuming that black cocoa powder isn’t as absorbent as regular Dutch-process cocoa powder, but I haven’t tested out this theory. I’ve had enough of experimenting with this cake. ;)
The stickiness made it challenging to handle. I did some research and found some people on a message board saying that you can reduce the baking soda, baking powder and amount of water to solve that.
It worked! Thanks to whoever figured that out (I can’t find the post anymore).

Make ahead
You can make the cake layers and freeze them for up to 3 months. Once they’ve completely cooled, wrap them in plastic wrap and place them in a Ziploc bag.
It’s easiest to work with frozen cake layers, so don’t defrost the layers when it’s time to assemble the cake.
You can assemble the cake, add the crumb coat, and then freeze it for up to a week. I would wrap it in plastic wrap and then place it in a big bag, just to be safe.
If you apply the crumb coat, then you obviously have frosting. You can also freeze that!
Just put it in a freezer-safe airtight container. Freezing plain cream cheese alters its texture, but due to the high fat content of cream cheese frosting, it can be frozen without any issues.
You can also make the entire cake and freeze it. If doing that, then place the decorated cake in the freezer. Once it’s completely frozen, cover it with plastic wrap and place it in a large freezer bag.

Benefits of making the cake layers in advance
- A chilled cake layer is easier to handle than a room-temperature cake.
- A frozen cake layer is even easier to handle! And you don’t have to worry about it falling apart.
- It also makes this cake much easier to prepare. You can absolutely start from step 1 and serve the cake on the same day. But I like to make the cake layers and cream cheese frosting on one day and then assemble it the next.
Even though this cake is easy to decorate, I like to go into it relaxed and not frazzled by the mess in the kitchen.
I had to make the cake and decorate it in one afternoon and was balancing the cake on a tower of bowls to decorate it. That’s not ideal. ;)

Black ice cream
If you’re wondering what kind of ice cream is served with the cake, that would be my Black Ice Cream! It, just like the frosting, tastes like an Oreo wafer.
Eating a big slice of cake and two scoops of this ice cream would definitely be too much, but it sure looks nice. If you’d like to serve this cake with black ice cream, definitely go for a small scoop of ice cream and a small slice of cake.


Jack Skellington Cake Recipe
Ingredients
- 3 cups (600 grams) granulated sugar
- 2 1/2 cups +plus 2 tablespoons (328-363 grams) flour see notes for options
- 15 tablespoons (108 grams) Dutch-process cocoa powder
- 3 tablespoons (21 grams) black cocoa powder
- 1 1/2 teaspoons baking powder
- 1 1/2 teaspoons baking soda
- 1 1/2 teaspoons salt
- 3 large eggs 50 grams each, out of shell eggs, room temp or chia eggs
- 1 1/2 cups (355 ml) milk
- 3/4 cup (177 ml) olive, canola or vegetable oil
- 1 tablespoon vanilla extract
- 1 cup + 2 tablespoons (266 grams) boiling water
Frosting:
- 24 ounces (680 grams) full-fat cream cheese room temperature
- 3/4 cup + 6 tablespoons (253 grams) unsalted butter DIVIDED, room temp
- 3 3/4 cups (450 grams) powdered sugar
- 1 1/2 teaspoons vanilla extract
- pinch of salt
- 1/3 cup (37 grams) black cocoa powder
Instructions
Make the cake:
- Preheat your oven to 350 °F (175 °C). Line 3 round 8″ cake pans with parchment paper on the bottom and grease the sides.
- In a large bowl, stir together the sugar, flour, Dutch-process cocoa, black cocoa powder, baking powder, baking soda and salt. Add eggs, milk, oil and vanilla.
- Mix until combined, and then stir in the boiling water. The batter will be quite thin.
- Divide the batter between the three pans. That’s 658 grams of batter per pan (675 grams per pan if using Bob’s GF flour).
- Bake for 26-28 minutes or until a toothpick comes out with some moist crumbs, but no uncooked liquid.
- Let cool for 10 minutes in the pans, and then turn out onto a rack to cool completely, about 2 hours. My cakes weren’t flat, but not very rounded, either. If you want to, you can level them (I did not).
- Unfrosted cake layers can be wrapped in plastic wrap and stored at room temperature for 2 days or refrigerated for 3. They can also be frozen to make the crumb coat tidier. I recommend at least chilling the cake overnight before stacking the layers, but freezing is even better.
Prepare the frosting:
- In a large mixing bowl, beat the cream cheese and only 3/4 cup (169 grams) butter together with an electric hand mixer at medium speed until well combined. It’s okay if it looks a little crumbly.
- Gradually beat in the powdered sugar until totally combined, and then beat in the vanilla and salt.
- Remove 1/3 or 429 grams of the frosting to a medium mixing bowl and add 1/3 cup (37 grams) black cocoa powder to that. Beat in on low until combined. Set aside.
- To the large mixing bowl with the remaining 2/3 of the frosting, add 6 tablespoons (84 grams) butter. Beat until well combined.
- Mine was firm enough to frost the cake with. If yours isn’t, place it in the fridge, stirring every 15 minutes, until it’s firm enough.
Assemble the cake:
- Place the bottom layer of cake, rounded side down, on the serving dish.
- Spread 3/4 cup + 2 tablespoons (200 grams) of vanilla frosting over the bottom layer, almost until the edge.
- Put on the next cake layer, rounded side down, and spread on the same amount of vanilla frosting over the top.
- Place the third cake layer on top, rounded side up.
Crumb coat:
- Use 1/2 cup (115 grams) of vanilla frosting as a crumb coat. Keep the frosting refrigerated until ready to use. And if you ever think it’s not firm enough, place it back in the fridge.
- Spread it all around JUST the sides of the cake.
- Spread 1/2 cup (115 grams) of chocolate frosting over the top of the cake. The first stripe going down the cake will (likely) be black, so you don’t have to fuss with making the frosting on the top look perfect around the edges.
- Place the cake in the freezer for 20-30 minutes after putting on the crumb coat (or 1-2 hours in the fridge). You can also refrigerate it overnight to help break up the workload.
Make the stripes:
- To make the stripes (make sure your frosting isn’t runny – it should be easy to pipe), I used a cutting bag that had a 1.6cm (2/3″) wide opening when laying the bag flat. When you open the bag, the hole was about 1cm (.4in).
- Cut two disposable bags, so you have the right size hole, or use a tip that has that size.
- Fill one bag with chocolate and one with vanilla frosting.
- Start by piping a ring of chocolate frosting around the base of the cake. See post for video.
- Then make a white stripe over the black, and alternate until you get to the top.
- Use a bench scraper to smooth out the sides by turning the cake with one hand while you drag the bench scraper against the frosting with your other hand. See post for video.
Make the face:
- Use a toothpick to outline a Jack Skellington face. Pipe the white frosting around the outline. Fill in the face with frosting.
- Then make an outline of the face, nose and mouth, and fill it in by piping on black frosting.
- Place the cake in the fridge for 4-8 hours, or overnight, so that it’s easier to get a nice cut. How long you need depends on if the cake layers are already frozen and if/how long you chilled the frosting before and during the decorating process. With my very warm kitchen and not chilling the cake or the frosting, 4 hours was enough to firm it up. 8 hours would have been better for a cleaner slice.
- Refrigerate covered for up to 4 days or freeze (whole or sliced) for up to 3 months.
Notes
- For the flour, you can use all-purpose flour, white whole wheat flour or whole wheat flour. If you’re gluten-free, use 2 1/2 cups plus 2 tablespoons (363 grams) Bob’s Red Mill 1-to-1 Gluten-free Baking Flour. I tried this cake 6 times with the King Arthur Gluten-free Measure for Measure Flour, tweaking it a bit each time, and it sank every time.
- If you want to use chia eggs instead of regular eggs, mix together 3 tablespoons of ground chia seed with 1/2 cup + 1 tablespoon (133 grams) of water until well combined. Let it sit for about 1-2 minutes or until it’s goopy like regular eggs. You can use whatever type of milk you want.
- If you’re using canned coconut milk, water it down so that it’s runny like regular milk. It still might add some coconut flavor to the cake. I would recommend a more neutral milk.
- If you live outside of the US/Canada/Australia, you likely have a different type of cream cheese than in the US. US cream cheese is firmer and meant for baking, rather than the kind for toast, like in Europe. For 8 ounces (225 grams) of cream cheese, buy a 300-gram package (the stuff at Aldi, Lidl, etc. works just as well as Philadelphia), put it in the center of a clean tea towel or cheesecloth, and squeeze out the liquid until you have 225 grams of cream cheese. So for this recipe, buy 900 grams of cream cheese and squeeze out the liquid until you have 680 grams of cream cheese left. Also note that medium eggs in the EU = US large eggs.
- If you’re in the EU, you need medium eggs.
- Cake based adapted from Hershey’s One Bowl Chocolate Cake.


I made this Jack Skellington cake with the kiddos and they absolutely loved the process and eating it. Thank you for creating such a special time for me and my babies!
I’m so glad that you enjoyed the cake! Thanks so much for your feedback. :)
This cake was AWESOME! I made it without the face on top and added other decorations. This will be my new go-to cake! ????
I’m thrilled to hear that! :) Thanks so much for your feedback!
This was adorable. My daughter wanted A Nightmare Before Christmas cake and I made this for her birthday. PEople were raving over it. Thank you!
You’re welcome! I love that this is what your daughter wanted for her birthday cake. I hope she had a great day! :) Thanks for your comment.
This really was the best chocolate cake ever! No one would’ve guessed it wasn’t from a professional bakery! It was light, moist, and perfectly sweet. And easy to make.
Yay! I’m so glad to hear that! Thanks so much for your feedback. :)
We made this right when you posted it as a trial for Halloween. I think the kids are school are going to freak out over it! It was insane. Insanely tasty! So much like an Oreo! THANK you!
You’re welcome! I’m glad that it was such a hit. :) Thanks so much for your comment!
I love this idea for our Halloween party! Do you think it would turn out the same if I just do 2 tiers rather than 3?
Yes! But to be honest, it’s easiest just to make the 2 layers and freeze the 3rd. Then you don’t have to reconfigure the measurements. And you can freeze the leftover frosting for the 3rd layer. :) You can not just bake the recipe as is in 2 pans. It wouldn’t bake up properly. I hope you’ll enjoy it!