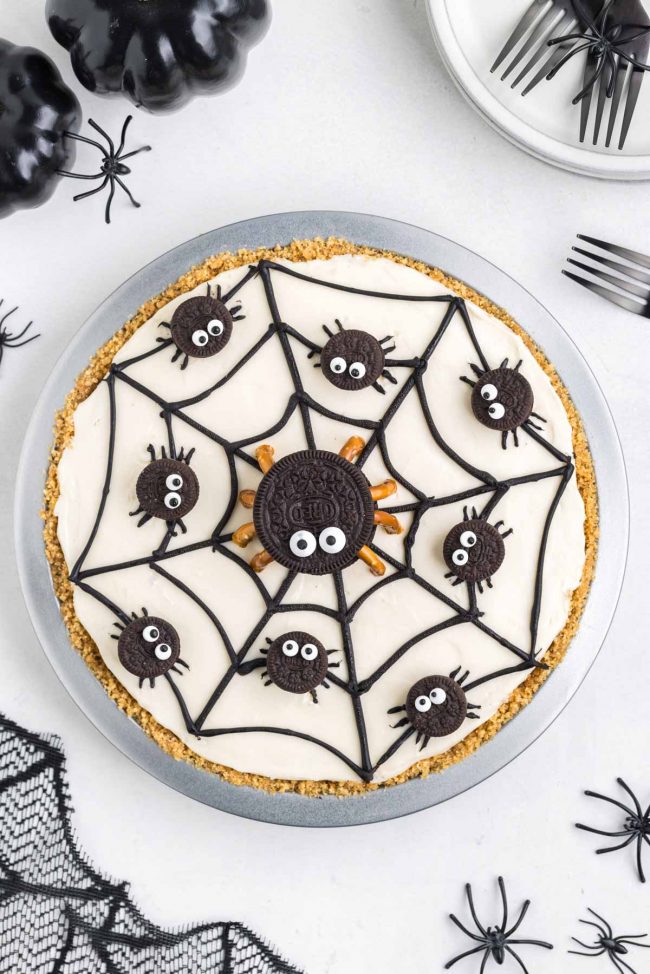
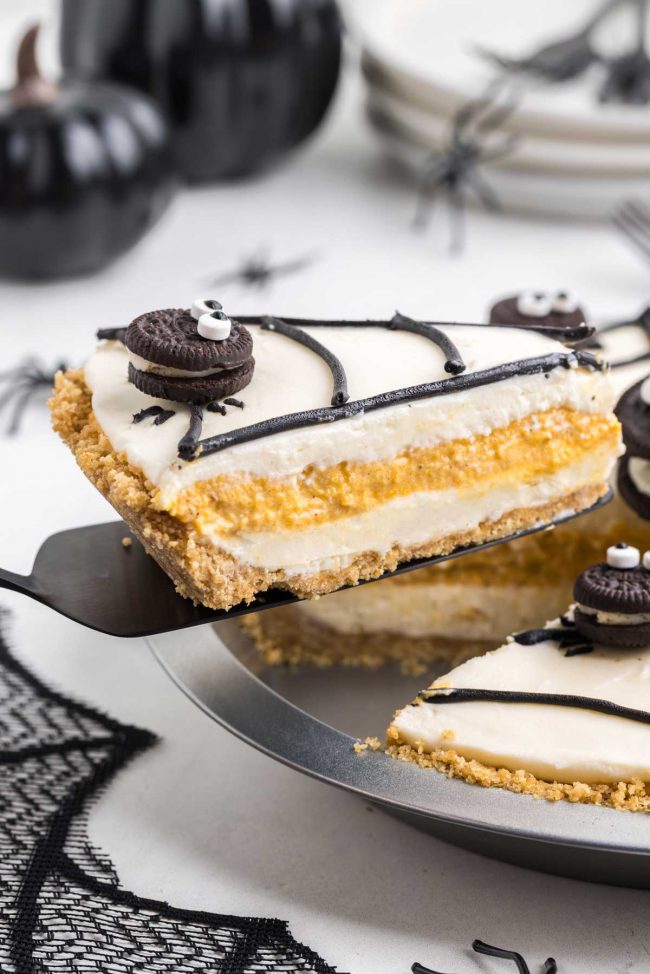
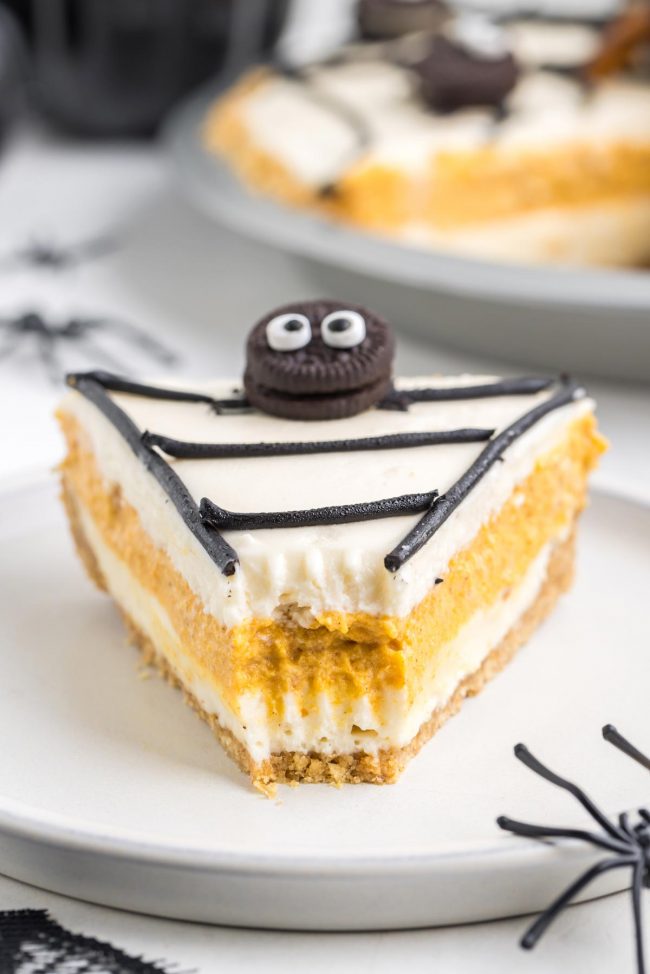
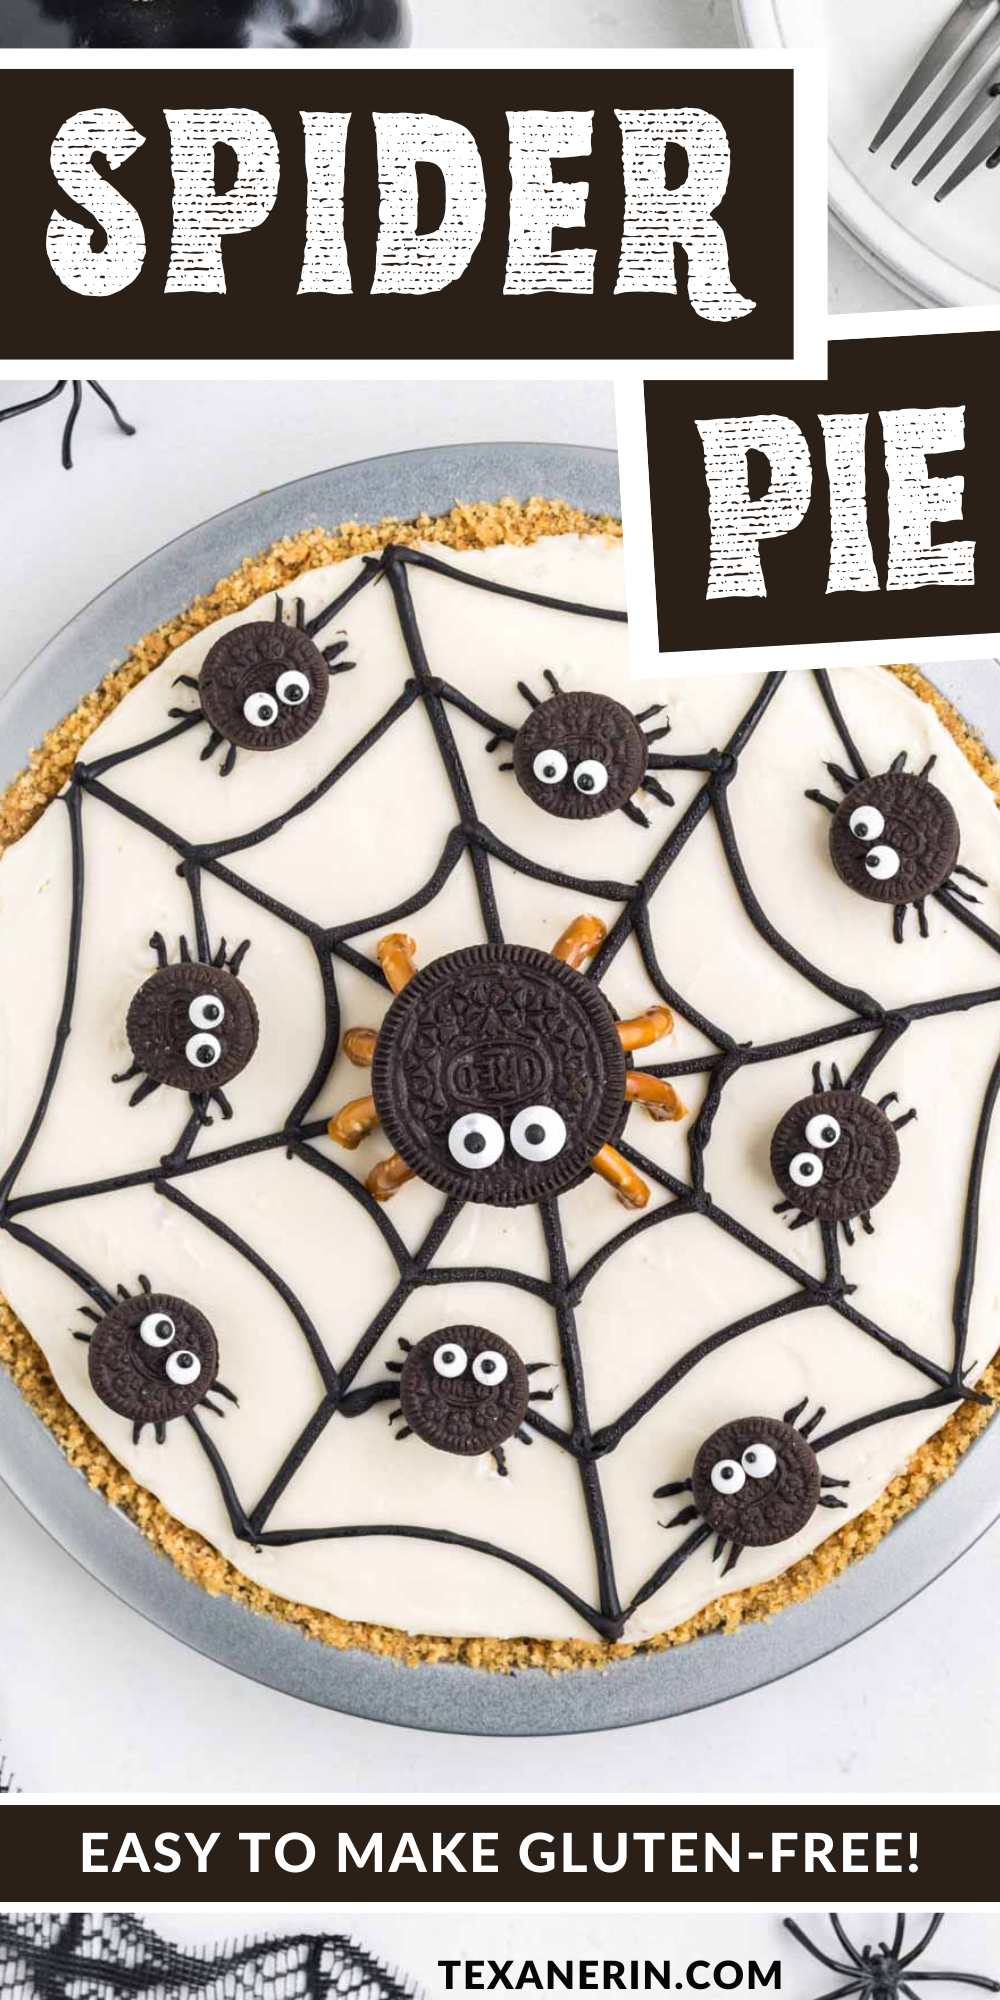
This spider pie is an easy 3-layer no-bake pumpkin cheesecake decorated with a spiderweb, a spider mama and her 8 spider babies. It’s really much easier than it sounds! It can also be made traditionally or gluten-free.
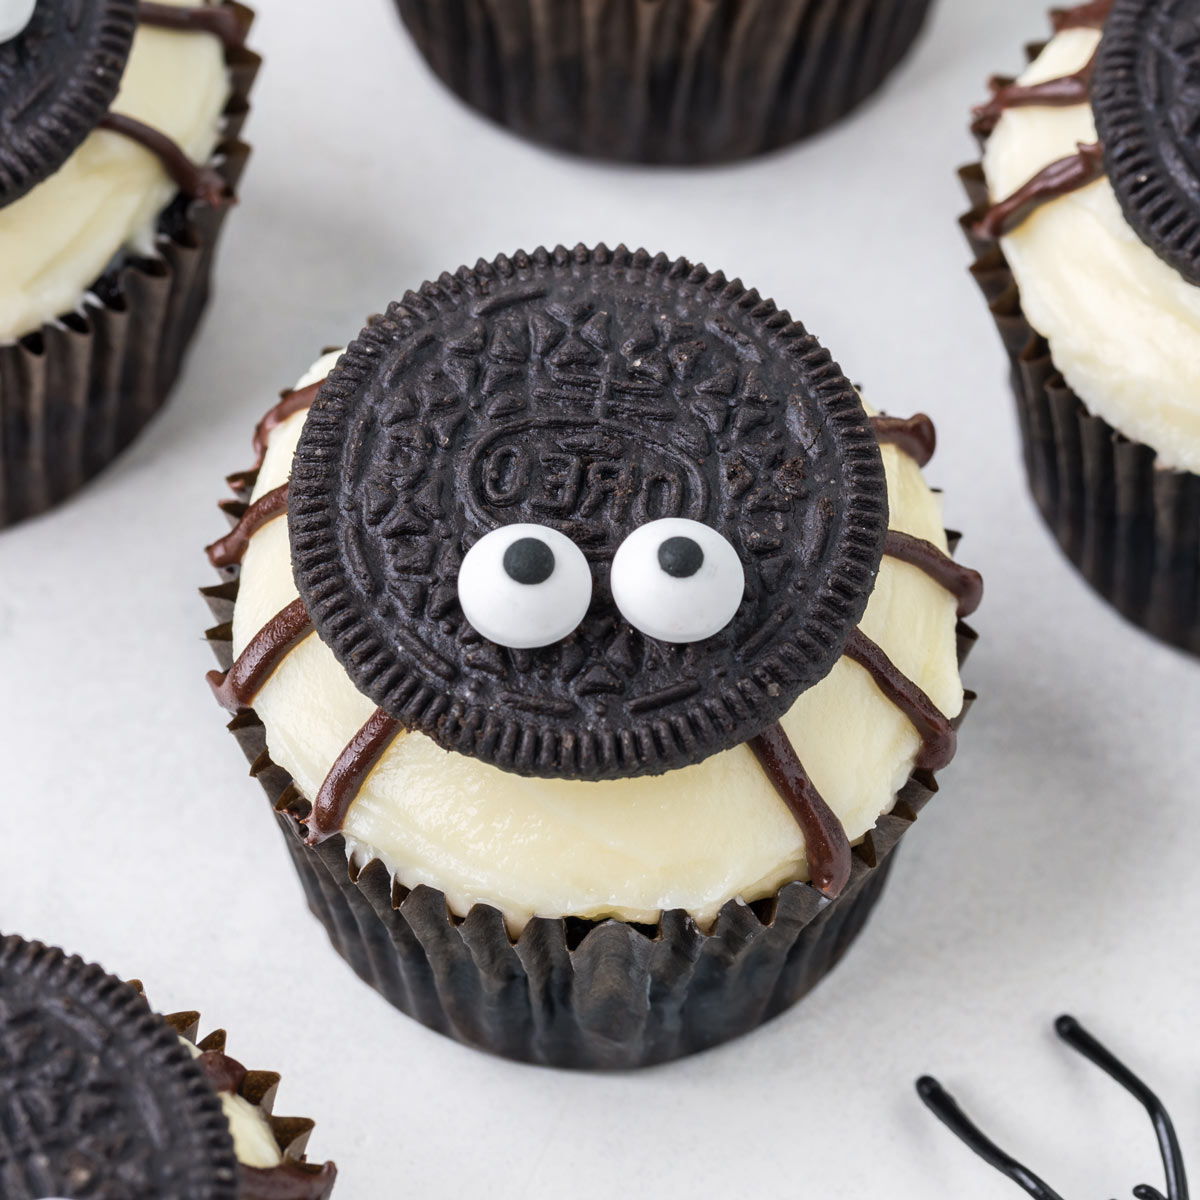
I recently posted these Spiderweb Brownies, and I posted these Spider Cupcakes back in 2016. Now I’ve finally put the spiders and spiderweb together for this spider pie. :D
And the pie itself is incredible. Should you not be interested in spiders, just skip all that business and go to town on your no-bake pumpkin pie!
And it freezes great, minus the decoration, so you can already prepare the pie and have it ready when Halloween rolls around.
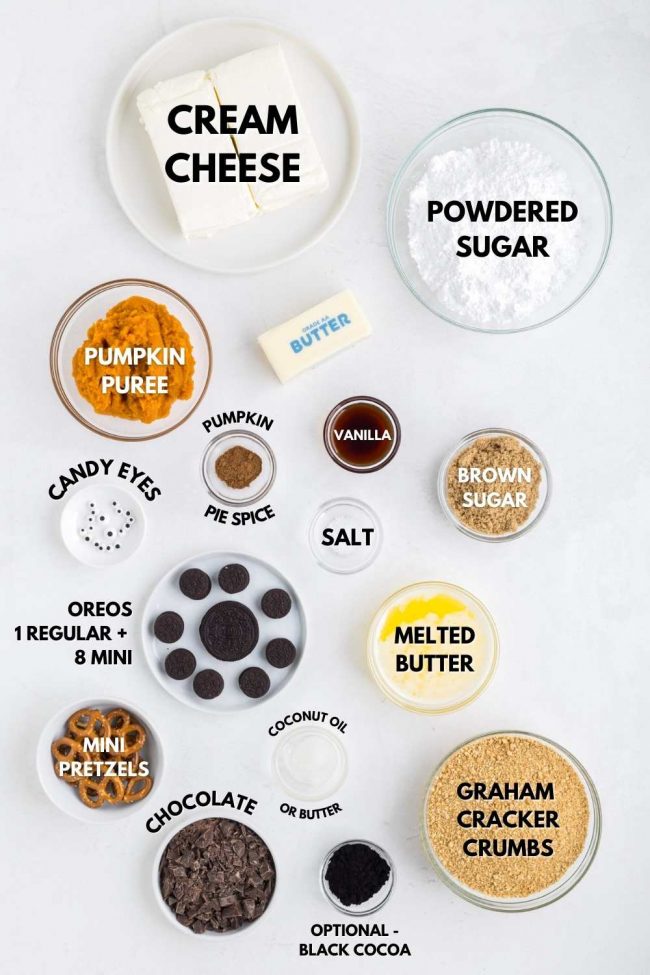
Ingredients
Here’s an overview of everything you need.
Note that the black cocoa powder is optional, but it is what makes the spiderweb and the spider legs so black. If you don’t use it, the legs will be brown like on my spider cupcakes shown below.
 Black cocoa usually gives treats an Oreo flavor, but not here. It just makes the chocolate taste a little darker. If you don’t care about the spiderweb being black, you can definitely skip the black cocoa.
For the eyeballs, I used the regular-sized ones for the mama spider, and for the babies, I used some that are 1/4″ or 6mm in diameter. The regular-sized ones fit on the babies, as well, so you can certainly use them if you don’t have the small ones.
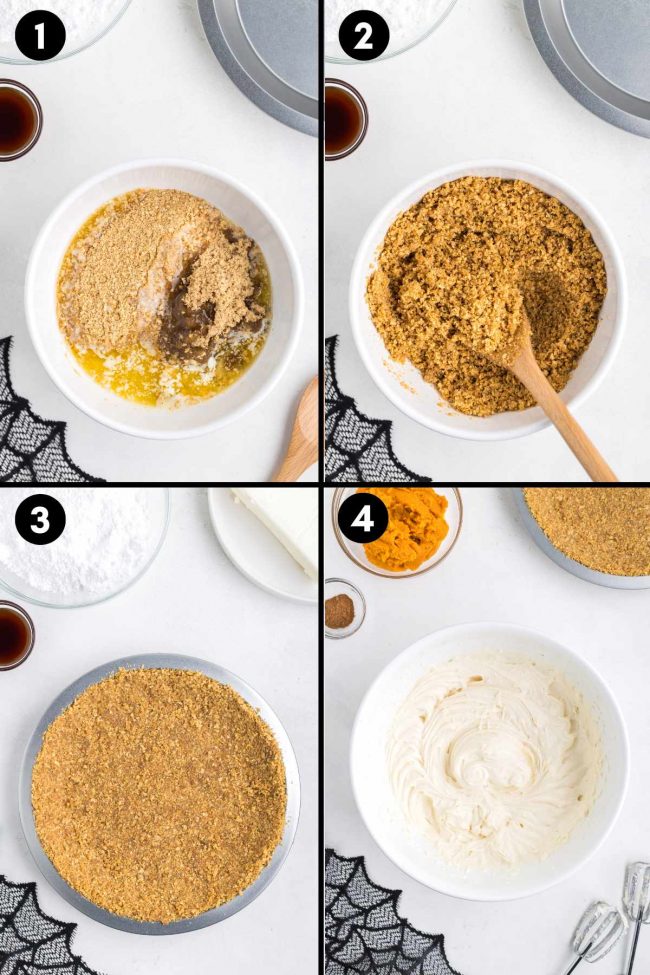
The crust
It’s a basic no-bake graham cracker crust. You can use store-bought graham crackers or make your own homemade graham crackers.
Making homemade crackers and then smashing them to crumbs would be a bit time-consuming, but the option is there should you not like the ingredients in store-bought graham crackers.
I don’t have time for that, so I use the grain-free Honey Cinnamon Seed & Nut Flour Sweet Thins from Simple Mills (the photographer used regular graham crackers in the photos).
You’ll need a box and a half, and they’re pretty expensive, so that isn’t exactly a perfect solution. But I had two boxes about to expire (they had gotten lost in the pantry), so it was the perfect use for them. And the crust was amazing.

So what you do for the crust is mix together all the crust ingredients and press into the pie pan. Then, you freeze it while you prepare the filling.
Freezing each layer as you go makes it easier to get pretty, clean-cut layers. If you’re in a hurry and don’t have time to freeze each layer, the layers still come out looking pretty decent. Just not quite as perfect.
If you have some other no-bake pie crust that you prefer over a graham cracker crust, you can use that. A gingersnap crust would be a great alternative!
You could also use a store-bought graham cracker crust for an even quicker option.
Cheesecake filling
I’m super excited and proud of this pie. All the no-bake pumpkin cheesecakes I found use pudding mix or other processed stuff I try to avoid.
Yes, the Oreos and graham crackers are processed, but I give homemade options for those. The pretzels are, too. But still. I’m thrilled with the cheesecake filling!
The cheesecake portion of this pie contains all the usual pumpkin cheesecake ingredients but no eggs. If you love tasting unbaked pumpkin cheesecake batter, you’re going to love this recipe.
I love cheesecake batter so much that I made a Red White and Blue Cheesecake Salad, which is basically just unbaked eggless cheesecake batter with fruit thrown in. 😄
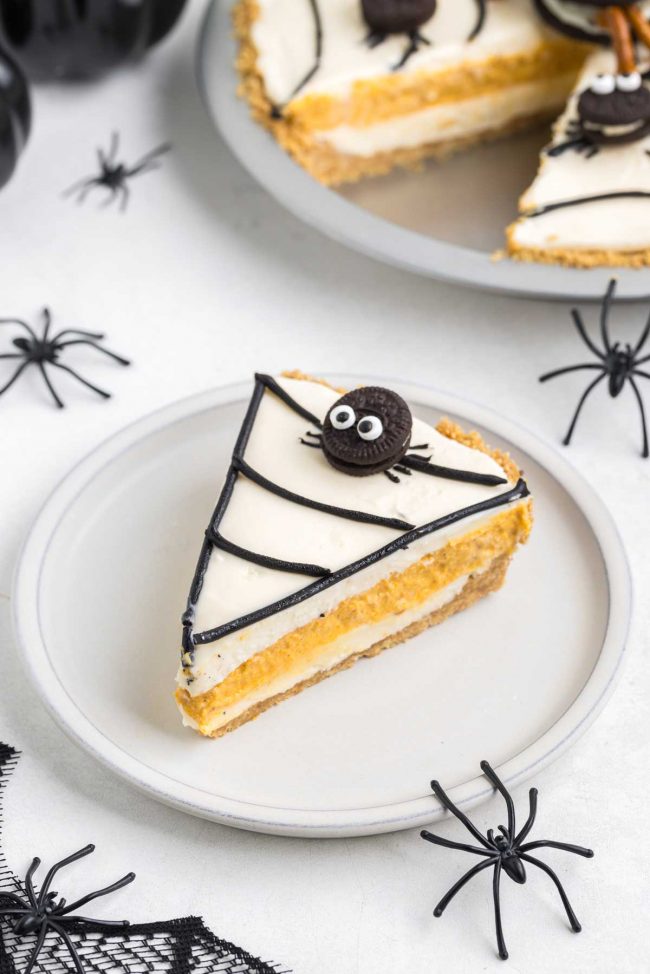
The filling of this spider pie is (probably obviously) firmer than unbaked batter but has the same taste.
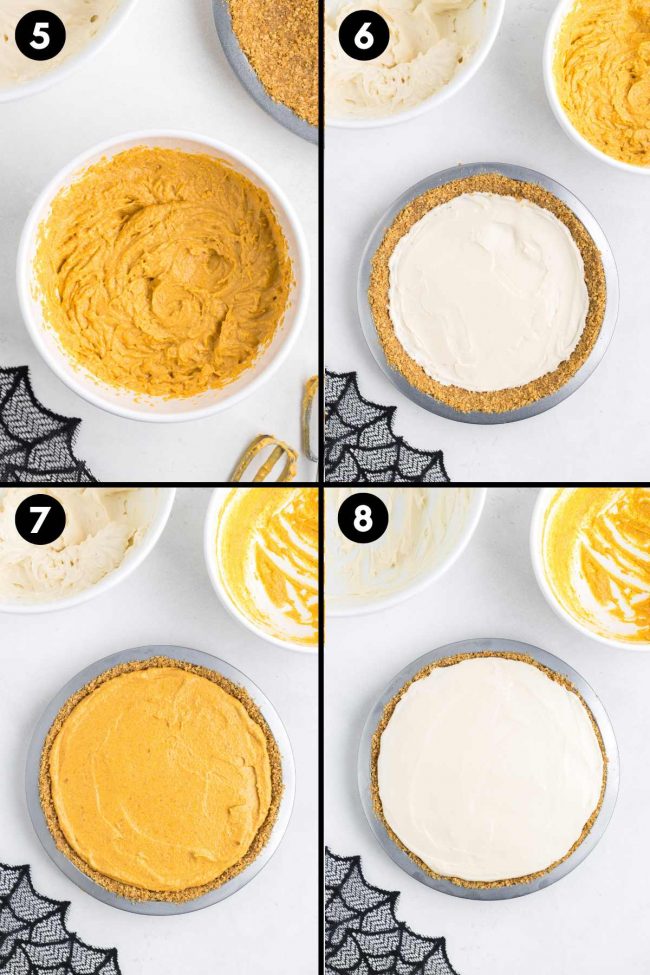
And you don’t need to make separate vanilla and pumpkin cheesecake filling. You make the vanilla filling, remove 1/4 of it, and add the pumpkin puree and pumpkin pie spice to it.
Then you spread half of the vanilla filling over the frozen crust, followed by the pumpkin layer, and then the remaining vanilla filling goes on top.
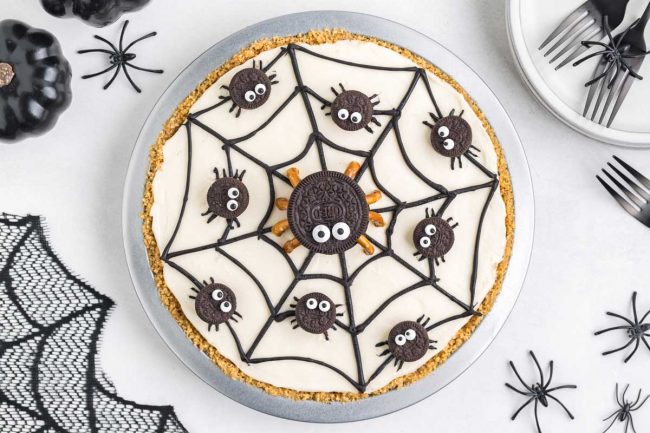
How to decorate it
As I always say, I’m not skilled at decorating things. So if I post something with some decoration, you know it has to be easy.
To make this spiderweb, you just need a piping bag with a small round tip. People say you can snip the end off of a small Ziploc bag and pipe that way, but I’ve never been successful with that. I’ve just ruined a bunch of bags using that method.
I used Wilton tip #5, which has a diameter of 3mm. I also tried it with tip #2 (1.5mm) and found it much too thin for my liking.
If you use a smaller tip than I recommend and find that the chocolate mixture is coming out squiggly and difficult to work with, then that means the tip is too small.
I just had a realization after hitting the publish button. Instead of making a separate chocolate-based topping, you can remove some of the white cheesecake filling and add black cocoa powder. I did that just today with a cake I worked on.
You should remove 1/4 cup of the white cheesecake filling to a small bowl and beat in 2 teaspoons (5 grams) of black cocoa powder. If it seems too stiff to pipe, which is likely, stir in a little milk.
This will, of course, make your white layers thinner. And if you use regular cocoa powder instead of black cocoa powder, your spiderweb will be much lighter brown than if you had just used plain semi-sweet chocolate.
So I only recommend this option if you have black cocoa.
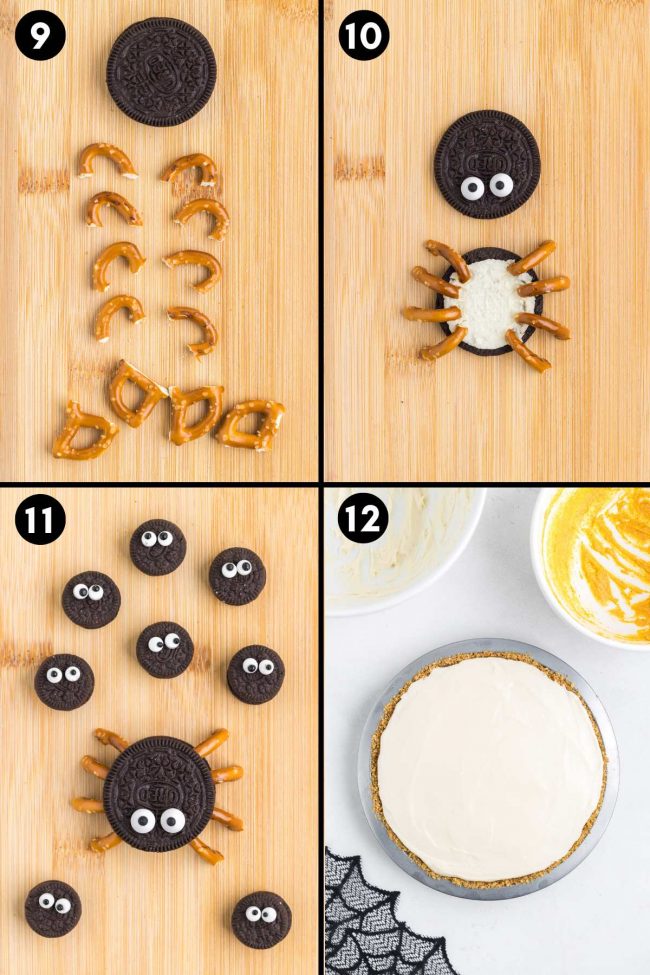
Oreo spiders
If you don’t want to use Oreos, you can use my Mummy Cookies and skip the mummy decorations. So follow the recipe up until line 10. You’ll also have to make the cookies much smaller.
You need one that’s about the size of a regular Oreo (1.75″ / 4.4cm) and 8 cookies that are the size (1″of mini Oreos).
It’s the same recipe as my Black Cookies minus the chocolate chips, but it’s important to press down the cookies after baking, which you don’t do in the black cookies.

Candy eyeballs
You can make your own candy eyeballs if you don’t like the ingredients in store-bought candy eyeballs.
This recipe for candy eyeballs is my favorite. I’ve tried a few!
The ingredients are powdered sugar, cornstarch (or tapioca or arrowroot starch), vanilla, water and black cocoa. You might be wondering why you’d buy black cocoa powder just for candy eyeballs, which would indeed be silly.
But you can use it in this Black Ice Cream or these Black Cookies. And the mummy cookies I just mentioned.
It does take some time to make your own eyeballs, but you can use them in so many Halloween recipes.
Make in advance
You can make the pie without the decoration today and freeze it. It’ll still be great for Halloween!
You can put the eyes on the Oreo babies and completely assemble the mama in advance. I wouldn’t do it more than a few days in advance.
If you put candy eyes in the refrigerator, the moisture from the fridge causes the black pupils to bleed a bit.
So you don’t want to put them in the fridge.
Gluten-free option
As I mentioned above, I used grain-free “graham crackers” from Simple Mills. You can, of course, use any gluten-free graham crackers.
And you need to use gluten-free Oreos and pretzels, like Snyder’s of Hanover Certified Gluten-free Mini Pretzels. For grain-free, Savor By Suzie sells mini grain-free pretzels.
Oreo makes their own gluten-free Oreos, but any brand of gluten-free chocolate sandwich cookies will do. All the ones I’ve come across are the same size, so they’ll all work here.
I hope you’ll enjoy this spider pie! I’d love for you to leave a comment below if you try it out. Thanks!
Other Halloween recipes for kids

Spider Pie
- Prep Time:
- Cook Time:
- Ready in:
- Yield: 8-12 slices
If you're gluten-free, see notes.
Ingredients
- 1 1/2 cups (180 grams) graham cracker crumbs (from about 12 full sheets)
- 1/4 cup (50 grams) brown sugar
- 1/8 teaspoon salt
- 6 tablespoons (84 grams) unsalted butter, melted
- two 8-ounce (225-gram) packages full-fat cream cheese1, room temp
- 1/2 cup (113 grams) unsalted butter, room temp
- 2 cups (240 grams) powdered sugar
- 1 tablespoon vanilla extract
- pinch of salt
- 1 teaspoon pumpkin pie spice
- 7.5oz (212 grams) canned pumpkin puree (that's 1/2 of a 15-ounce can)
- 1/3 cup (56 grams) chopped semi-sweet chocolate or chocolate chips
- 1 tablespoon black cocoa powder
- 3/4 teaspoon refined coconut oil or unsalted butter
- 1 normal-sized Oreo
- 2 normal-sized candy eyes
- mini pretzels2
- 8 mini Oreos
- 16 mini candy eyes (1/4" or 6mm in diameter)
- leftover black frosting from the spiderweb
For the crust:
For the filling:
For spiderweb and baby spider leg frosting:
For mama spider:
For baby spiders:
Directions
- In a medium mixing bowl, stir together the graham cracker crumbs, brown sugar and salt until well combined.
- Stir in the butter until well combined.
- Press onto the bottom and up the sides of an ungreased 9” pie pan. Pat it as evenly as you can get it. It’ll be thick! Freeze the crust while you prepare the filling.
- In a large mixing bowl with an electric hand mixer beat the cream cheese, butter, powdered sugar, vanilla and salt until light and fluffy.
- Remove 1/4 (197 grams) of the cheesecake filling to another medium mixing bowl, and to that new bowl (with 197 grams of filling), beat in the pumpkin and pumpkin pie spice on low until combined. Set aside.
- Spread 1/2 (294 grams) of the white filling over the frozen pie crust (it’ll have frozen pretty quickly).
- Place in the freezer for about 20-30 minutes or until firm enough to easily spread the pumpkin layer over the top.
- Then spread all of the pumpkin filling over the 1st layer of cheesecake.
- Place in the freezer for about 20-40 minutes or until firm enough to easily spread the second cheesecake layer over the top.
- Spread the second half of the white filling over the pumpkin layer.
- You can put the eyes on the Oreo babies and completely assemble the mama in advance. If you put candy eyes in the refrigerator, the moisture from the fridge causes the black pupils to bleed a bit. So you don't want to put them in the fridge.
- Melt the chocolate in a microwave-safe bowl at half power in 30-second increments, stirring after every 30 seconds.
- Stir in the cocoa powder and coconut oil. The texture will change to something glossy and more like fudge frosting. If it’s too runny right now to pipe (it’ll depend on how hot your chocolate got), then let it sit a few minutes, or refrigerate and stir often until thickened a bit.
- Fit a piping bag with Wilton #5 and fill it with the frosting.
- It's easiest to make the spiderweb by piping on plus sign. Then make an X. Then you connect them to form a spiderweb.
- Cut off the legs from mini pretzels with a very sharp paring knife.
- Use that knife to open the Oreo.
- Place the spider legs between the two wafers. Make sure the legs are pointing down like spiders and not sideways, like crabs. They won’t be in there very securely, but I had no issues with moving the spider onto the pie (however, I did not transport this pie!). If you want, you can pipe on some chocolate frosting to secure the legs onto the bottom wafer. Once it hardens, it’ll act as glue. If you want to do that, you should scrape off the white from the Oreo. That would also make it more spider-like!
- Pipe a little frosting on the bottom of 2 eyes for the mama spider and then attach them.
- Put the top Oreo with the eyes over the bottom Oreo piece with the legs. Place the mama spider in the middle of the pie.
- For the babies, pipe a little frosting on the bottom of each of the 16 eyes and then attach them to the 8 mini Oreos.
- Place mama spider in the middle and the 8 babies around her. Pipe on 4 small straight legs on each side of the spider baby with a smaller tip like Wilton #2.
- You can freeze the undecorated pie for up to 3 months. Defrost in the fridge for 1-2 hours or on the countertop for about 20-30 minutes.
- Again, the candy eyeballs should not be refrigerated. You can refrigerate the pie with the spiderweb for up to 3 days, but don't add the spiders until serving.
Prepare the crust:
Prepare the filling:
Make the spiderweb:
Make the spiders:
Storage:
Notes
- If you live outside of North America and have the kind of cream cheese that's meant for toast (that comes in a little plastic tub) rather than American style brick cream cheese, then get two 300-gram packages of cream cheese, place it in the center of a cheesecloth, and wring out the liquid until you have 450 grams of cream cheese left.
- You might need up to 10 mini pretzels to make sure you get nice-looking legs, some pretzels might break while cutting - I used 5 or 6.
- If you're gluten-free, make sure to use GF graham cracker crumbs, GF Oreos and GF pretzels.
Join over 12,400 readers and sweeten up
your inbox with new posts for free!
This subscription is free of charge and can be canceled at any time.


18 comments on “Spider Pie for Halloween” — Add one!
2 comments are awaiting moderation!
How adorable! I just made this pie without the spiders and it was so delicious. Definitely making it with the spiders for our Halloween parties this year!
Oh, yay! So glad that you enjoyed it and will be making it again! Thanks so much for your comment. :)
This looks so beautiful and creative! I love that the instructions are well-detailed. It is a perfect Halloween recipe and I will save it for later.Thanks for sharing!
You’re welcome! I hope you’ll love it. :)
I made the pie minus the decoration and everyone loved it. The 4 of us ate it in one sitting. It’s still so hot here so it was awesome I didn’t have ot turn on the oven! Thank you so much!
You’re welcome! I’m so glad that everyone loved it. :) And 1 pie for 4 people sounds reasonable. This one is hard to resist. ;) Thanks for your comment!
This pie was so cute! We tried it out with some leftover Oreos. My kids couldn’t get enough! Neither could I. They asked to make it again tomorrow. Haha. I told them we can make it again for Halloween.
Tomorrow? 😂 I like their enthusiasm! I could live with eating this every day. ;) Thanks so much for your comment! I’m glad that it was a hit.
I used a storebought crust for an even quicker pie and OH MY! An absolute killer recipe. Thanks a million.
You’re welcome! I’m glad that it came out well with a store-bought crust and that you liked it so much. :) Thanks for your feedback!
We made just the cheesecake part (not the spiders) and had to make extra because we ate so much with a spoon! We’ll definitely be making this for our Halloween dessert. Thank you so much.
You’re welcome! I hope you’ll get to try the spiders next time for Halloween. :) Thanks a bunch for your comment!
Made this for my granddaughter for her visit today and she couldn’t have been happier. Almost too adorable to eat! But we managed. Thank you!
Haha. I’m glad that you managed! Thanks so much for your feedback. So nice of you to make your granddaughter this pie! :)
I love everything about this. It’s adorable, it’s pumpkin, and no bake. And it looks pretty easy thanks to all your detailed instructions. Definitely giving it a try for Halloween!
I hope that you’ll enjoy it. :)
A pumpkin cheesecake pie is already a fantastic dessert, but the addition of the spider design is truly ingenious.
Thank you! Glad you think so. :)